Hi everyone! I’m clearly not as dedicated to blogging as I was when we were doing the Scaly Mountain project! But better late than never! It’s hard to believe, but next week will be one year from when we closed on the house. A lot has happened in a year!
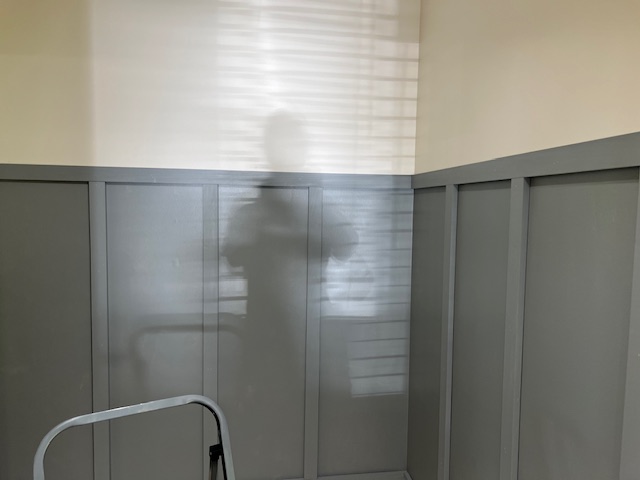
Once we wrapped up our laundry/pantry area, it was time to focus upstairs on the guest bedroom and downstairs with the den. Upstairs was a quick weekend project where we just added some chair rail and board and batten to give the room a little interest. It’s very neutral but needed something more, so this gave it what it needed! We are pleased with how it turned out and our guests seem to like it!
Here’s a picture of the room from when we were buying the house.
Screenshot
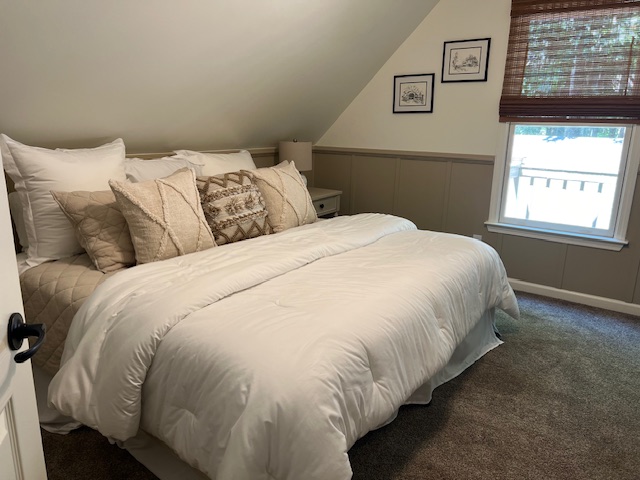
It was clearly underutilized and kind of sad looking! The room is plenty big enough for the king bed we put in there, and we are really happy with how it turned out! In addition to our board and batten, we also put in new bamboo blinds and replaced the super noisy ceiling fan with an updated, quiet one. The board and batten was an inexpensive and quick way to update the room and lean in to the angled ceiling. I like the way it all turned out.
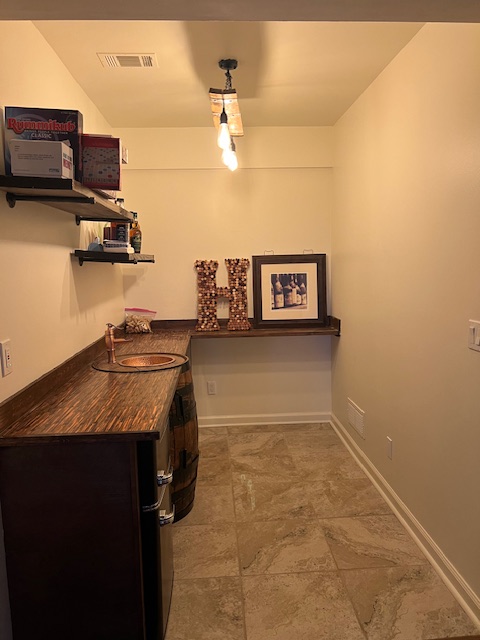
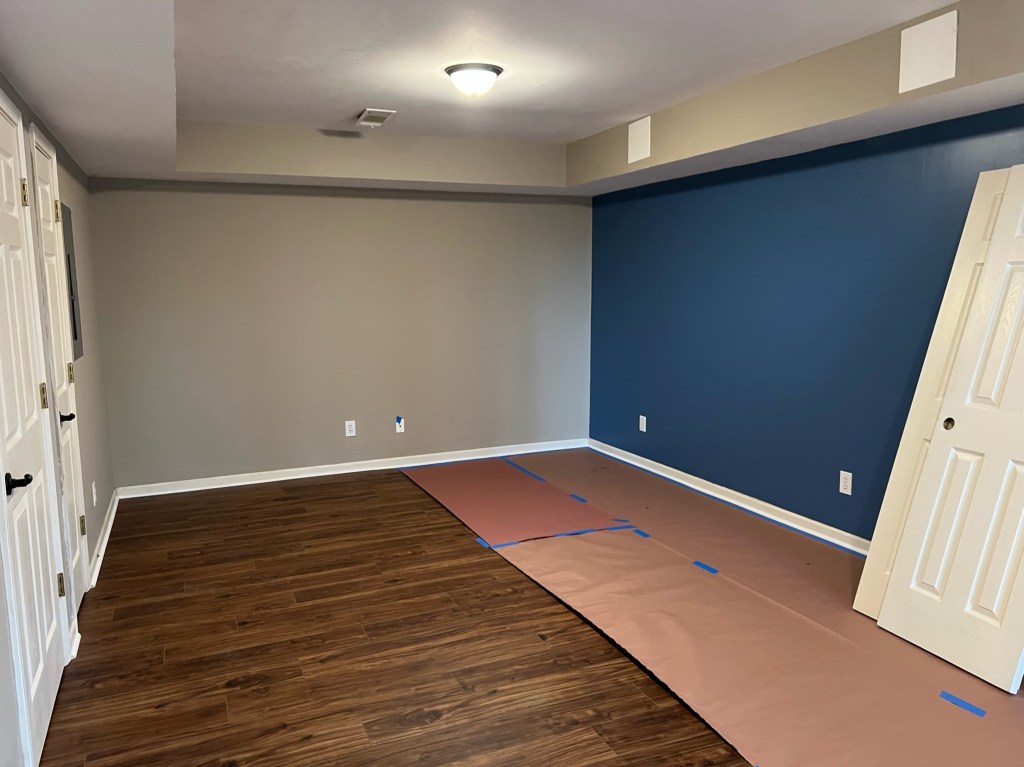
Once we wrapped up the bedroom, we started to work down in the basement. As a refresher, here’s what the den and the bar area looked like when we purchased the house a year ago.
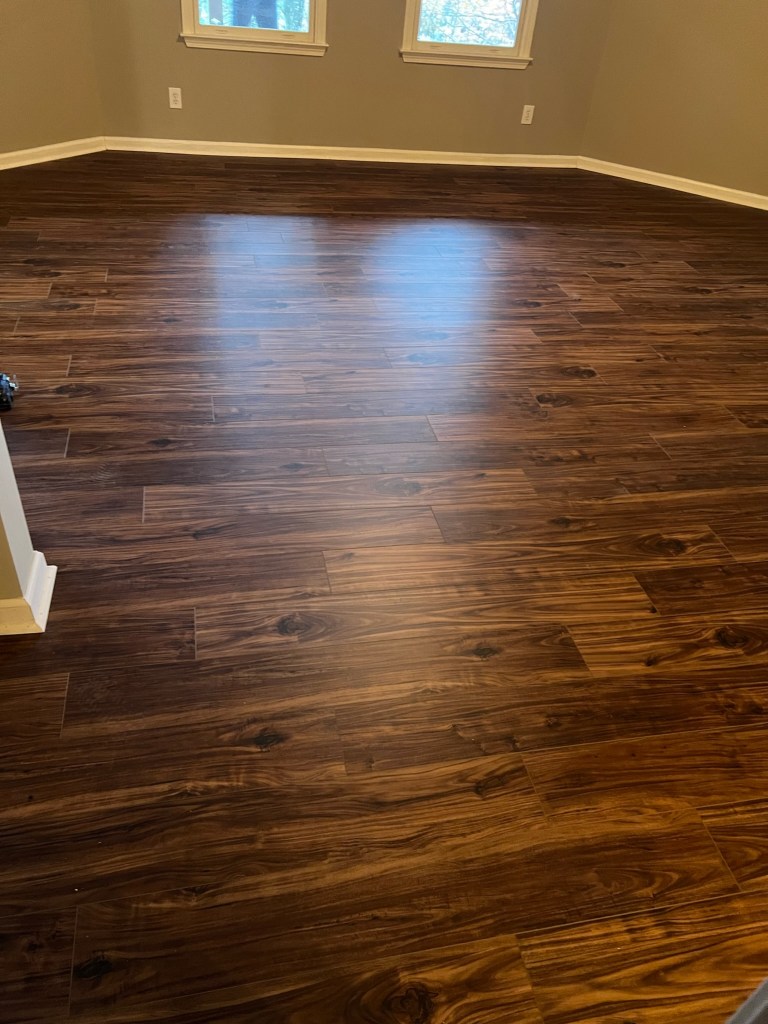
Almost every light bulb in the house was an Edison bulb with a yellowish cast, which did the rooms no favors. We updated the light in the bar and put in a ceiling fan in the den and those both helped a lot. Additionally, we painted the entire house and put in LVP in the basement (with the exception of the bar area which had perfectly good tile in it).
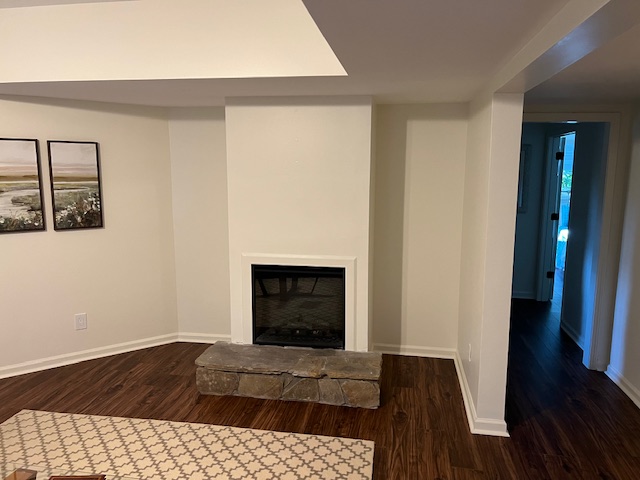
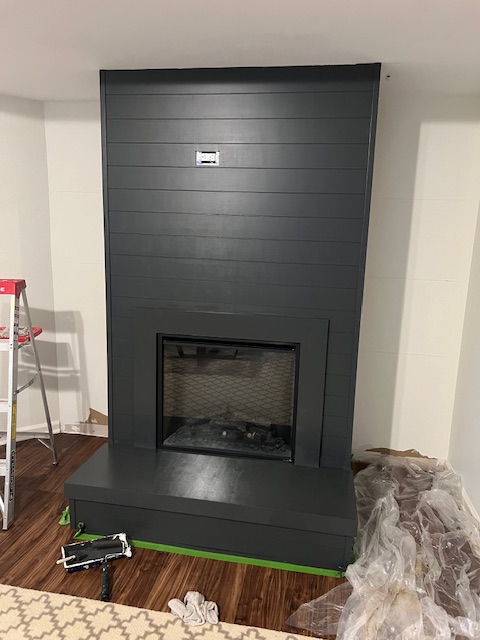
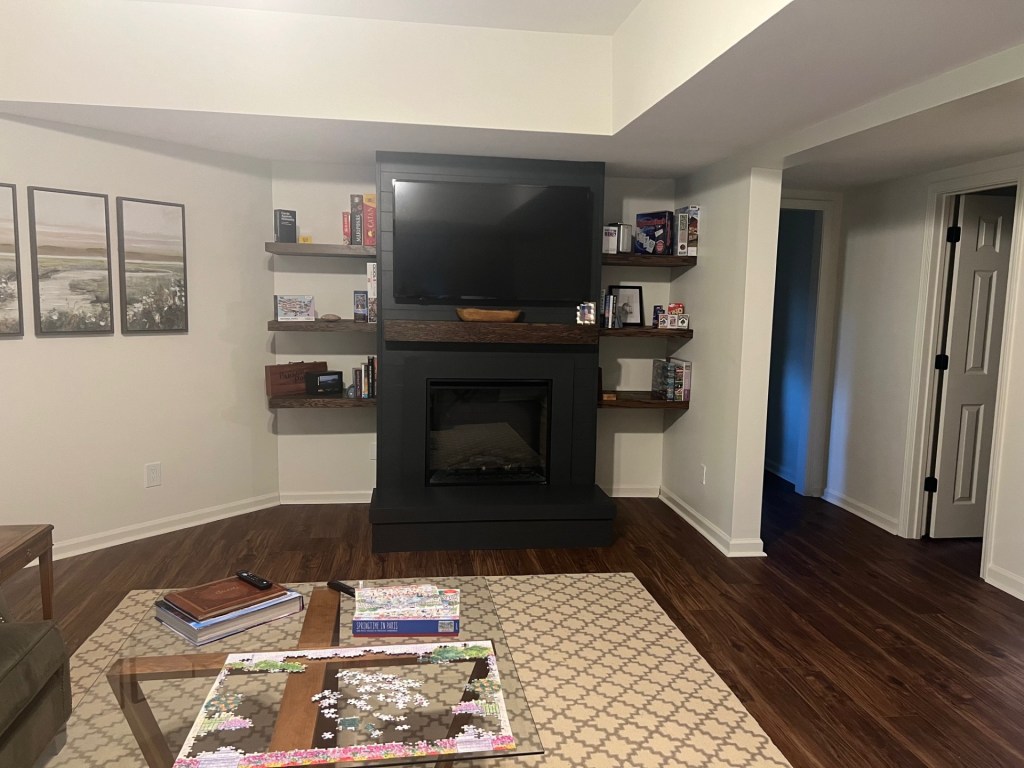
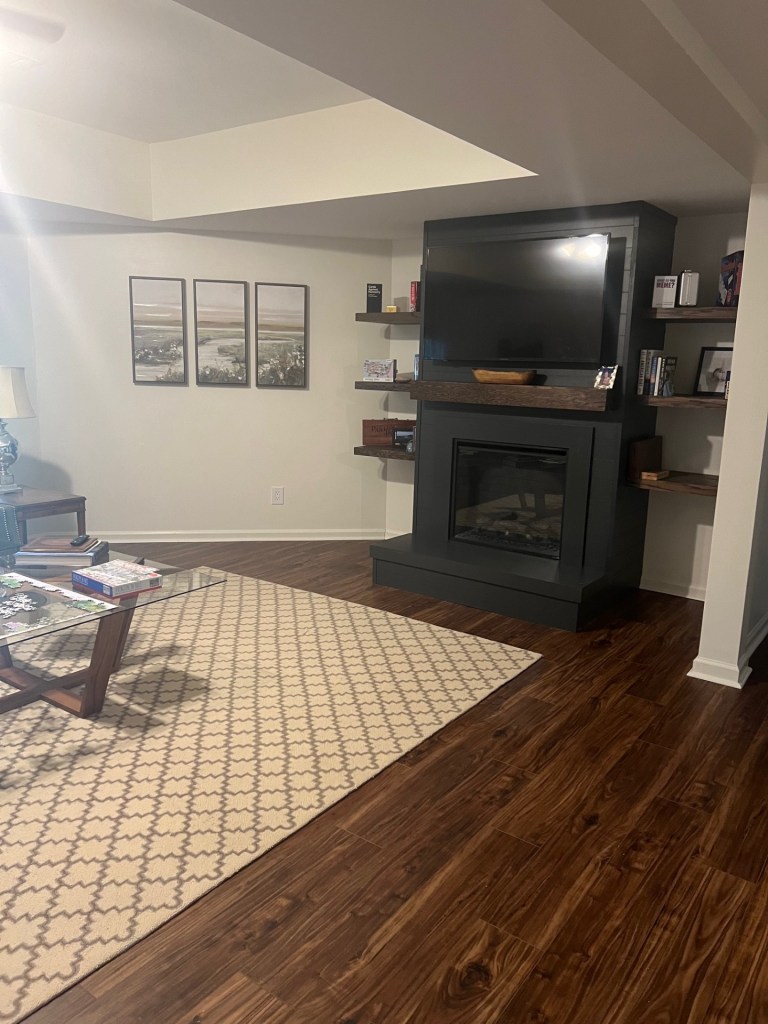
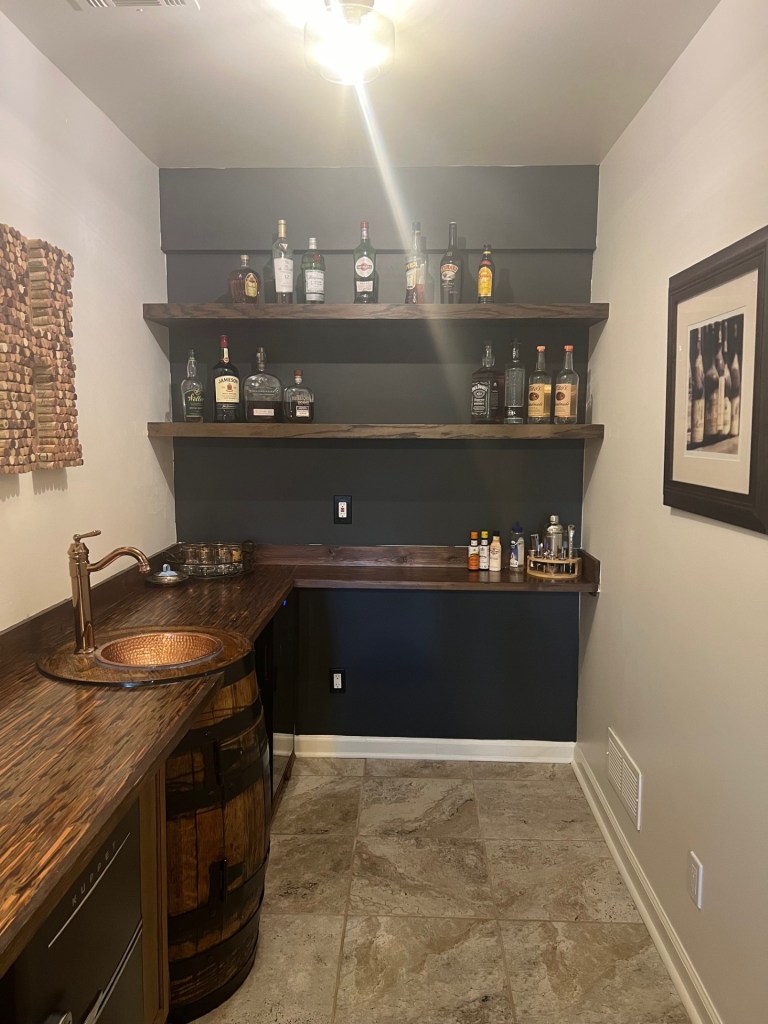
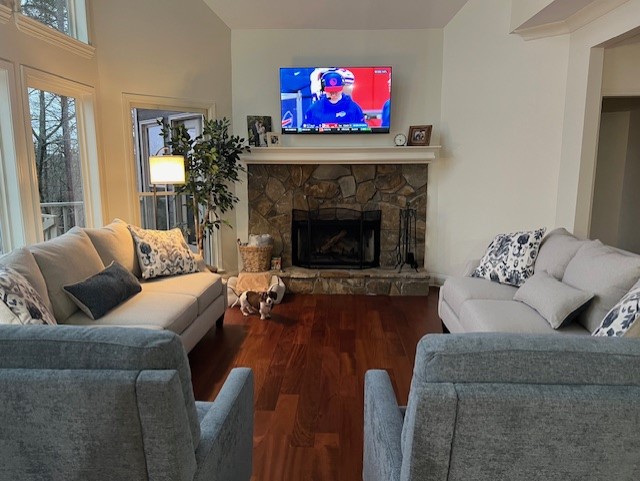
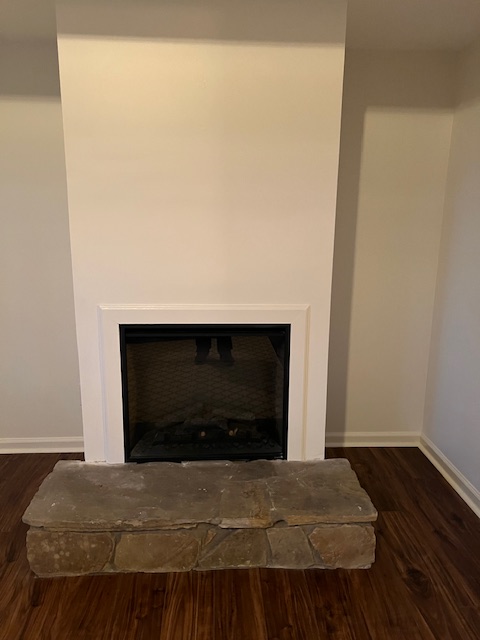
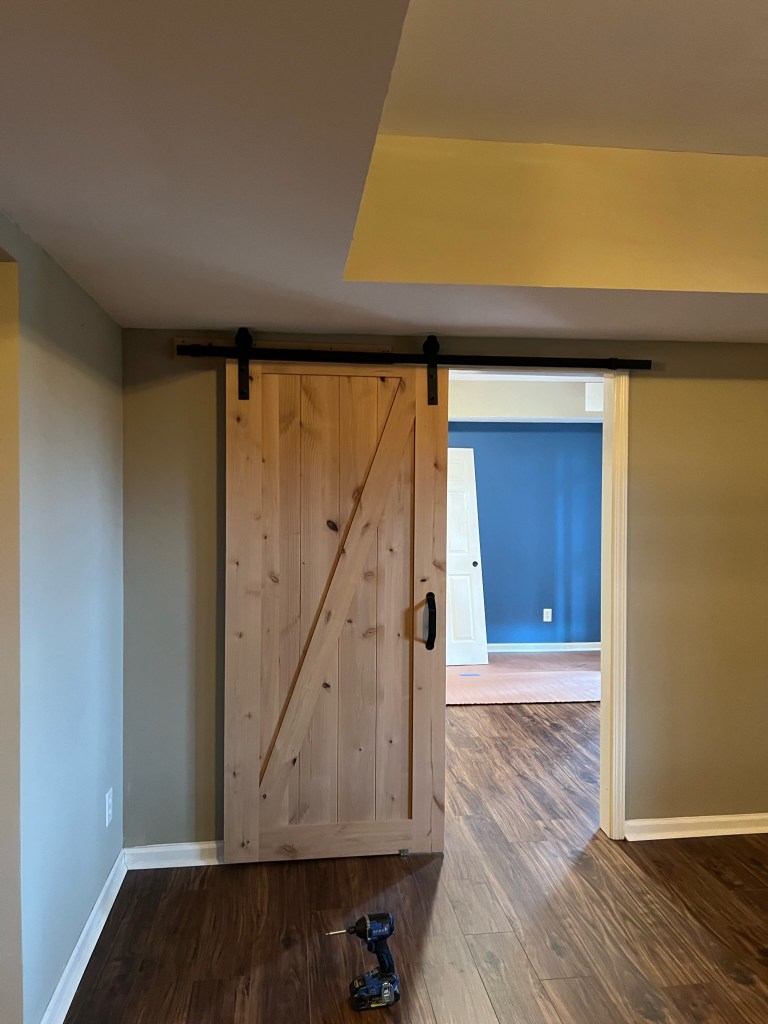
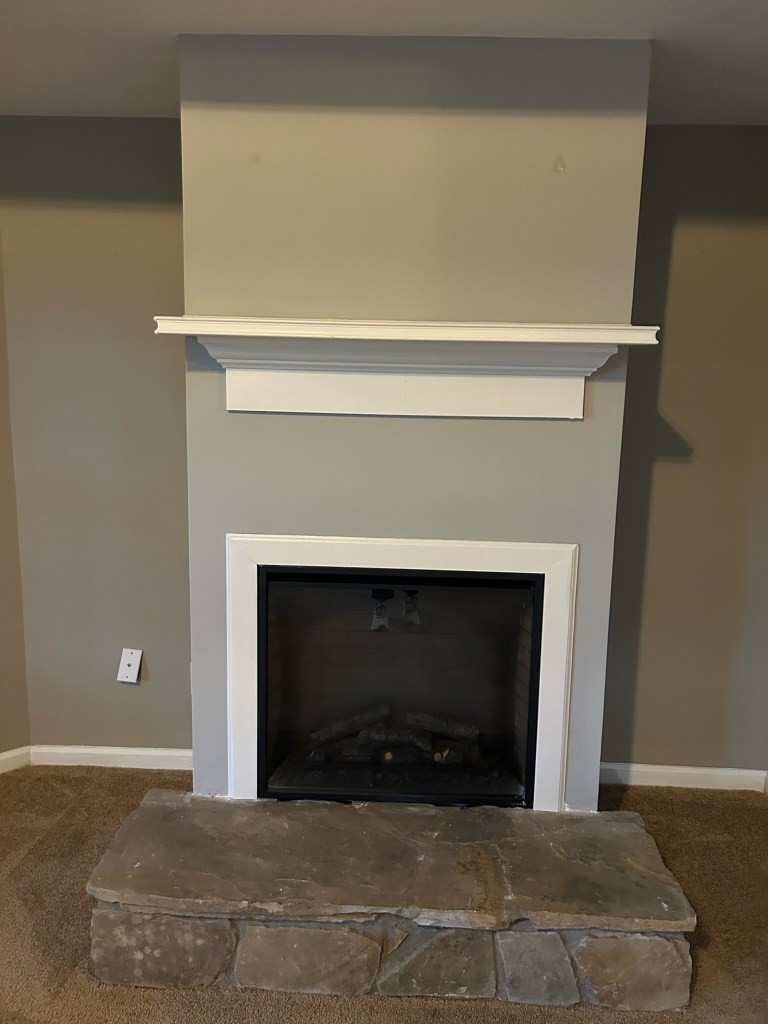
The bar area was okay but just never felt balanced. Plus the weird metal rods holding the wood shelves were dropping and looked awful. And in the den, one of the things that neither of us liked was how narrow the fireplace was and how huge the ugly stone hearth was (it was wider than the fireplace?!?!?).
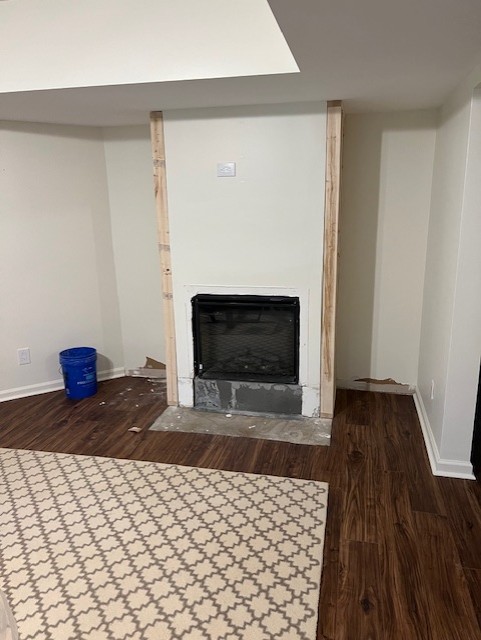
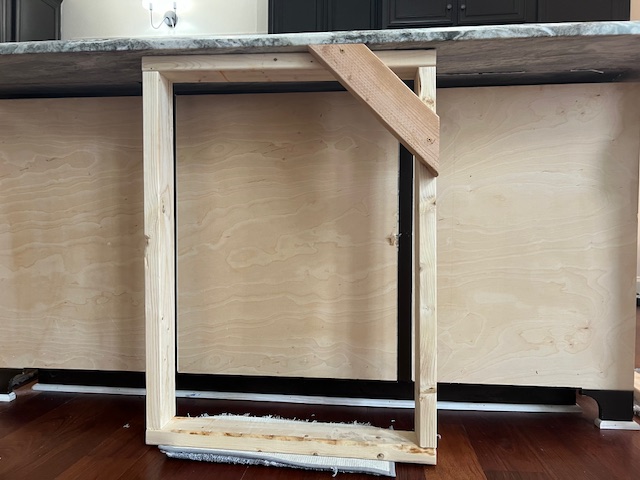
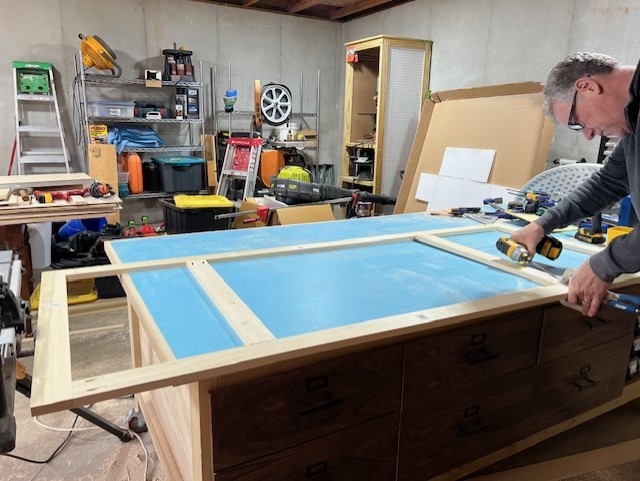
We started with some demo. Keith got out his trusty sledgehammer and got to work on both the fireplace and the awful hearth. We decided to remove it because it would just be easier to frame out a new one altogether. Because this is a faux electric fireplace, we didn’t have to worry about the hearth being fireproof. Here is a little before and after of the demo process. You’ll notice that Keith added framing to the sides of the fireplace to beef it up. It also allowed us to have the hearth be the same width as the now beefier fireplace.
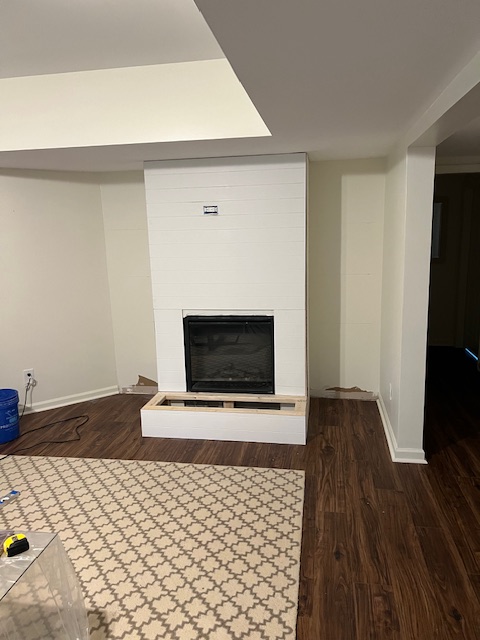
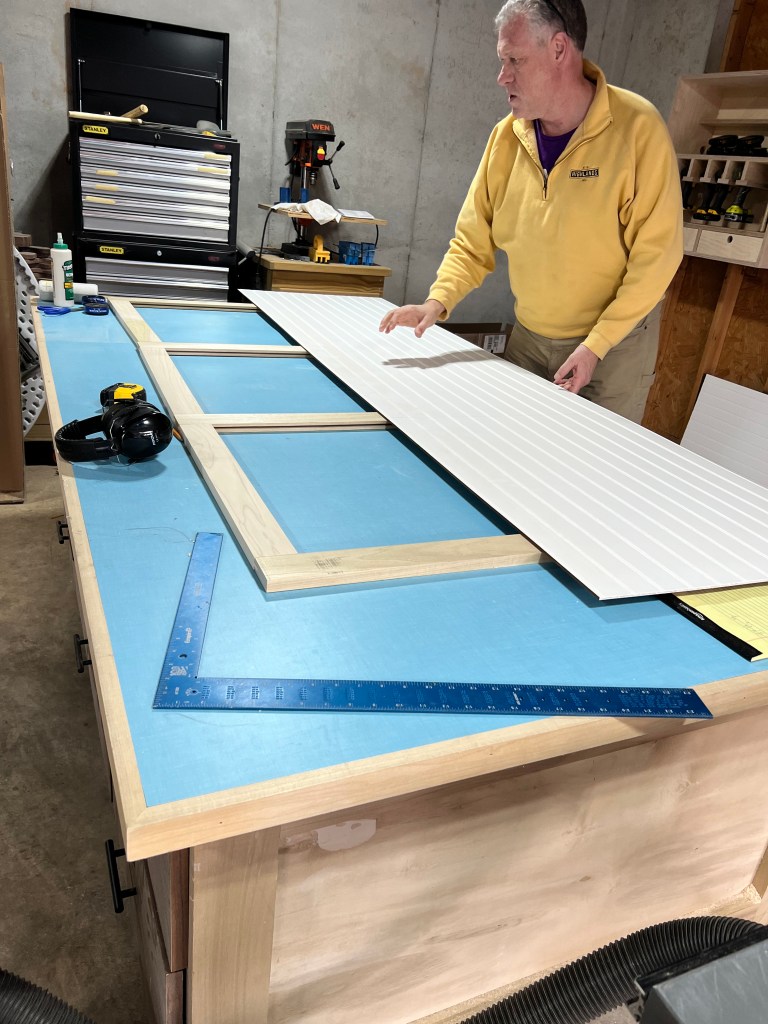
Next up was adding electrical for a TV then building the new frame for the hearth and shiplapping the fireplace. For the shiplap, rather than buy planks of it, it was easier and significantly cheaper to buy shiplap panels. So that’s what we used. For the hearth, we just used some leftover plywood.
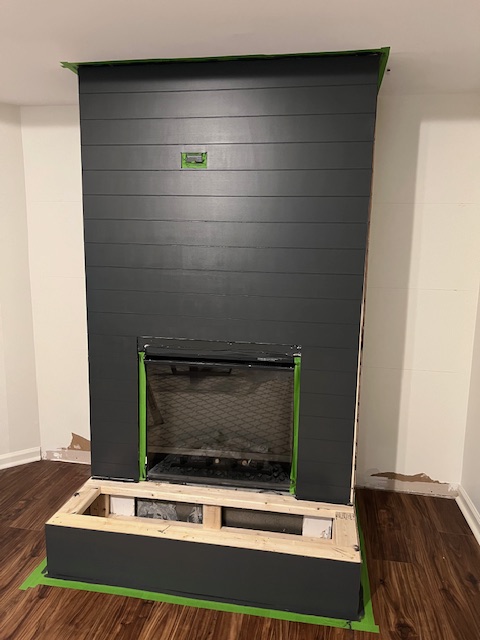
Next up, shelves! We knew we wanted floating shelves, and Keith watched lots of YouTubes to learn how to do them. We bought some beautiful red oak plywood and he got to work using some new techniques to create them. It was a little easier said than done to install them but we figured it out! I don’t have pictures of the build process, but it was fairly intense. We built three for each side of the fireplace and two for the back wall of the bar. Here is the final product! *Don’t judge me for my painting skills! 😉
There you have it! We are so happy with the end result and hope you like it too! Next up … putting lipstick on the pig (aka our master bath tub) and taking our front door out of the 80’s! Stay tuned for that hopefully sooner rather than later!
Hi everyone! I’ve been really bad about blogging but wanted to catch everyone up on the progress we’ve made on our Big Canoe home. Last time I wrote (four months ago, mind you), we were just finished demoing our laundry/pantry hall. Well, we finally mostly wrapped it up this past weekend so I thought I’d share that along with some other projects I’ve been working on by myself.
We last left you with the room looking like this. A hot mess for sure!
We started with replacing the floor. It was slate which I could never truly get clean. Now it is LVT in a nice bright color and very easy to clean. We used Keith’s friend Craig (Next Door Flooring in Alpharetta if you’re an Atlanta person looking for any kind of flooring needs) to replace the floor. SO MUCH BETTER!
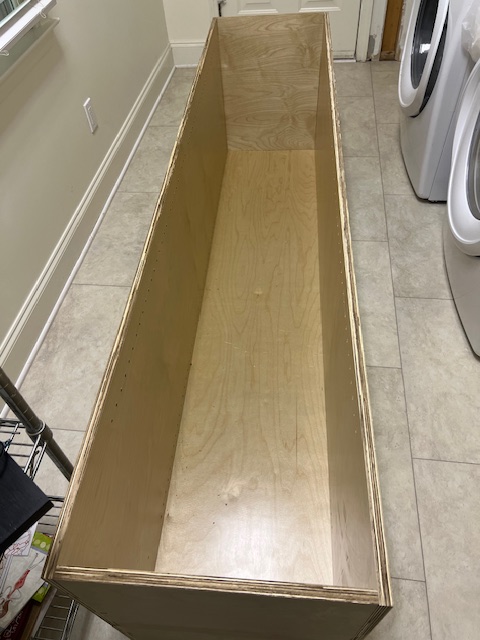
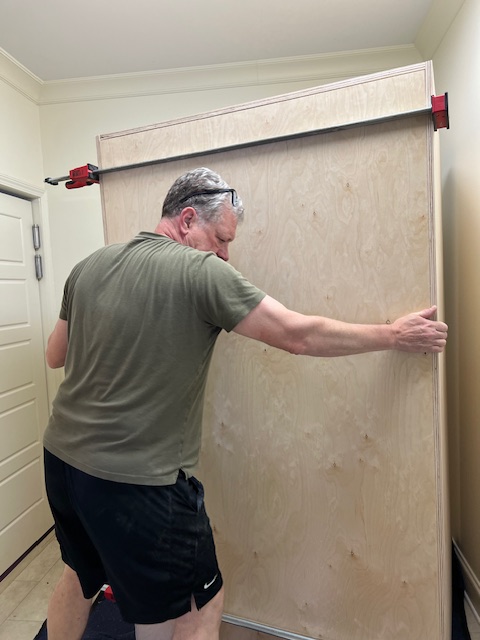
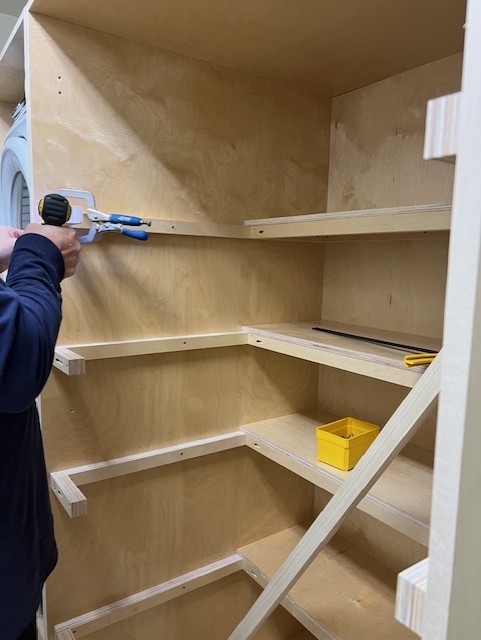
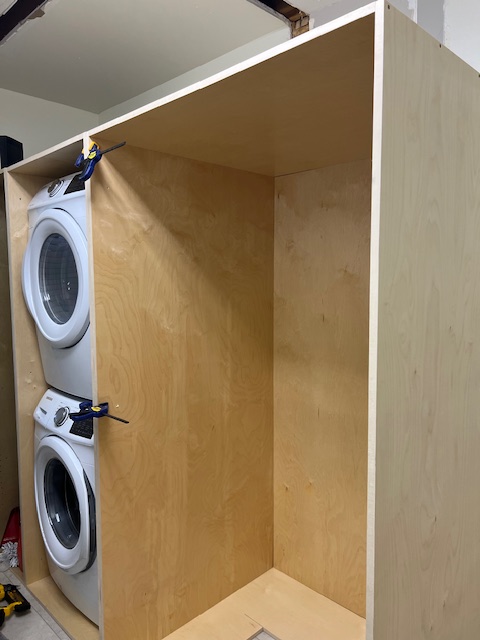
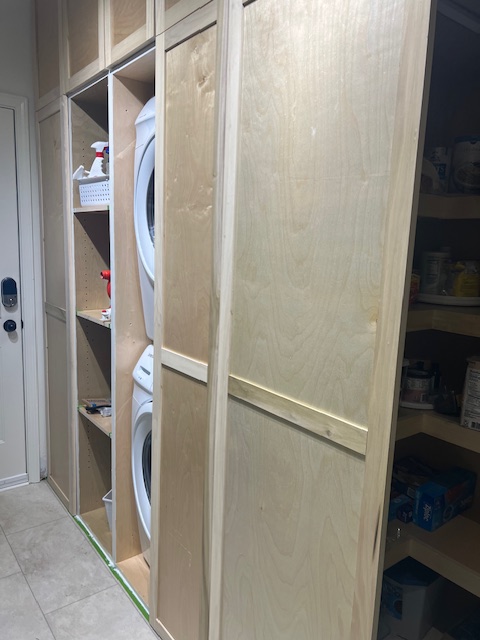
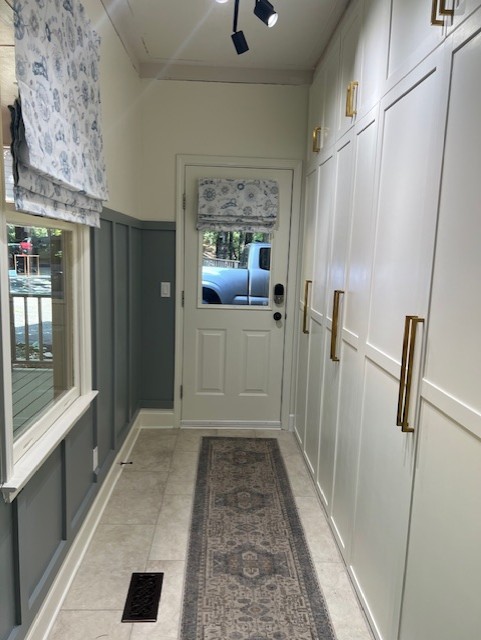
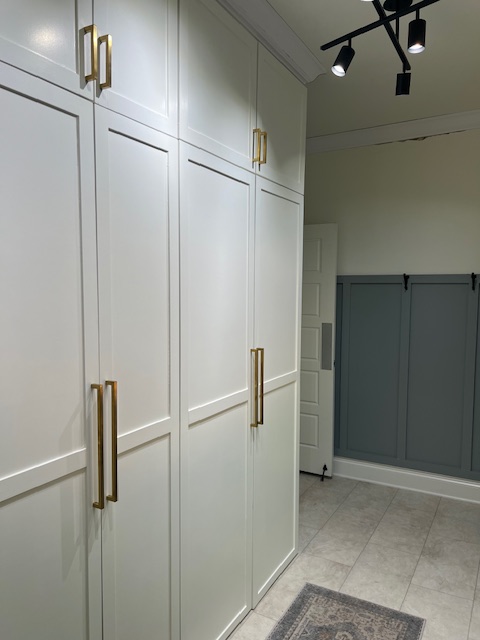
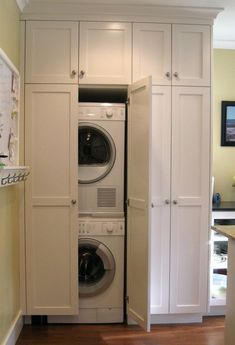
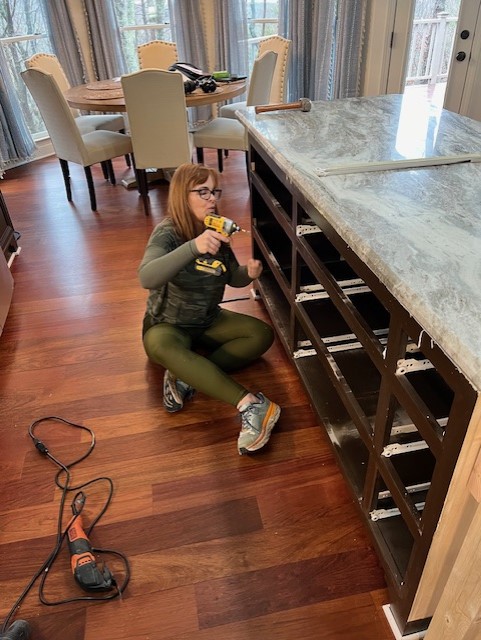
Once that was done, we very slowly began the process of building and installing the cabinets. It took a LOT of plywood, a lot of time, and a few mistakes, but we finally got the boxes built. Our plan was to have two broom closets right as you walk in the side door, then stack the washer and dryer in another cabinet, and finally to have a small walk-in pantry on the other side of the washer/dryer cabinet. These cabinets were big! And standing them all up in a fairly small room was some work, but we made it happen! Big shout out to Keith for all of his work building the cabinets. As we always say, I’m design, he’s production, and I’m his production assistant!
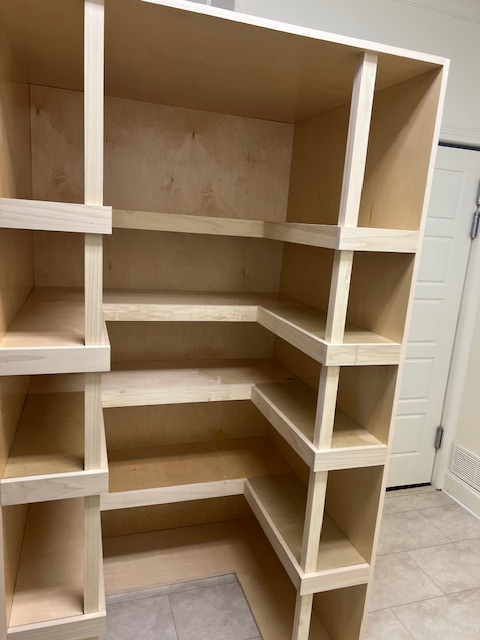
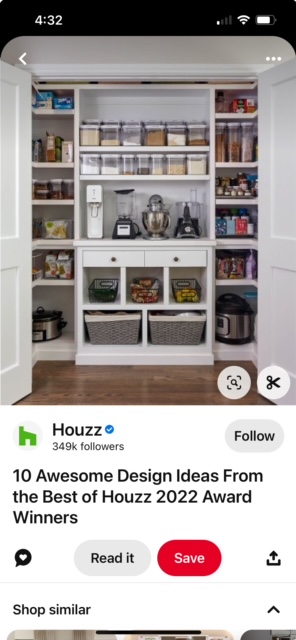
Once they were installed, we started working on the insides of them. There was some engineering involved in how we would support the pantry since there weren’t really “walls” to put the side shelves on. But we figured it all out and this is what we ended up with.
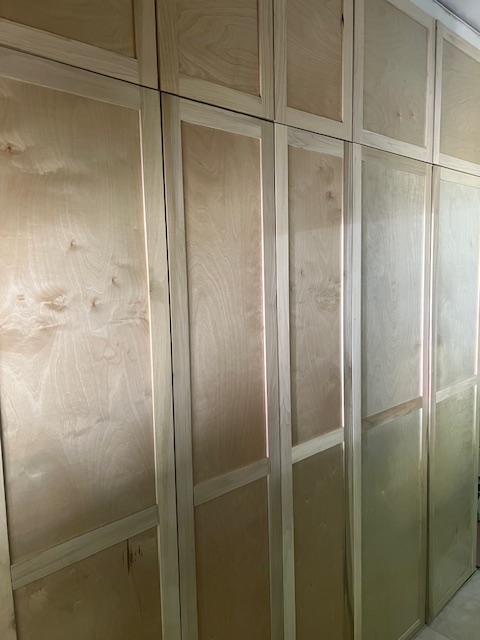
Then began the process of building the doors. These are some large doors and there are a lot of them, because all of these cabinets have uppers as well. They took a while to make, but they turned out great. Here are some pics of them unpainted and in progress.
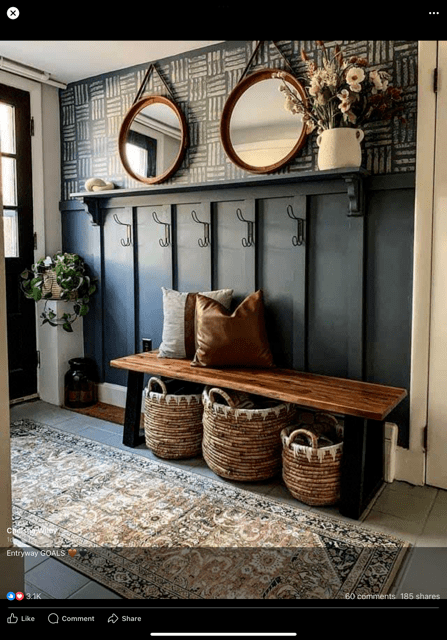
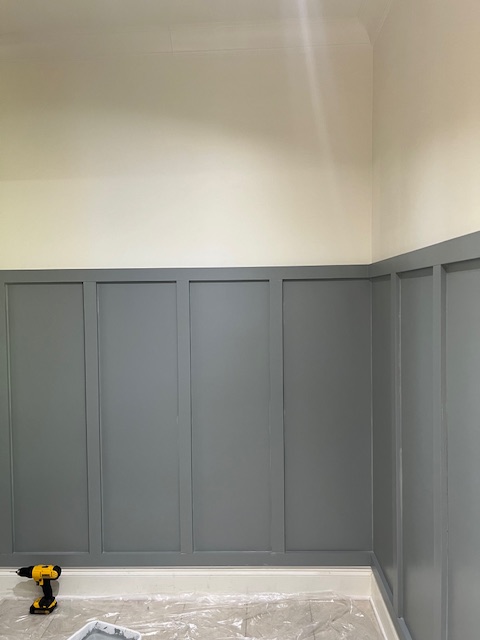
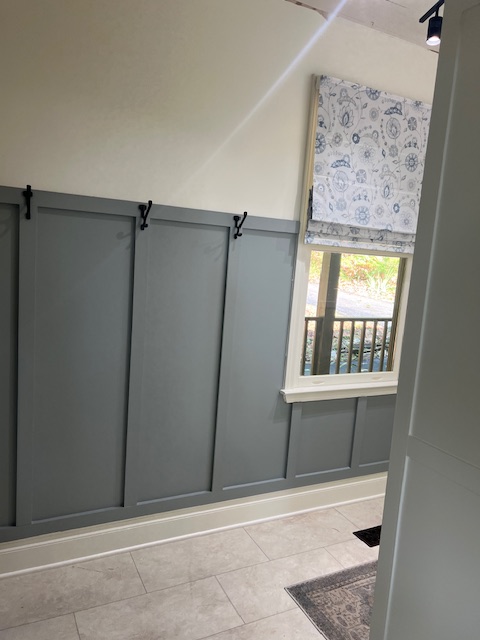
While Keith was building doors, I spent time creating board and battens for the drywall. My inspiration pic shows you the look I was going for, and the actuals show the end result. We are both really pleased with how the wall treatment turned out! We used the same paint color as our kitchen island to provide some continuity with the two rooms.
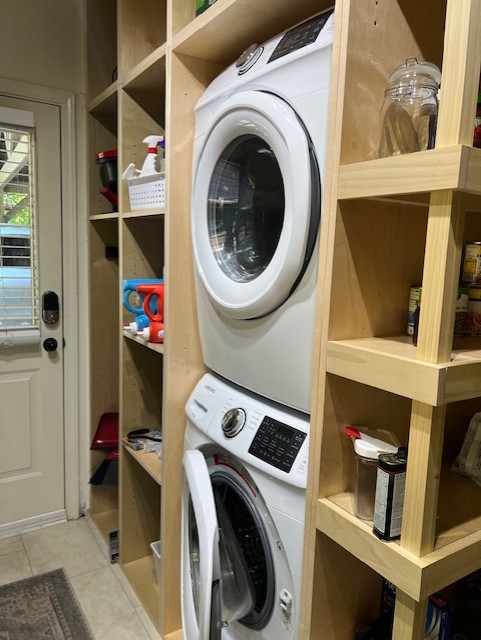
Once Keith wrapped up making the doors, I spent a couple of weekends priming them and painting them. This past weekend we hung them, put the handles on them and we are both so very pleased with how the room turned out! Notice that I did also add some hooks to my board and batten. They’ll be great for coats once it cools off, but also a great place to put Chloe’s leash, car keys, etc. I also replaced the faux wood blinds with some roman shades.
One note, you may see that we’ve still got to put crown molding up. We’ve discovered something Keith isn’t good at (besides drywall work other than hanging it). That’s crown molding. So we’ll be paying Carlos to come fix that when he comes back to do some other projects we have for him!
I’m not one to sit around doing nothing on my days off, so I also worked on some projects (mostly) solo during the weeks. When we first moved into the house, we had Carlos paint all of the walls a neutral white color. But we knew we’d go back and add some color and life to some of the rooms. The first room I worked on was the downstairs bedroom. This is the “before”. Very vanilla.
Then this is the “after”. I did a slat feature wall behind the bed, took down the faux wood blinds, hung bamboo blinds and some blackout curtains. I love the results and I hope you do too!
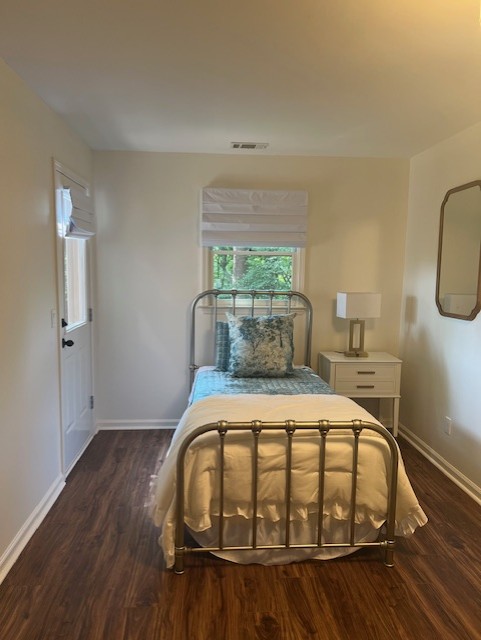
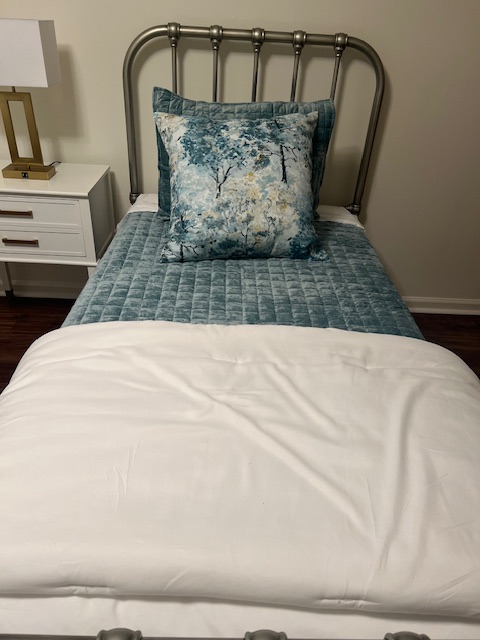
We have another downstairs bedroom with two twin beds in it. It’s still a little bland (I’m still in search of some art for the walls). I’ve sewn some new pillows for the beds and swapped out the faux wood blinds for white roman shades.
When we are up there next, we’ll start working on the upstairs bedroom. We’ve got a fun wall treatment planned for up there. Then we’ll start tackling the downstairs fireplace. But you’ll have to wait until next time to see those results. Hopefully it won’t take me four months to get you an update! Until then….
I mentioned in my last blog post that a little “accident” had occurred with our laundry bi-fold doors. They opened right by the back door and let’s just say that if you aggressively open the door while someone is doing laundry with the bifold open, you can actually not only rip it out of the track but you can break the door. That’s how the scope creep happened.
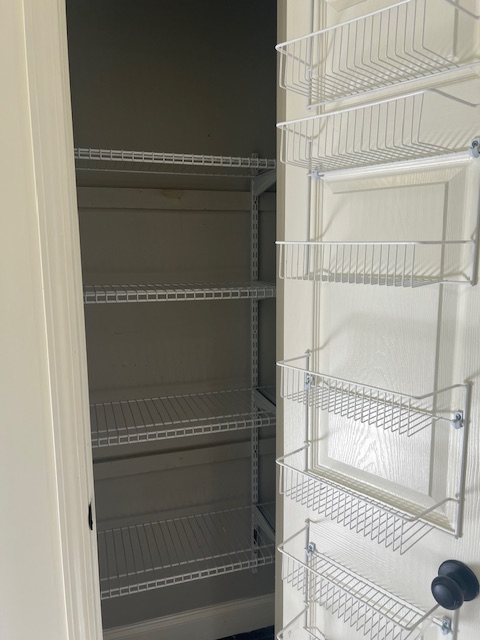
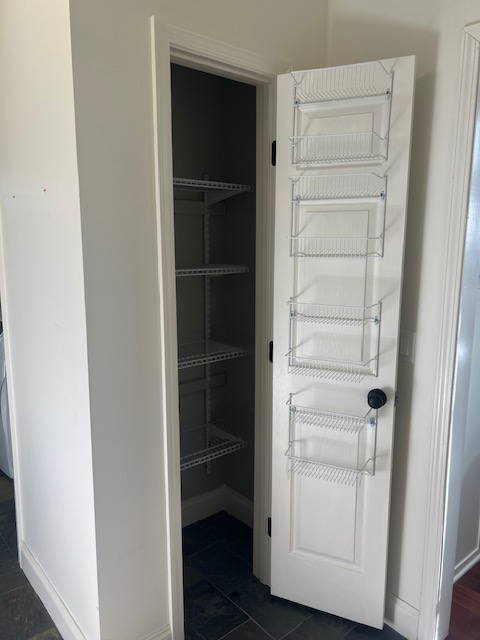
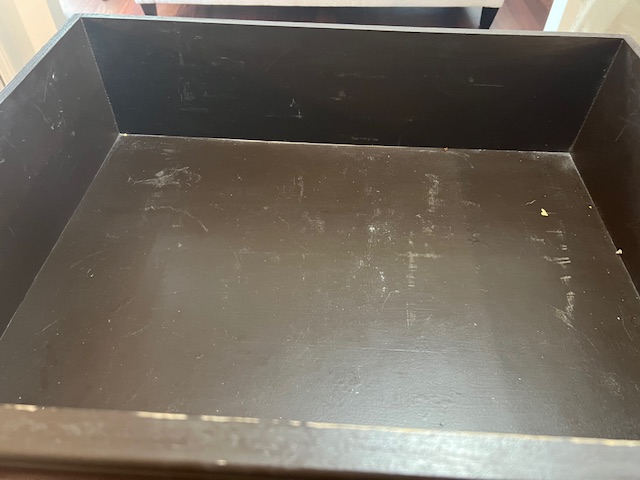
Originally our plan was to deal with our pantry next. To say it was awful was being kind. Whoever thinks adding a 40″ wide pantry with an 18″ door should be shot. And whoever thinks wire shelving is a good idea for a pantry has never tried to put canned goods or anything small in a pantry. This is what we were dealing with.
I recognize this is first world problems, but it was annoying and we had a plan to deal with it. We were going to build a cool pantry cabinet to go in there. But when the laundry door was broken, that idea went out the window.
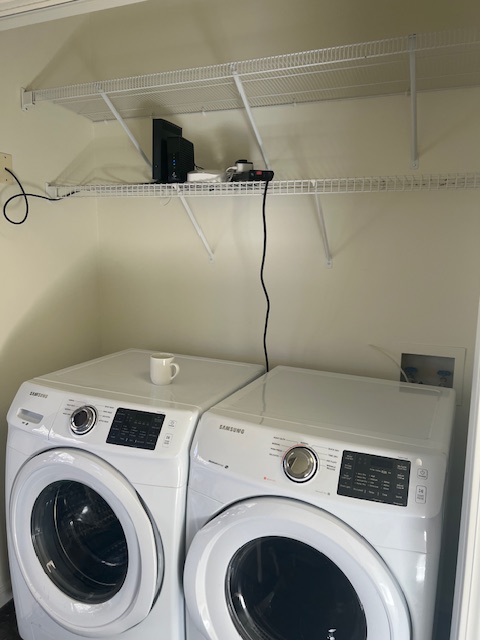
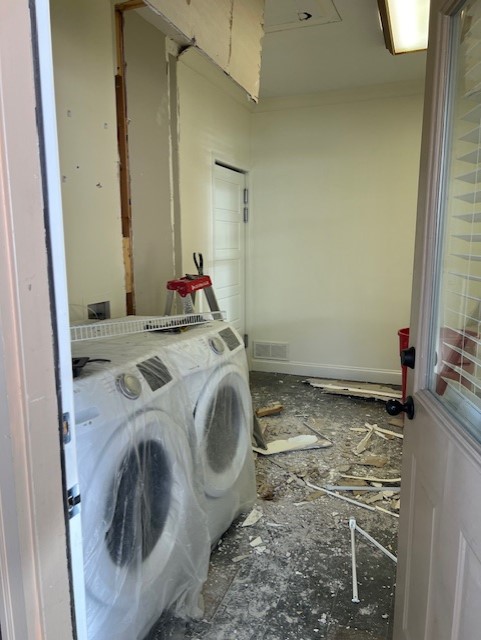
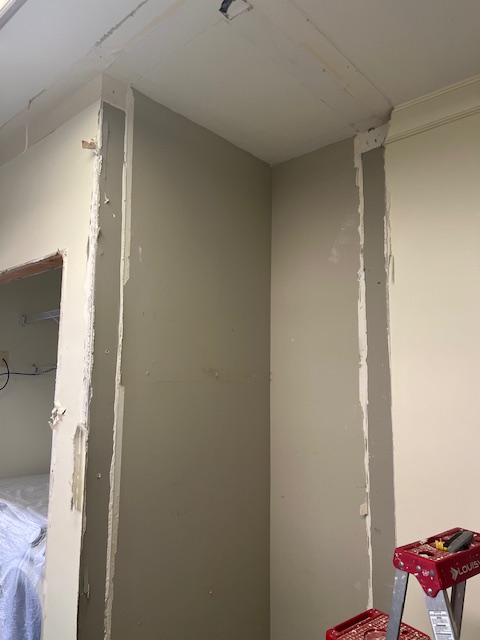
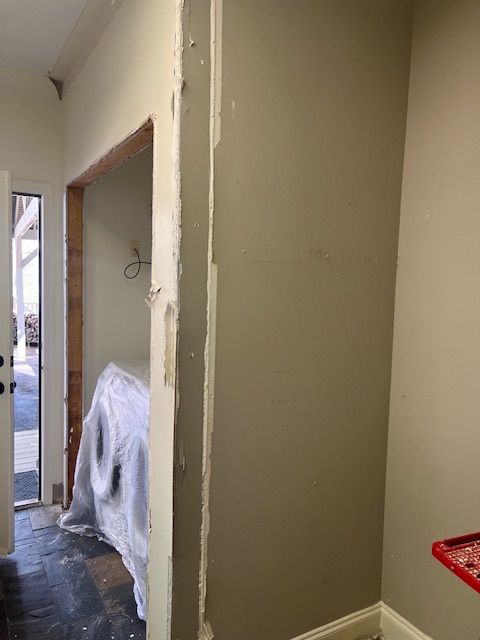
Scope Creep … cue to last Saturday morning when Keith woke up on fire to demo the whole room. Yep, you read that right. Demo the whole room. In all fairness we had already discussed that we may as well start from scratch in the room. And when I say start from scratch, I mean demoing everything (including the flooring) and starting over. The overall room dimensions are roughly 14’x8′. Since we have a front-load washer and dryer we could stack them, fit in a broom closet and make a small pantry that you can actually reach into which will be approximately 43″x40″.
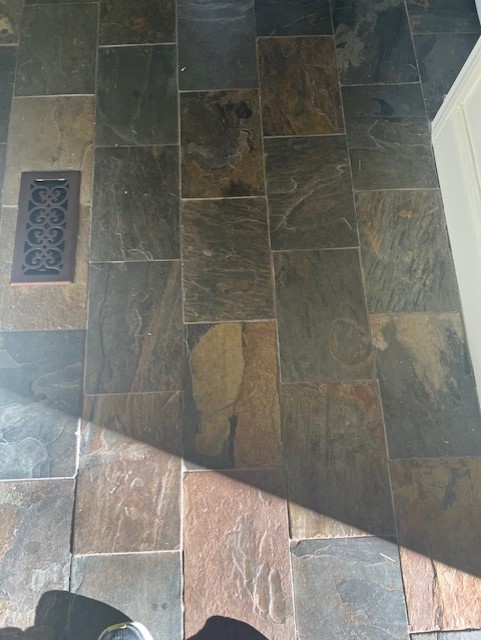
Let’s start with the flooring. It was slate and honestly it never looked like it was clean (nor was it actually clean). Neither of us love it, and since we removed a wall we have missing flooring where the wall was. This week, we are replacing the slate with a luxury vinyl tile that will be more updated looking and a lot easier to keep clean.
You can see that the slate is very uneven, has lots of grooves and is dated looking. I don’t have a picture of the new floor but will post one once it’s in.
Here are a few pics of the overall room before demo.
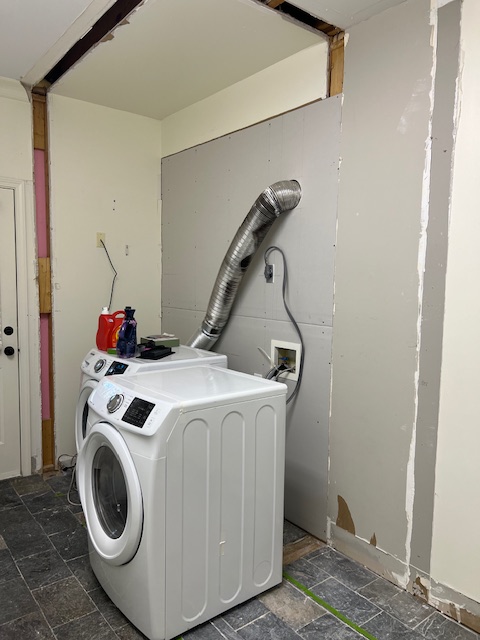
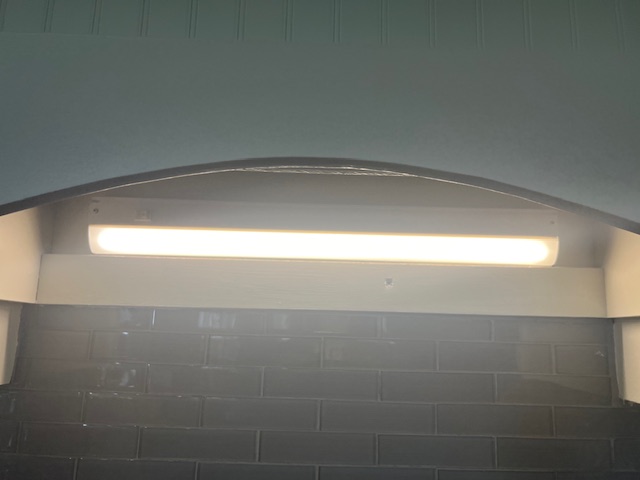
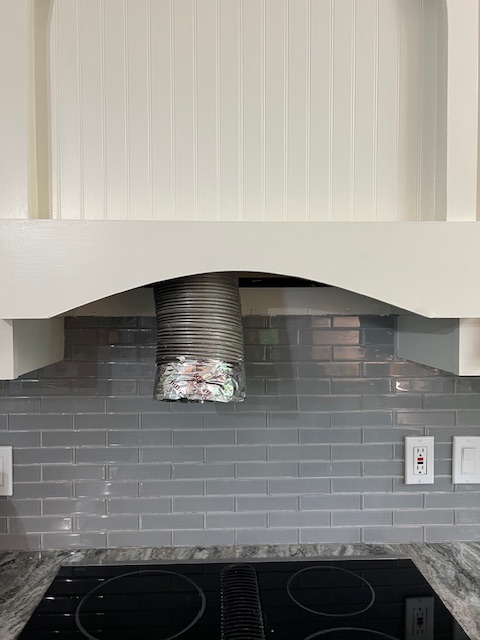
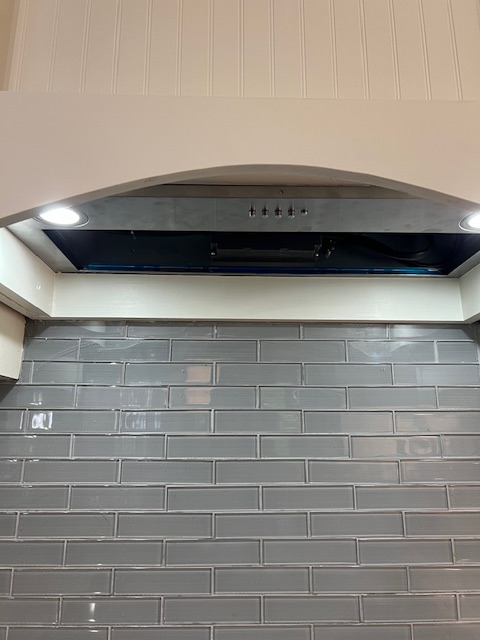
Another thing we didn’t like about the house is on the other side of the wall from the laundry room and that was the faux vent hood box. Because we have a Jennair cooktop (which sucks, by the way), it had a downdraft, but whoever renovated the kitchen put a pretend vent hood box above it with a light in it. We will replace the cooktop sometime in the future, but now was the time to deal with the vent hood.
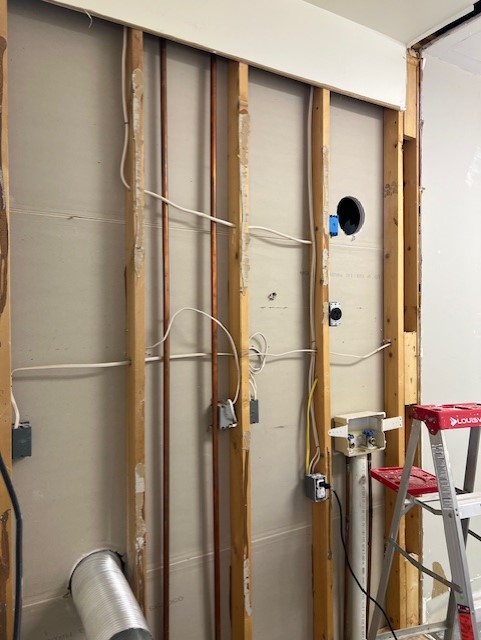
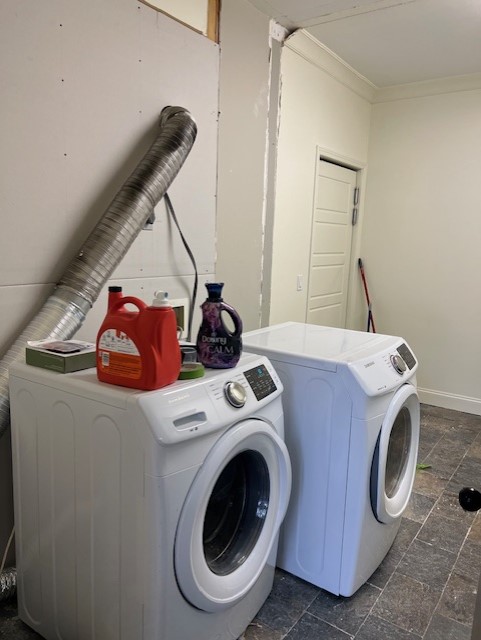
The light was just dumb as you can see from the picture on the left. In order to put in a new vent hood, we needed to run a new exhaust pipe from it to the existing exterior hole. Which required removing additional drywall behind the washer/dryer. But I’ll get to that in a minute. In the meantime, here is our new vent hood!
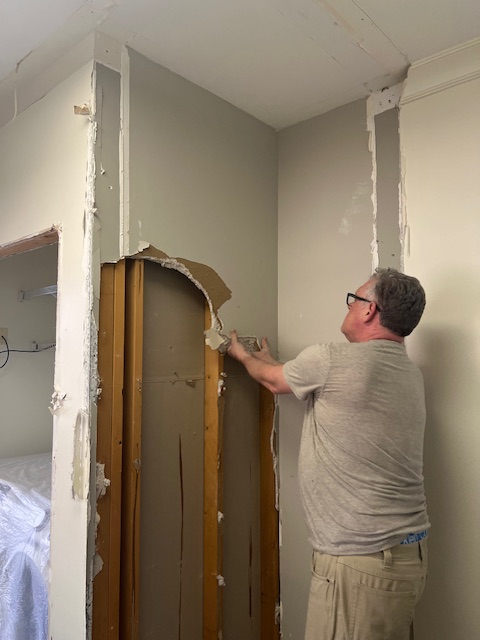
Here are some fun pics of demo of the room. We also plan to replace the super dated ceiling fixture – goodbye fluorescent light!
The room is now ready for flooring. It’s actually fairly cheap (about $1300) to rip out all of the slate and put in the LVT. I’m looking forward to seeing that next weekend when we are back up here! Notice the new huge vent pipe for the vent hood.
While we are still working on the design of the new area, we’ve got a basic idea of what we will do. Right next to the door will be a broom closet and next to that will be some shelves for laundry supplies. Here’s an inspiration picture.
To the right of those will be the washer and dryer stacked. Here’s an inspiration picture of that.
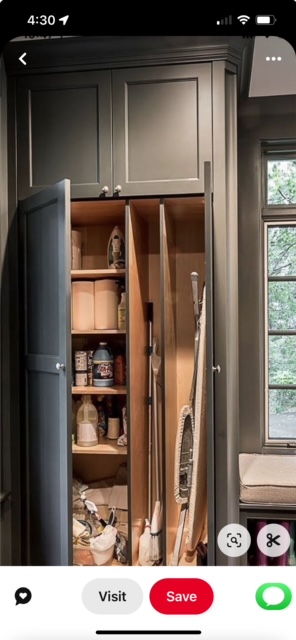
Ours will look very similar to that. Now on to the pantry. We’re still trying to decide how to design it. The dimensions are approximately 43″ wide by 40″ deep. While we could build a cabinet with drawers, a 40″ deep drawer isn’t a good idea. So we will do a “step in” pantry instead. The back shelves will be 15″ deep and the side shelves will be 10″ deep. That will leave 20″ wide by 25″ deep for a person to stand in. Here’s some inspiration for that.
Ours won’t be quite that wide or deep but it gives you an idea of what we’re thinking.
If you have any fabulous ideas for this space, please share!
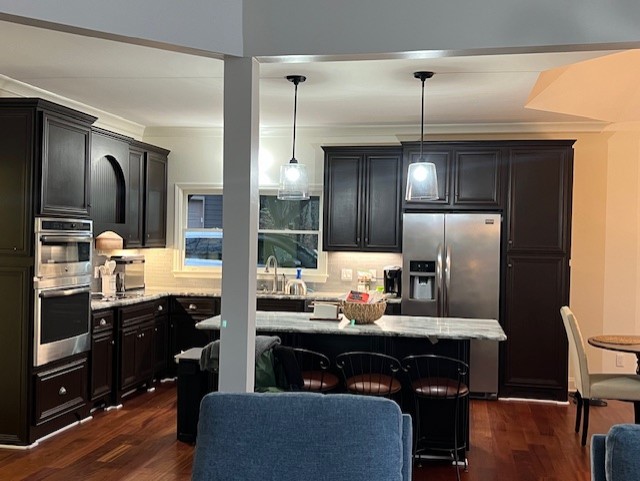
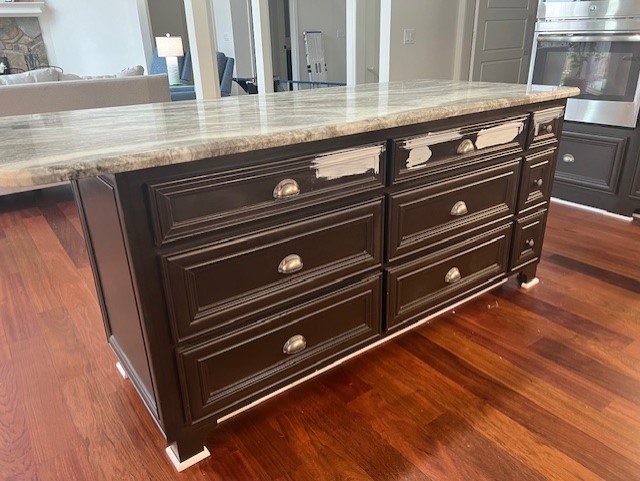
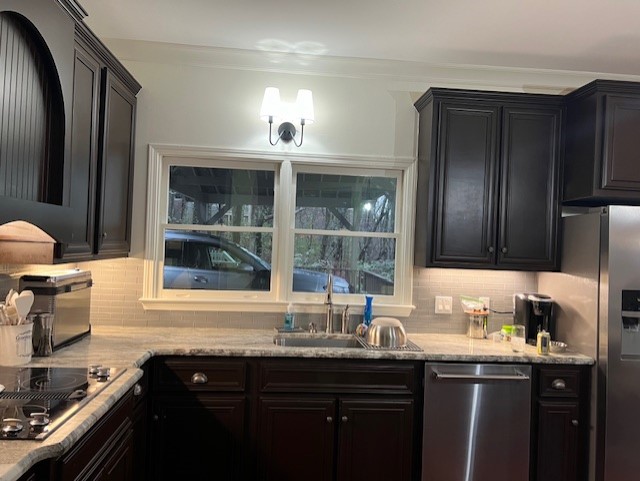
Hi everyone! It’s been a minute since I’ve written, but a lot has happened in that time. After we finished the doors and drawers, we had our contractor come in to paint everything. It looks amazing! We painted the island a grey that goes well with our existing granite and backsplash, and the rest of the kitchen is Dover White, the same creamy white that is throughout our house. It’s amazing how much different it looks now! Here are some before and after photos….
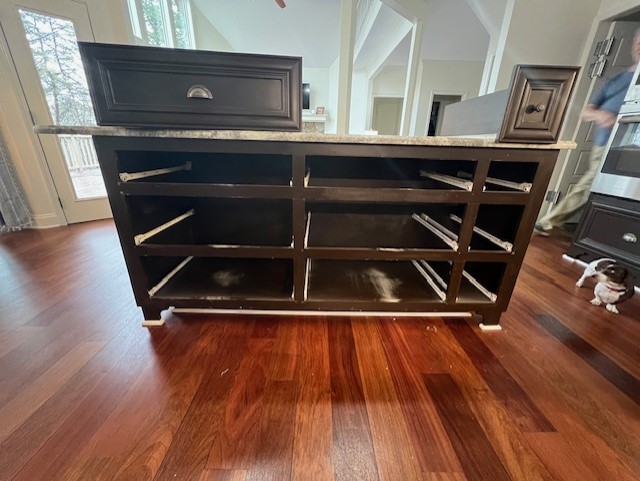
As a recap, since we’ve moved in, we’ve swapped out the farmhouse light shown in the first picture above. To do that we had to do a little drywall repair because they swagged the light (which I’m still shaking my head about) and we put in two new junction boxes and clear lights. We also got rid of the heavy light above the sink for an updated light. We removed the old island (literally out from underneath the granite) and built a new one with pull out trash bins, storage for our dishes and so much more. We made it about 7 inches wider than the old one as well. We also added a few fun features. First off is our pull-out coffee bar as seen below.
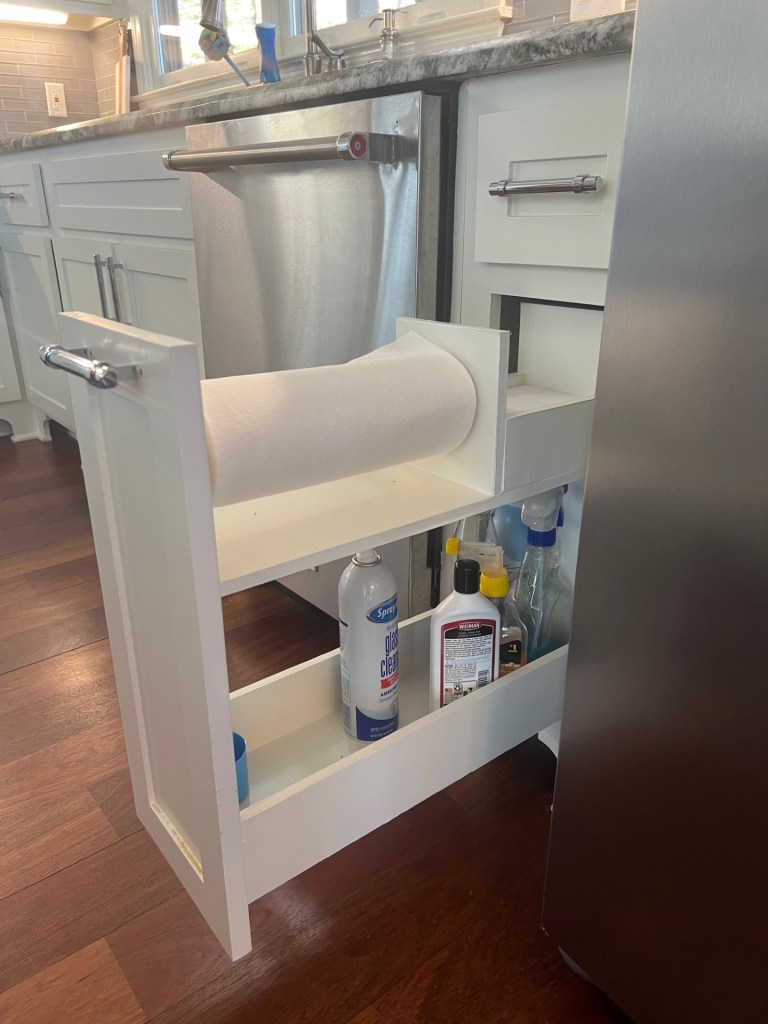
We also had a very narrow cabinet between the dishwasher and the fridge. I found a fun inspiration idea online and so we made that space into a pull-out paper towel and cleaning supplies drawer.
One thing we still hate in our kitchen is our stovetop. It’s a Jennair downdraft glass cooktop. It doesn’t cook evenly and the downdraft just doesn’t do much. So we will be swapping out the cooktop soon for an induction cooktop and a real vent hood (right now it’s a fake vent hood above the stove with just a light in it). That will be happening in the next month or so.
In addition to projects, we’ve also been trying to furnish the house on a budget. I’ve had some luck finding some good stuff online and we are slowly finding art to put on the walls. So it’s looking less sterile every time we go up and add things.
Our next big project will be our pantry/laundry. Our initial pantry project got some scope creep after a mishap with the bifold door in front of the washer yesterday. It opens right by the back door and … well, someone opened the back door into the bifold door and broke it. So, given that we were going to embark on a pantry project which is right next to the laundry, I’ll be going back to the drawing board to design something that will work well with the space.
That’s about it for now folks. As I said, short and sweet. More to come soon on the pantry/laundry!
Hi everyone! It’s been about a month since I’ve posted, but we’ve been busy with a lot of projects and the house is coming along nicely!
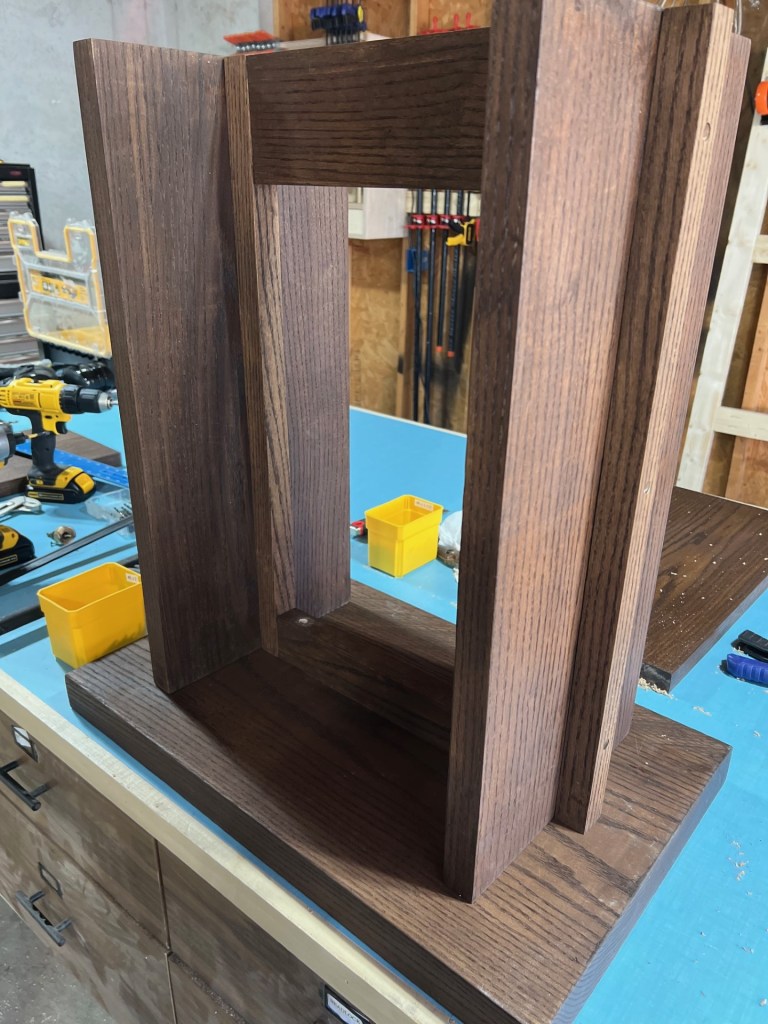
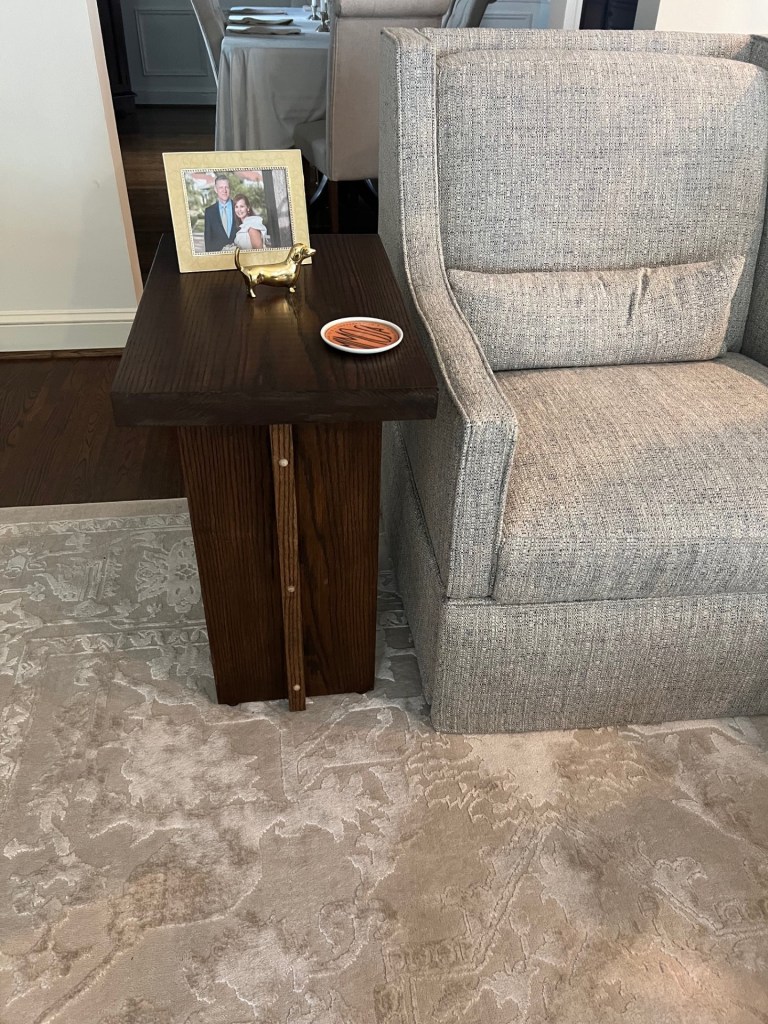
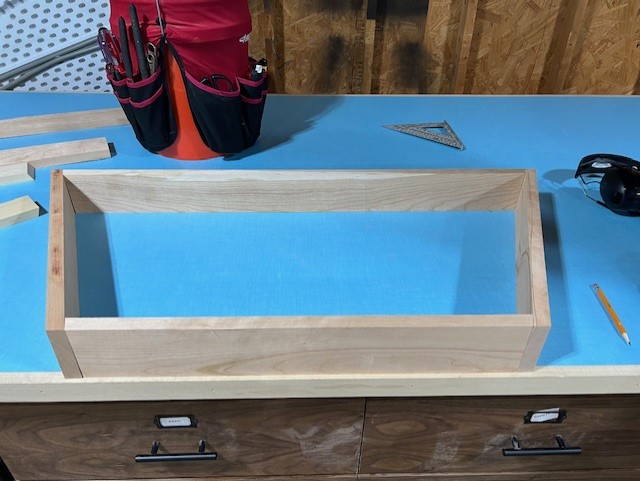
You may or may not remember that we were working on some end tables for Atlanta. We got those finished and are both delighted about how they turned out. Since they’re solid oak, they weigh a ton. I think they’re very pretty and look great with our new furniture in Atlanta. They weren’t a ton of work either! Here’s a little bit of the assembly process and a reminder of what our inspiration piece looked like.
Here is the final product!
Now back to our house in Big Canoe. Last we left it, we had replaced the old island. We’re still super happy with the new island and how functional it is. After wrapping that up, we wanted to add functionality to the rest of the kitchen as well.
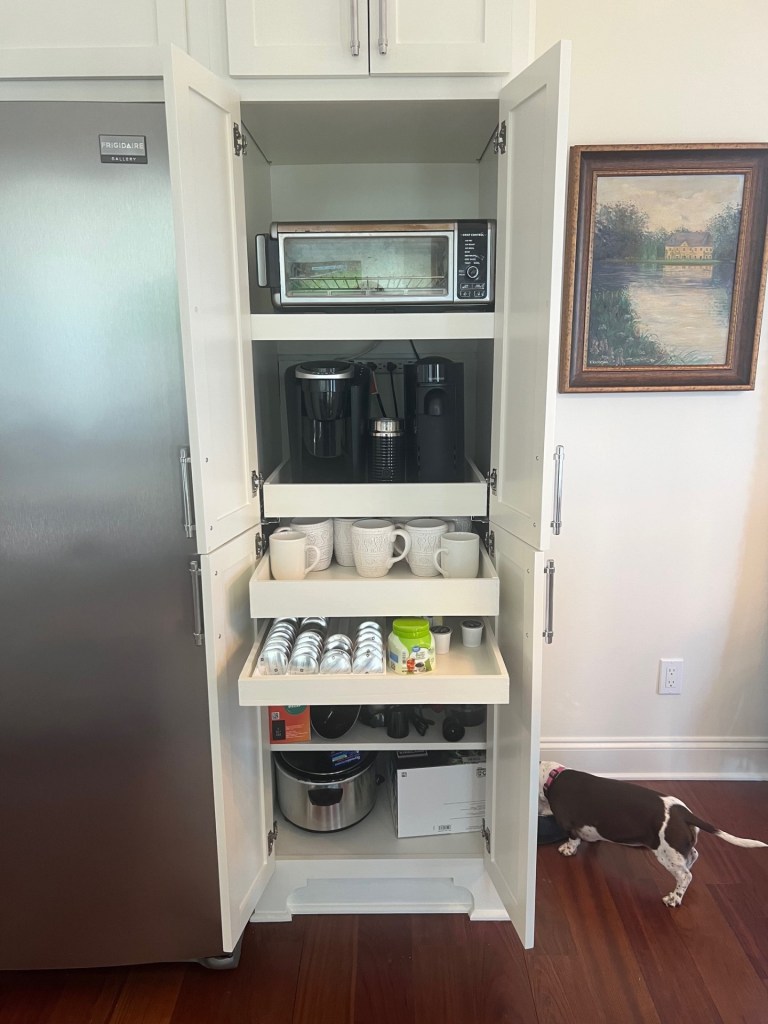
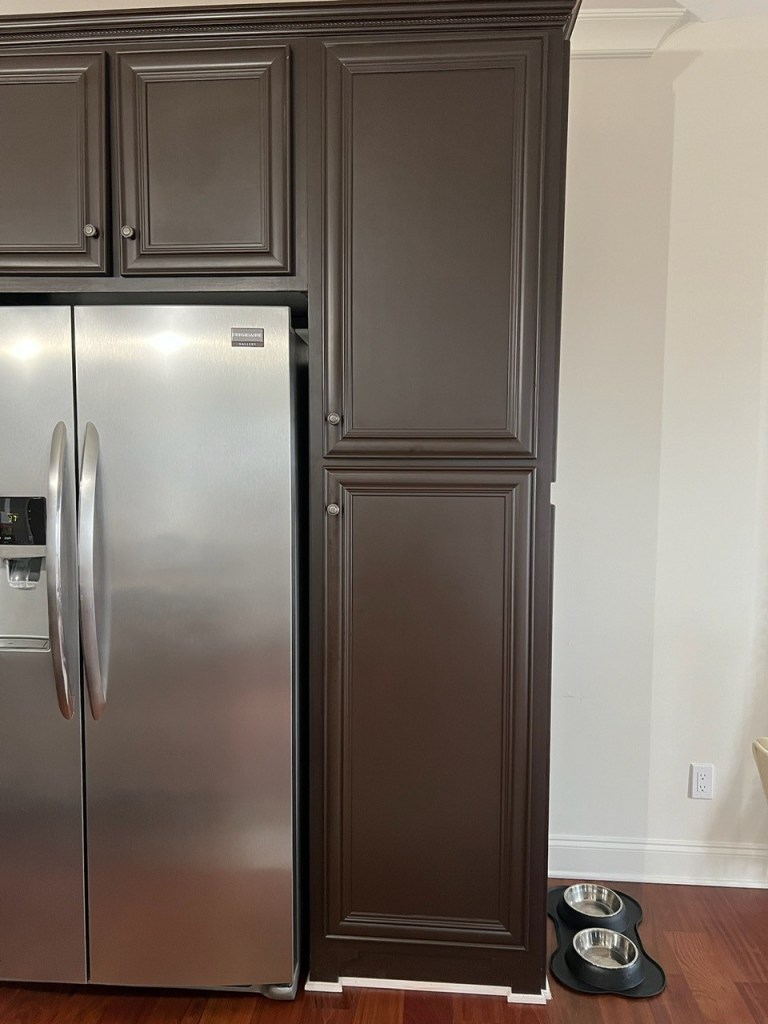
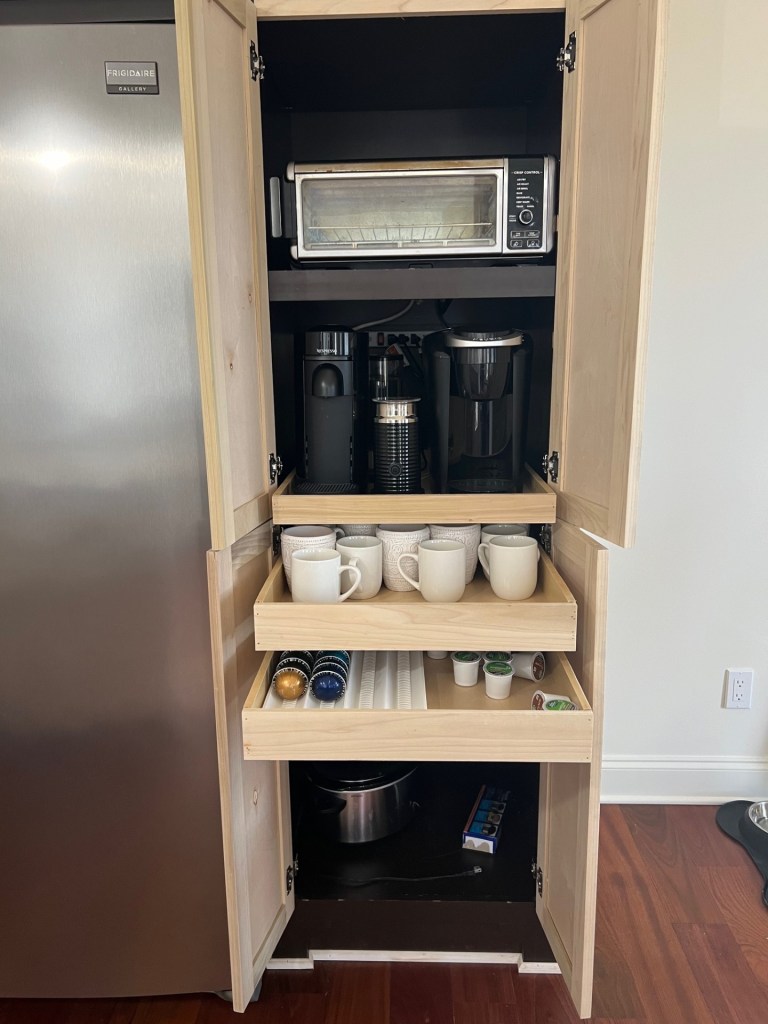
To the right of the refrigerator, there was a floor to ceiling cabinet which we had been using to store our dishes in before finishing the island. Now that the dishes have been moved, we had a world of opportunity to update that cabinet. We’ve now made it into a coffee cabinet and have also moved our airfryer/toaster oven in there. We LOVE it! It’s so functional! We ran an extension cord from the outlet behind the refrigerator, so now everything plugs in and stays off the counter. Here’s the before and after.
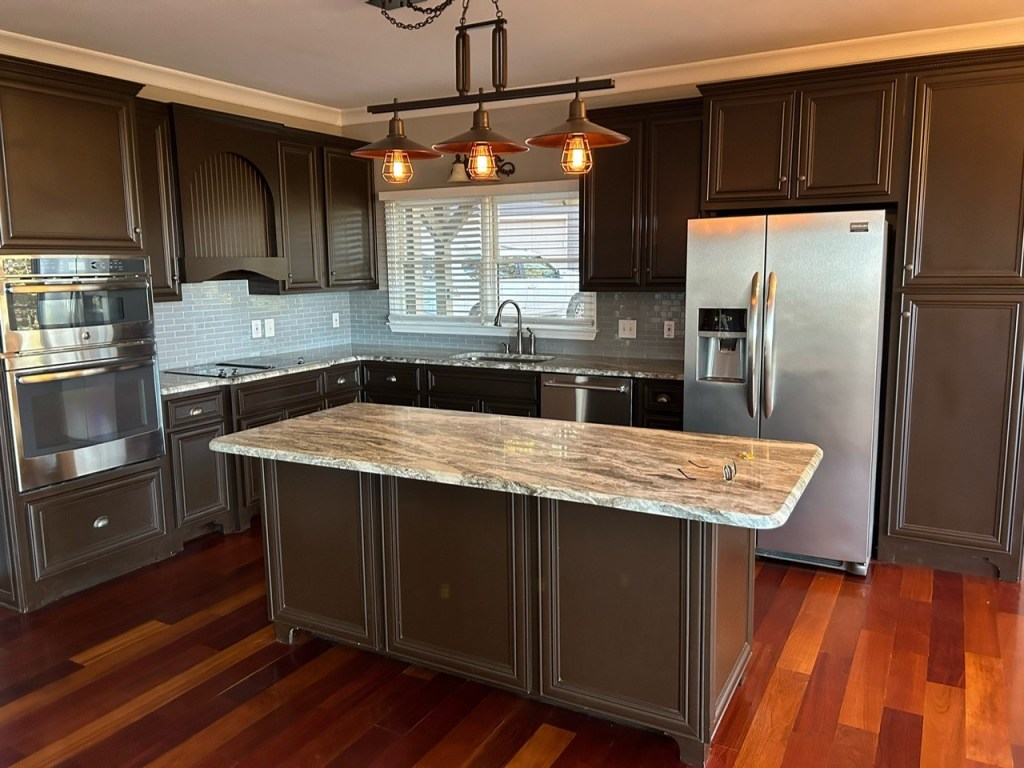
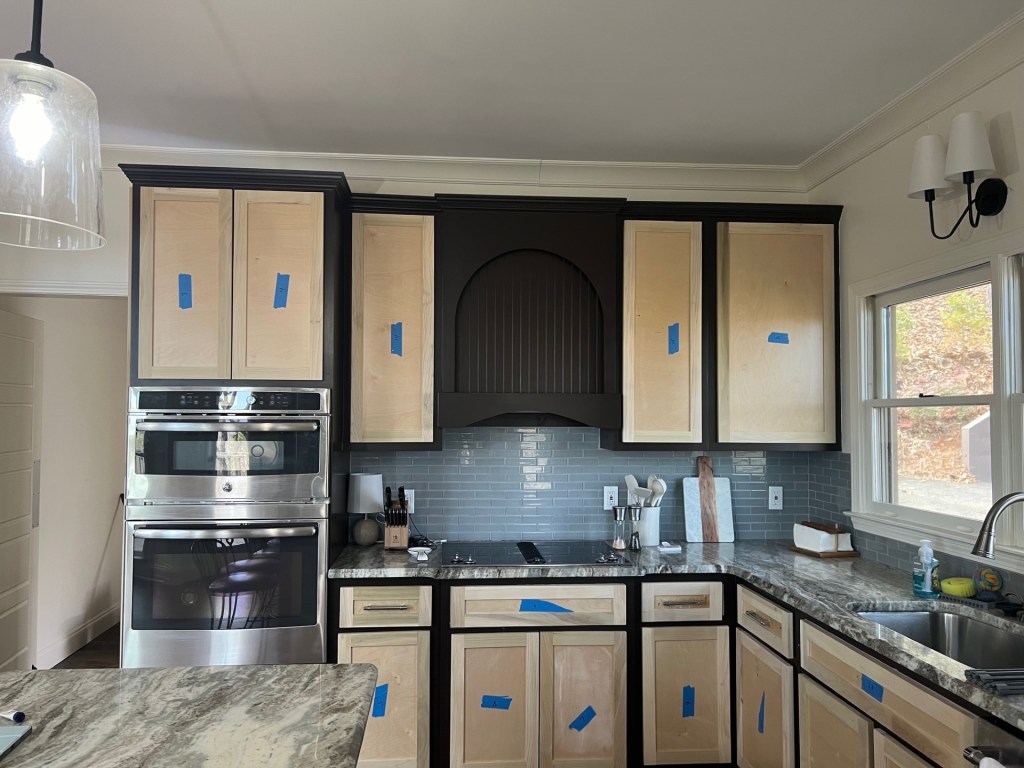
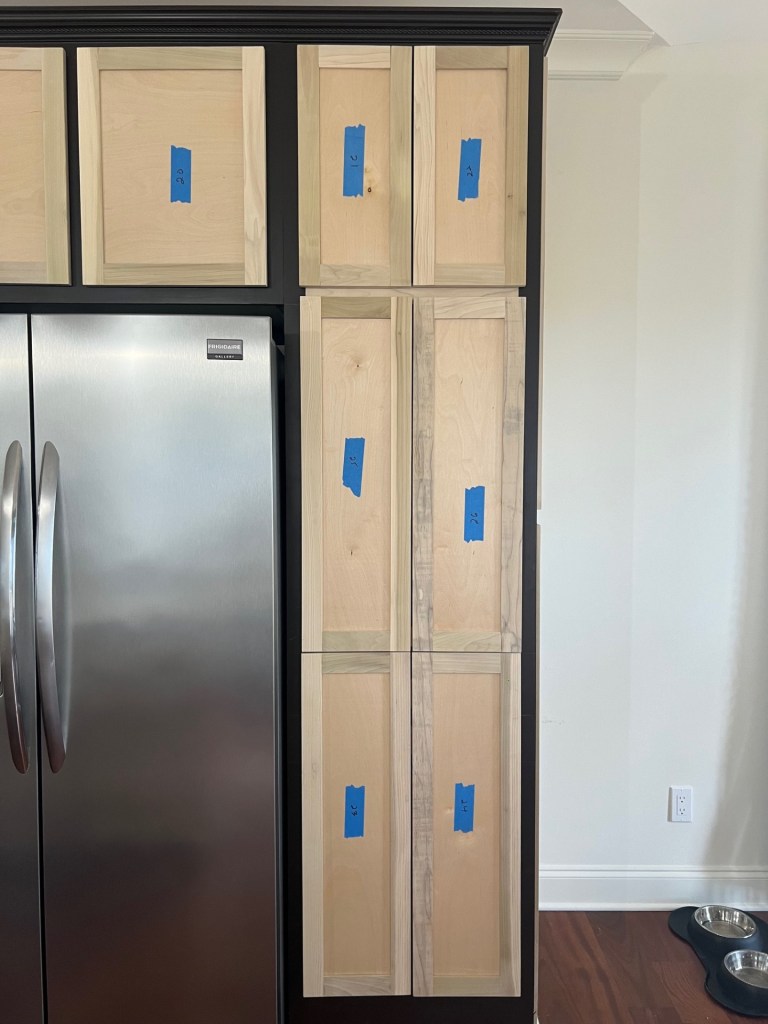
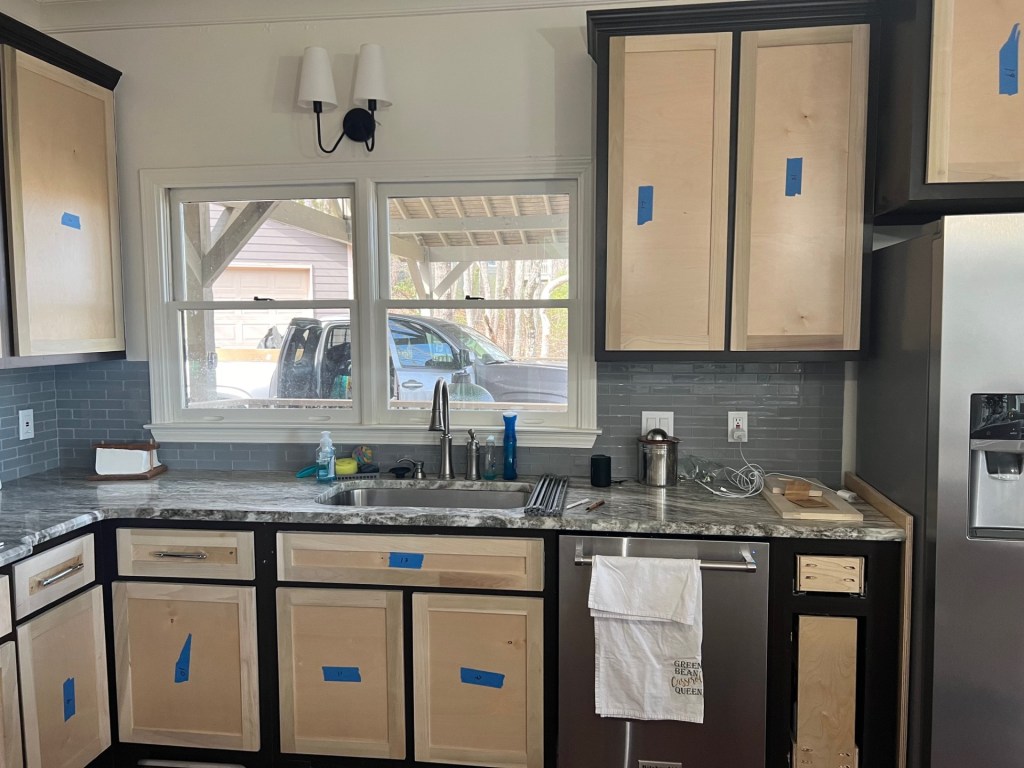
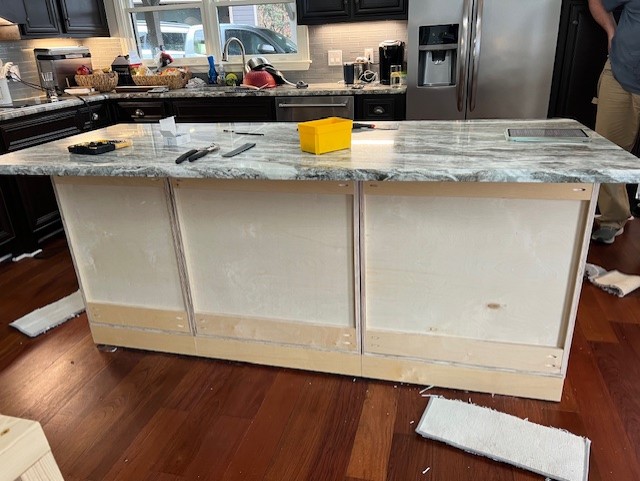
Now over to the rest of the kitchen. We have made all new drawers, since the old ones were crap. And we have all of the doors and panels made and have replaced them. We’re adding a panel to the left of the refrigerator to hide the side of the fridge (a pet peeve of mine), but we haven’t yet put it up because we need some edge banding to finish it off and we didn’t have the right size. So we’ll do that next time we’re up there. Here’s a reminder of the before of the kitchen.
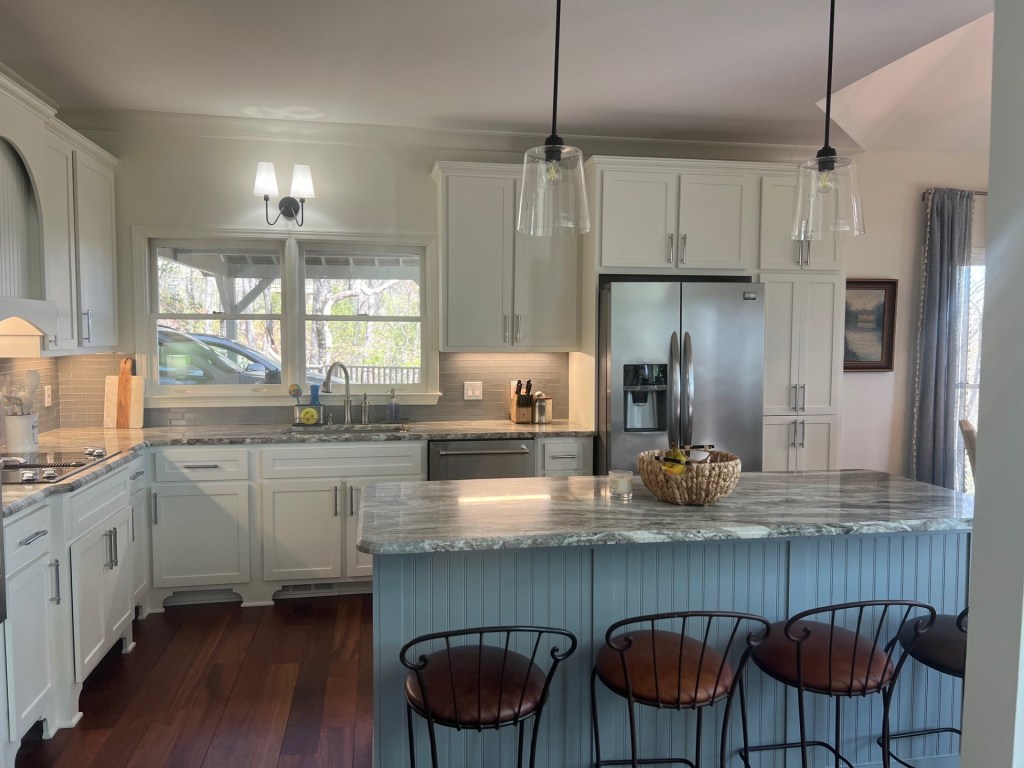
Here is the “after” photos. Obviously we still have to get the cabinets painted. The guys will start on that in a couple of weeks once they finish up a couple of other projects they’re working on. The cabinets will be white except for the island which will be a soft medium gray.
When Carlos (our contractor) saw our cabinet doors he was very complimentary and said he needed to do the same thing at his house! So I’ll take that as a “good job”! To be honest, Keith did the lions share of work here. I assisted with cutting the frame boards to length and doing a lot of sanding. But after the table saw incident of 2020, I no longer work a table saw!
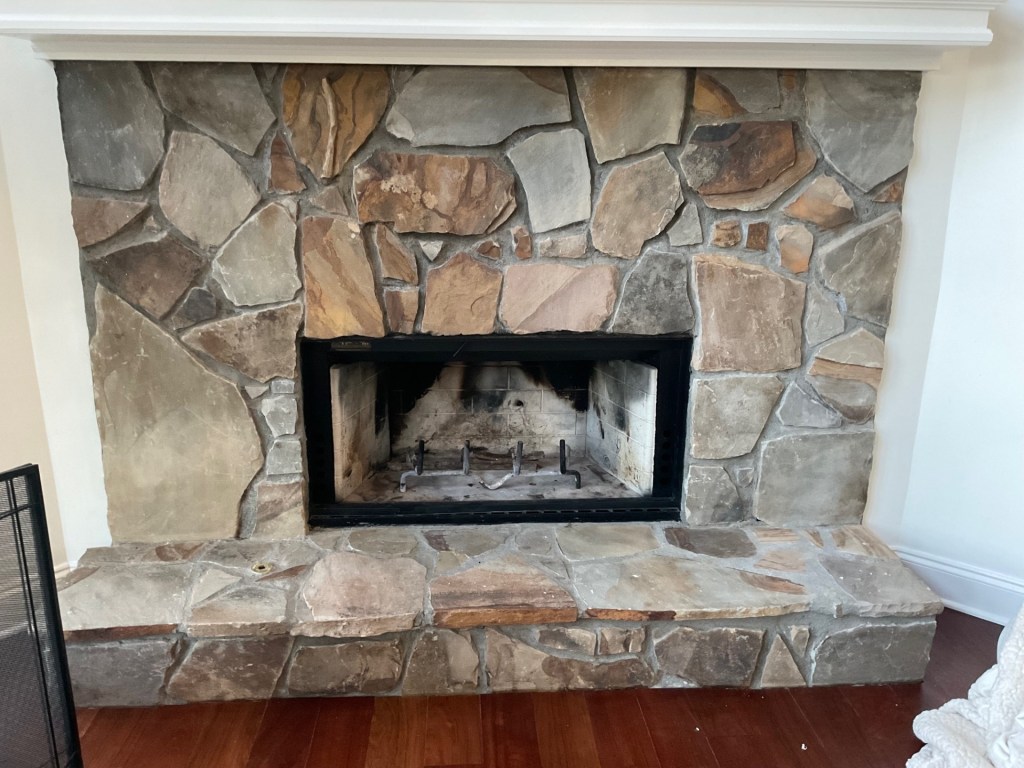
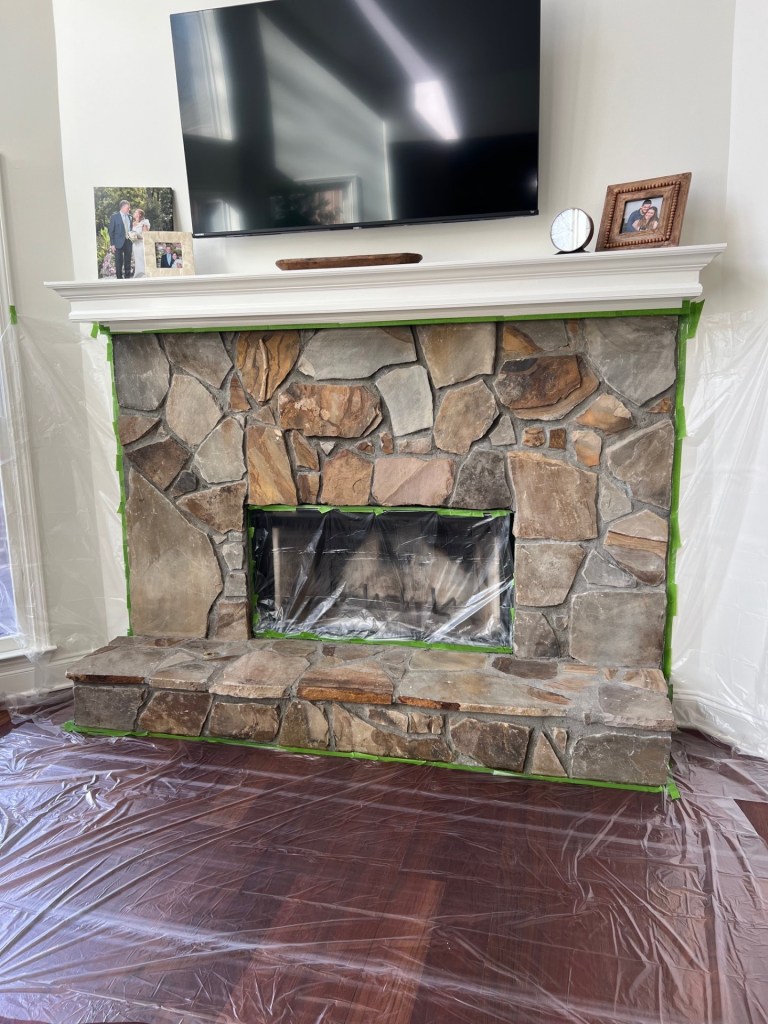
One project I tackled on my own this weekend was a facelift to the fireplace. One of the things I truly disliked about this house was the stone on the fireplace. It SCREAMED 1990’s and was very orangey looking. Just a reminder of the before….
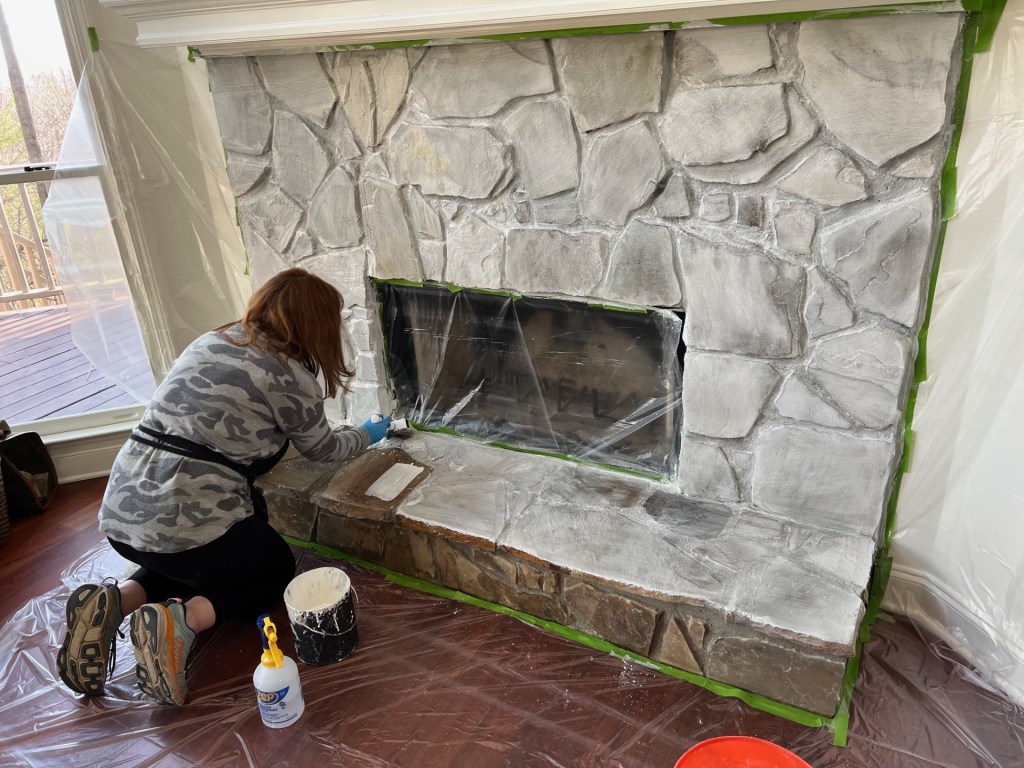
After doing a lot of research, I decided to do a limewash on the fireplace. I cleaned and scrubbed the fireplace with special stone cleaner and then got busy doing a LOT of taping and putting up plastic. The limewash is quite thin and messy (although easy cleanup), so I wanted to protect everything I could.
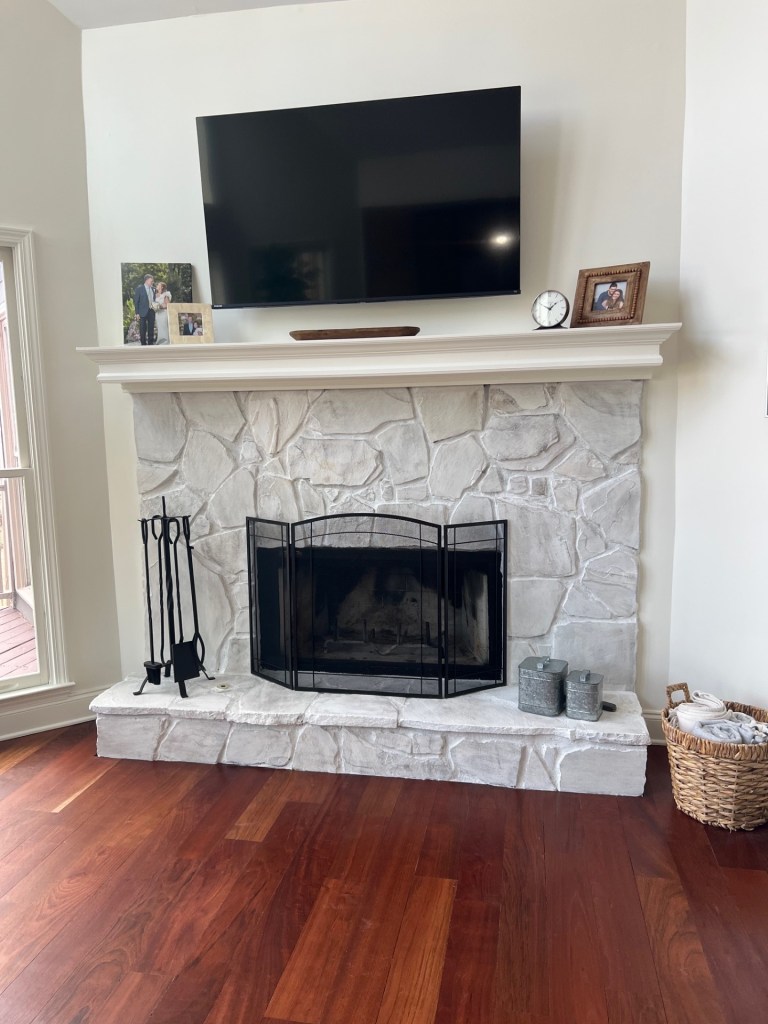
And then here’s the final result.
Am I in love with the fireplace now? No. But I like it a lot better now. It really weighed the room down before but now it’s a lot brighter and cleaner looking. It’s very easy to do touch up to it, so if we get the hearth dirty (which is likely to happen with ash), we can easily clean it up and add a little more.
Well, that’s a wrap folks! Next time I post, I’ll have pictures of the painted cabinets. We’ll also start working on a pantry cabinet which is in the room right next to the kitchen. The pantry has zero functionality right now so we’ll be making it a lot better. Then we’ll start to tackle some of the fun little design project we’ve got up our sleeves!
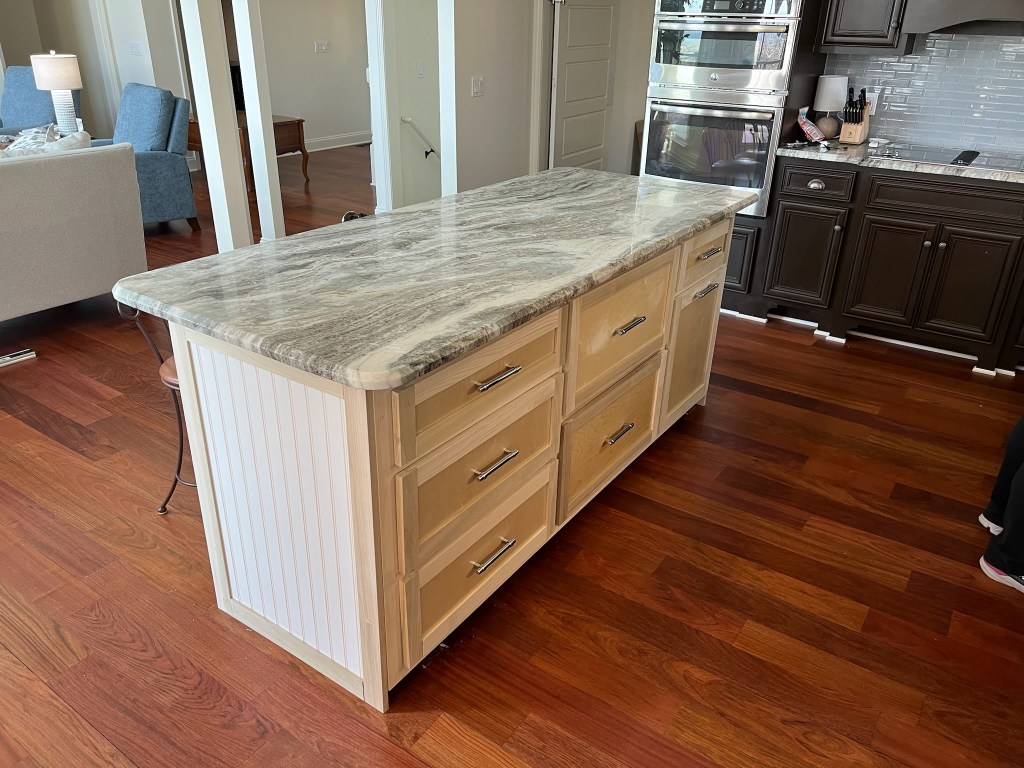
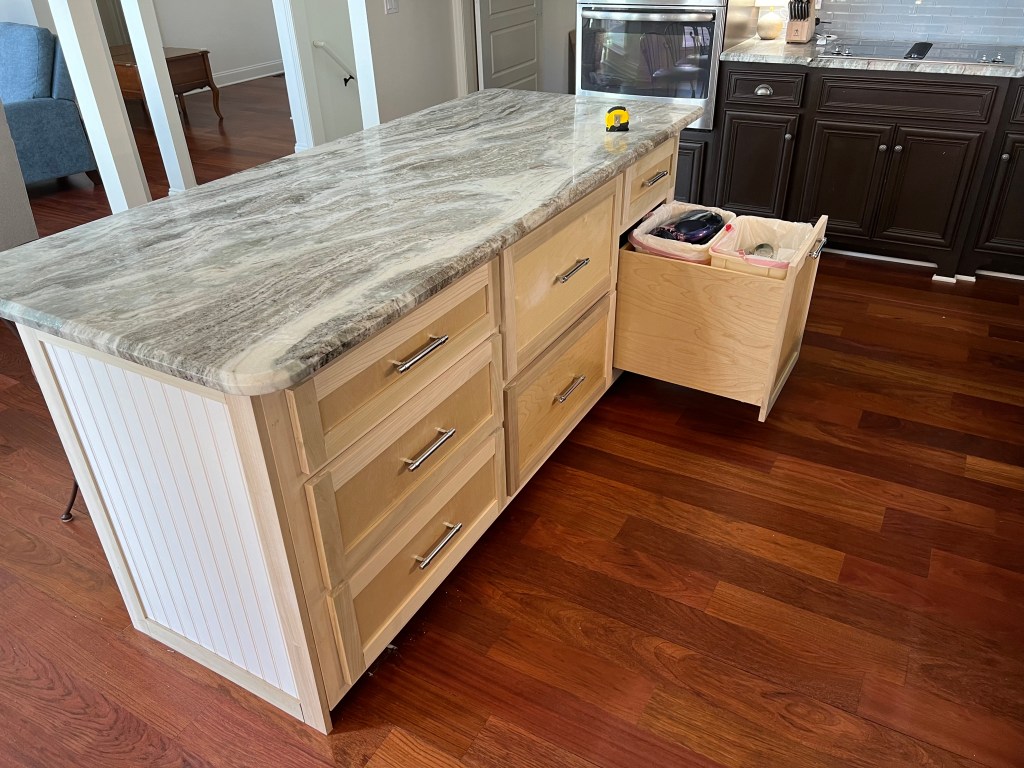
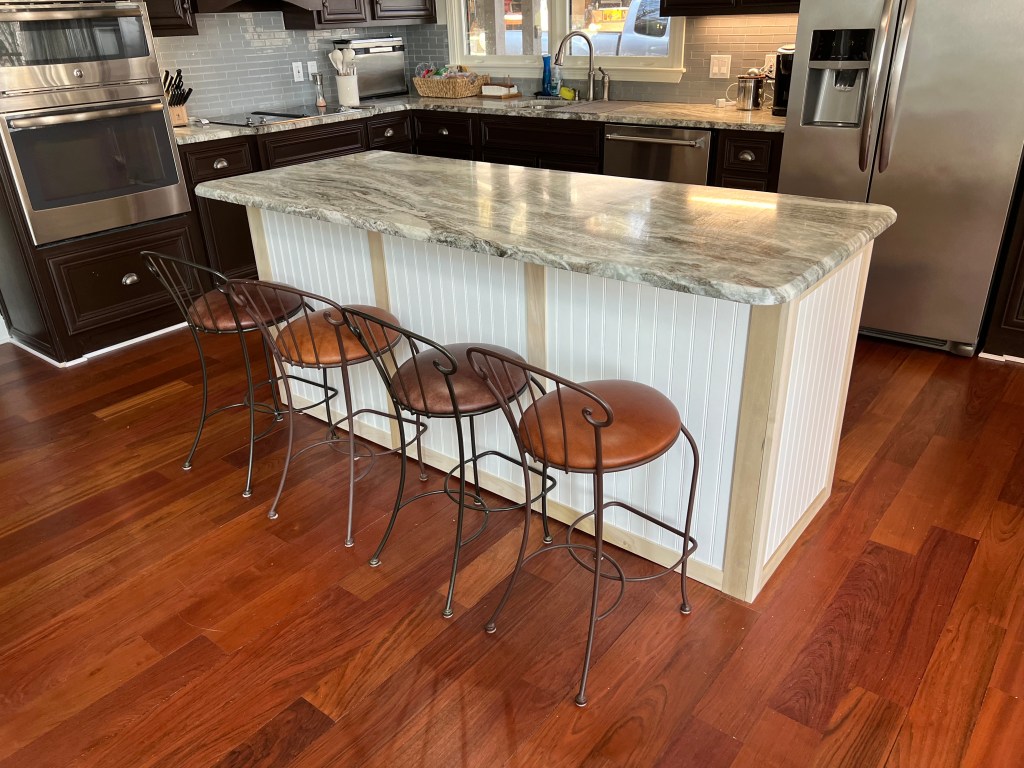
Except for painting and putting on quarter round, the island is completed! We are both thrilled with the result and very happy with the extended size and significant improvement of functionality.
One thing that drove both of us crazy was not having a good place to put trash. By extending the width of the island, we were able to add a pull out trash/recycle drawer, create a drawer to hold all of our dishes, and have lots of additional storage for things like mixing bowls, storage containers, etc. Another thing that was awful about the old island was the fact that the drawers wouldn’t open easily and weren’t very sturdy at all. Just to give you some context on the difference in quality of our old drawer slides versus the new ones, here’s a little compare and contrast! The white drawer slide on the right is the old, cheap drawer slide, and the silver one on the left is a heavy-duty Blum drawer slide which is the best drawer slide you can buy. No more sticking, screeching drawers when they are opened!
Now back to the rest of the island. As a reminder, we had some room to the left of the island where the prior folks had a bar stool, so we had an extra six inches or so that we used when we created the new island. It gave us a LOT more function. Here are some “before” pics of the island:
And let’s not forget the rather scary “during” photo of the island along with a few others…
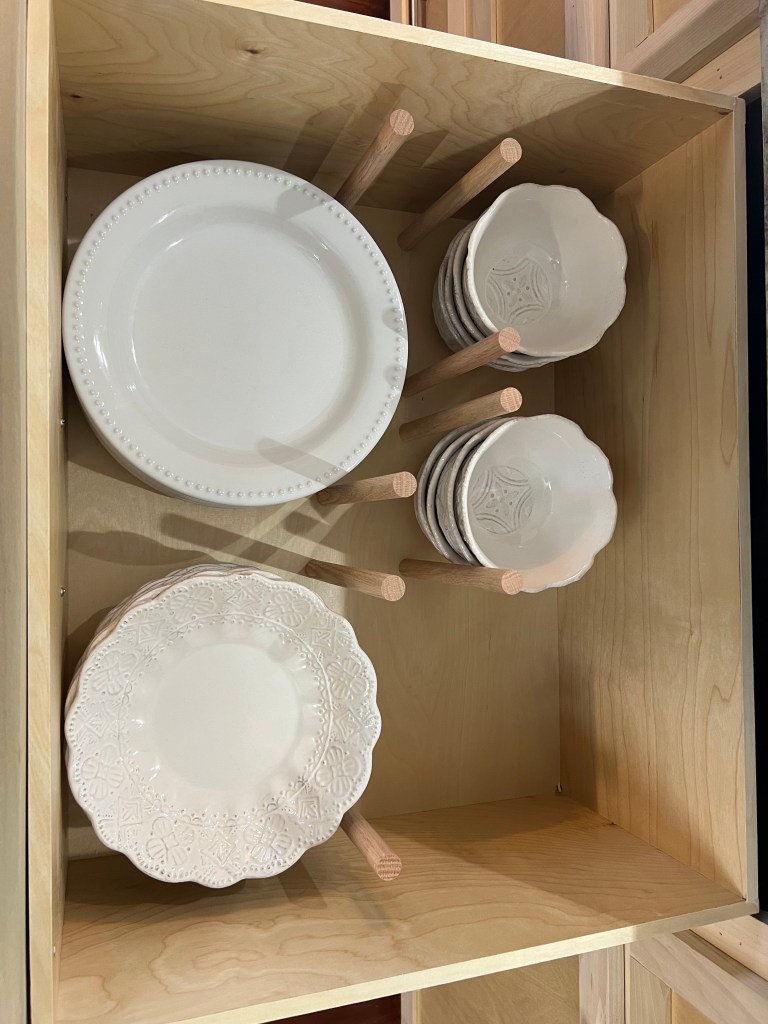
Before I show you the after pics, I’ll share a little more about the island. One of the frustrating things in this kitchen (besides the lack of a good place to put trash/recycle), was that the upper cabinets weren’t deep enough for my dishes. So we had to put them in the cabinet to the right of the refrigerator. Which was fine for a short-term solution, but we have plans for that cabinet and needed to store our dishes elsewhere. The island was the perfect place to do it. Since we were able to build very sturdy drawers with heavy-duty drawer slides, we could actually store our dishes in the middle deep drawer. We put some pegs in to hold the dishes from sliding around and it’s a perfect place to put them. Now …. here are the “after” pictures!
So much more functional! Obviously a paint job will do wonders. We plan to paint it a soft gray to provide some contrast with the rest of the kitchen, which will be a creamy white color. We’ll wait until we are completely done with the entire project before we have them painted.
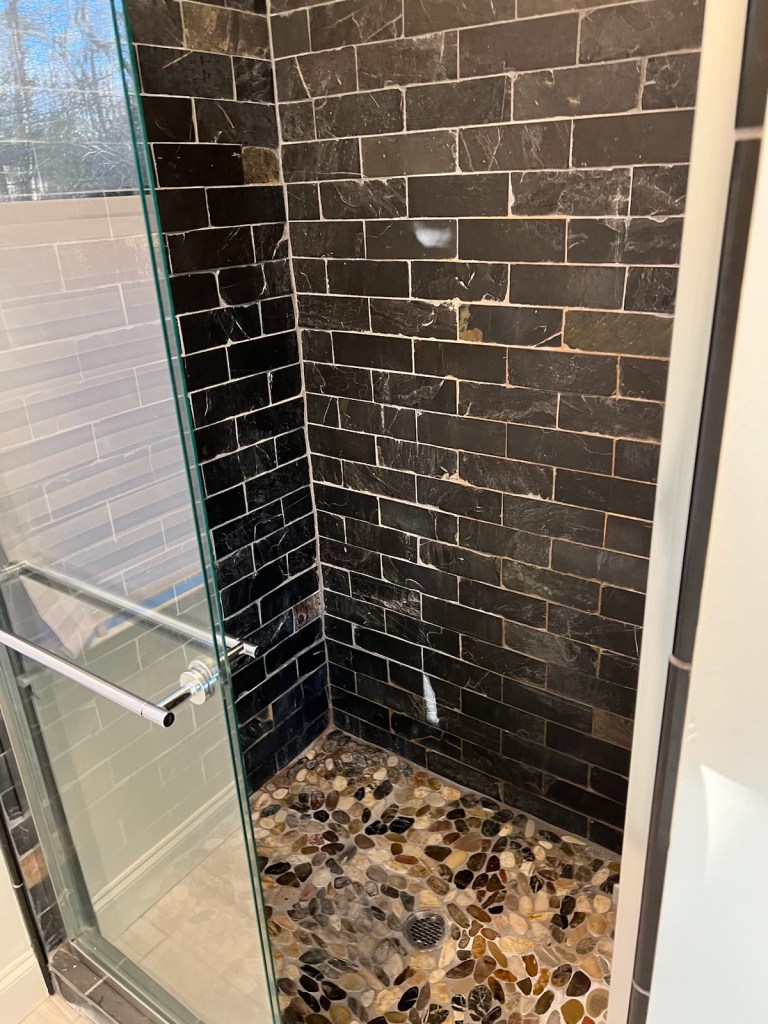
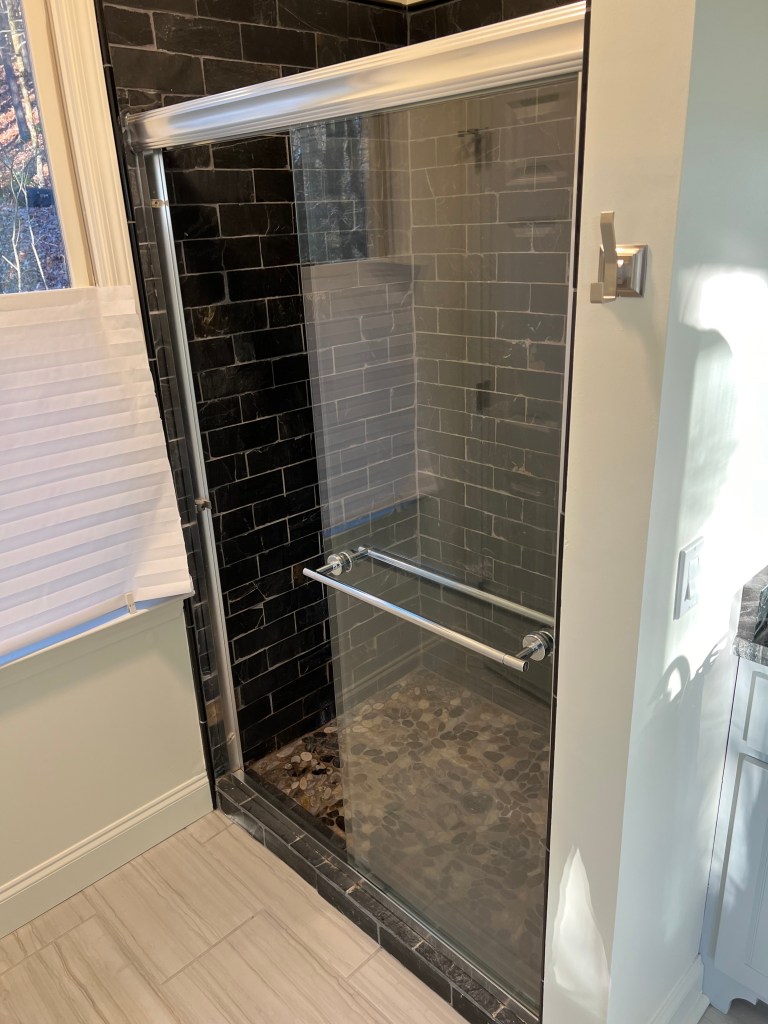
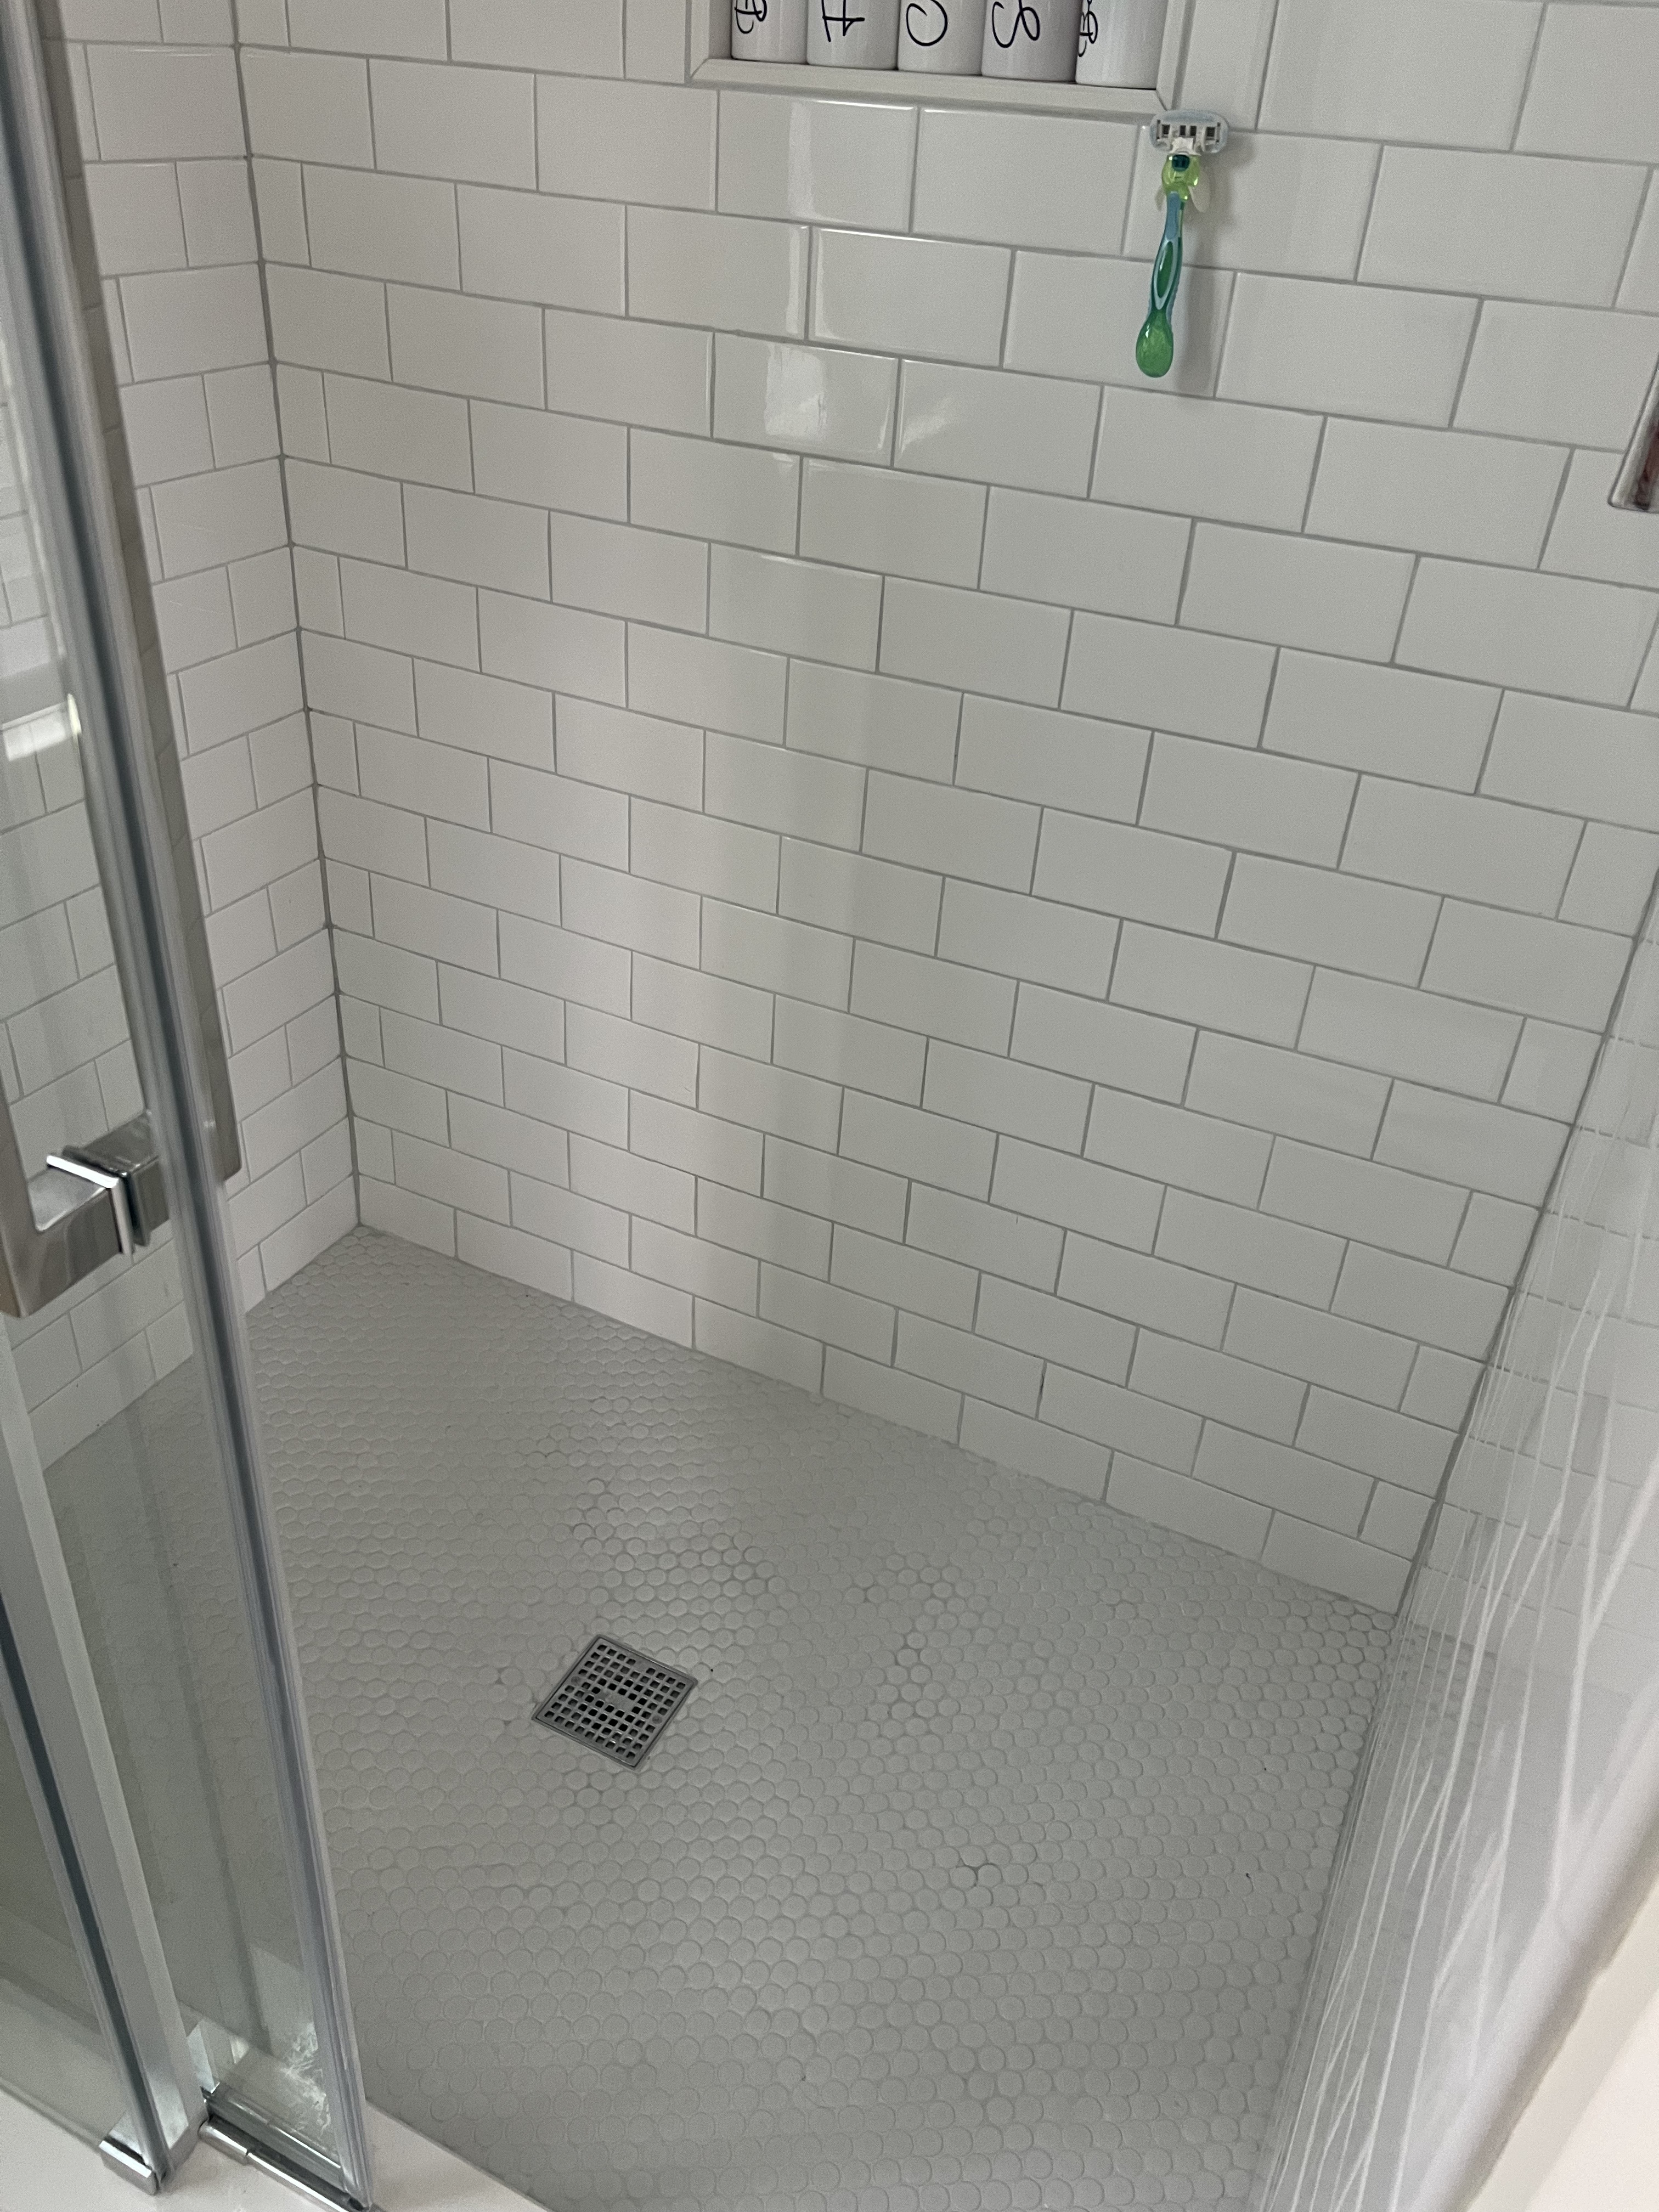
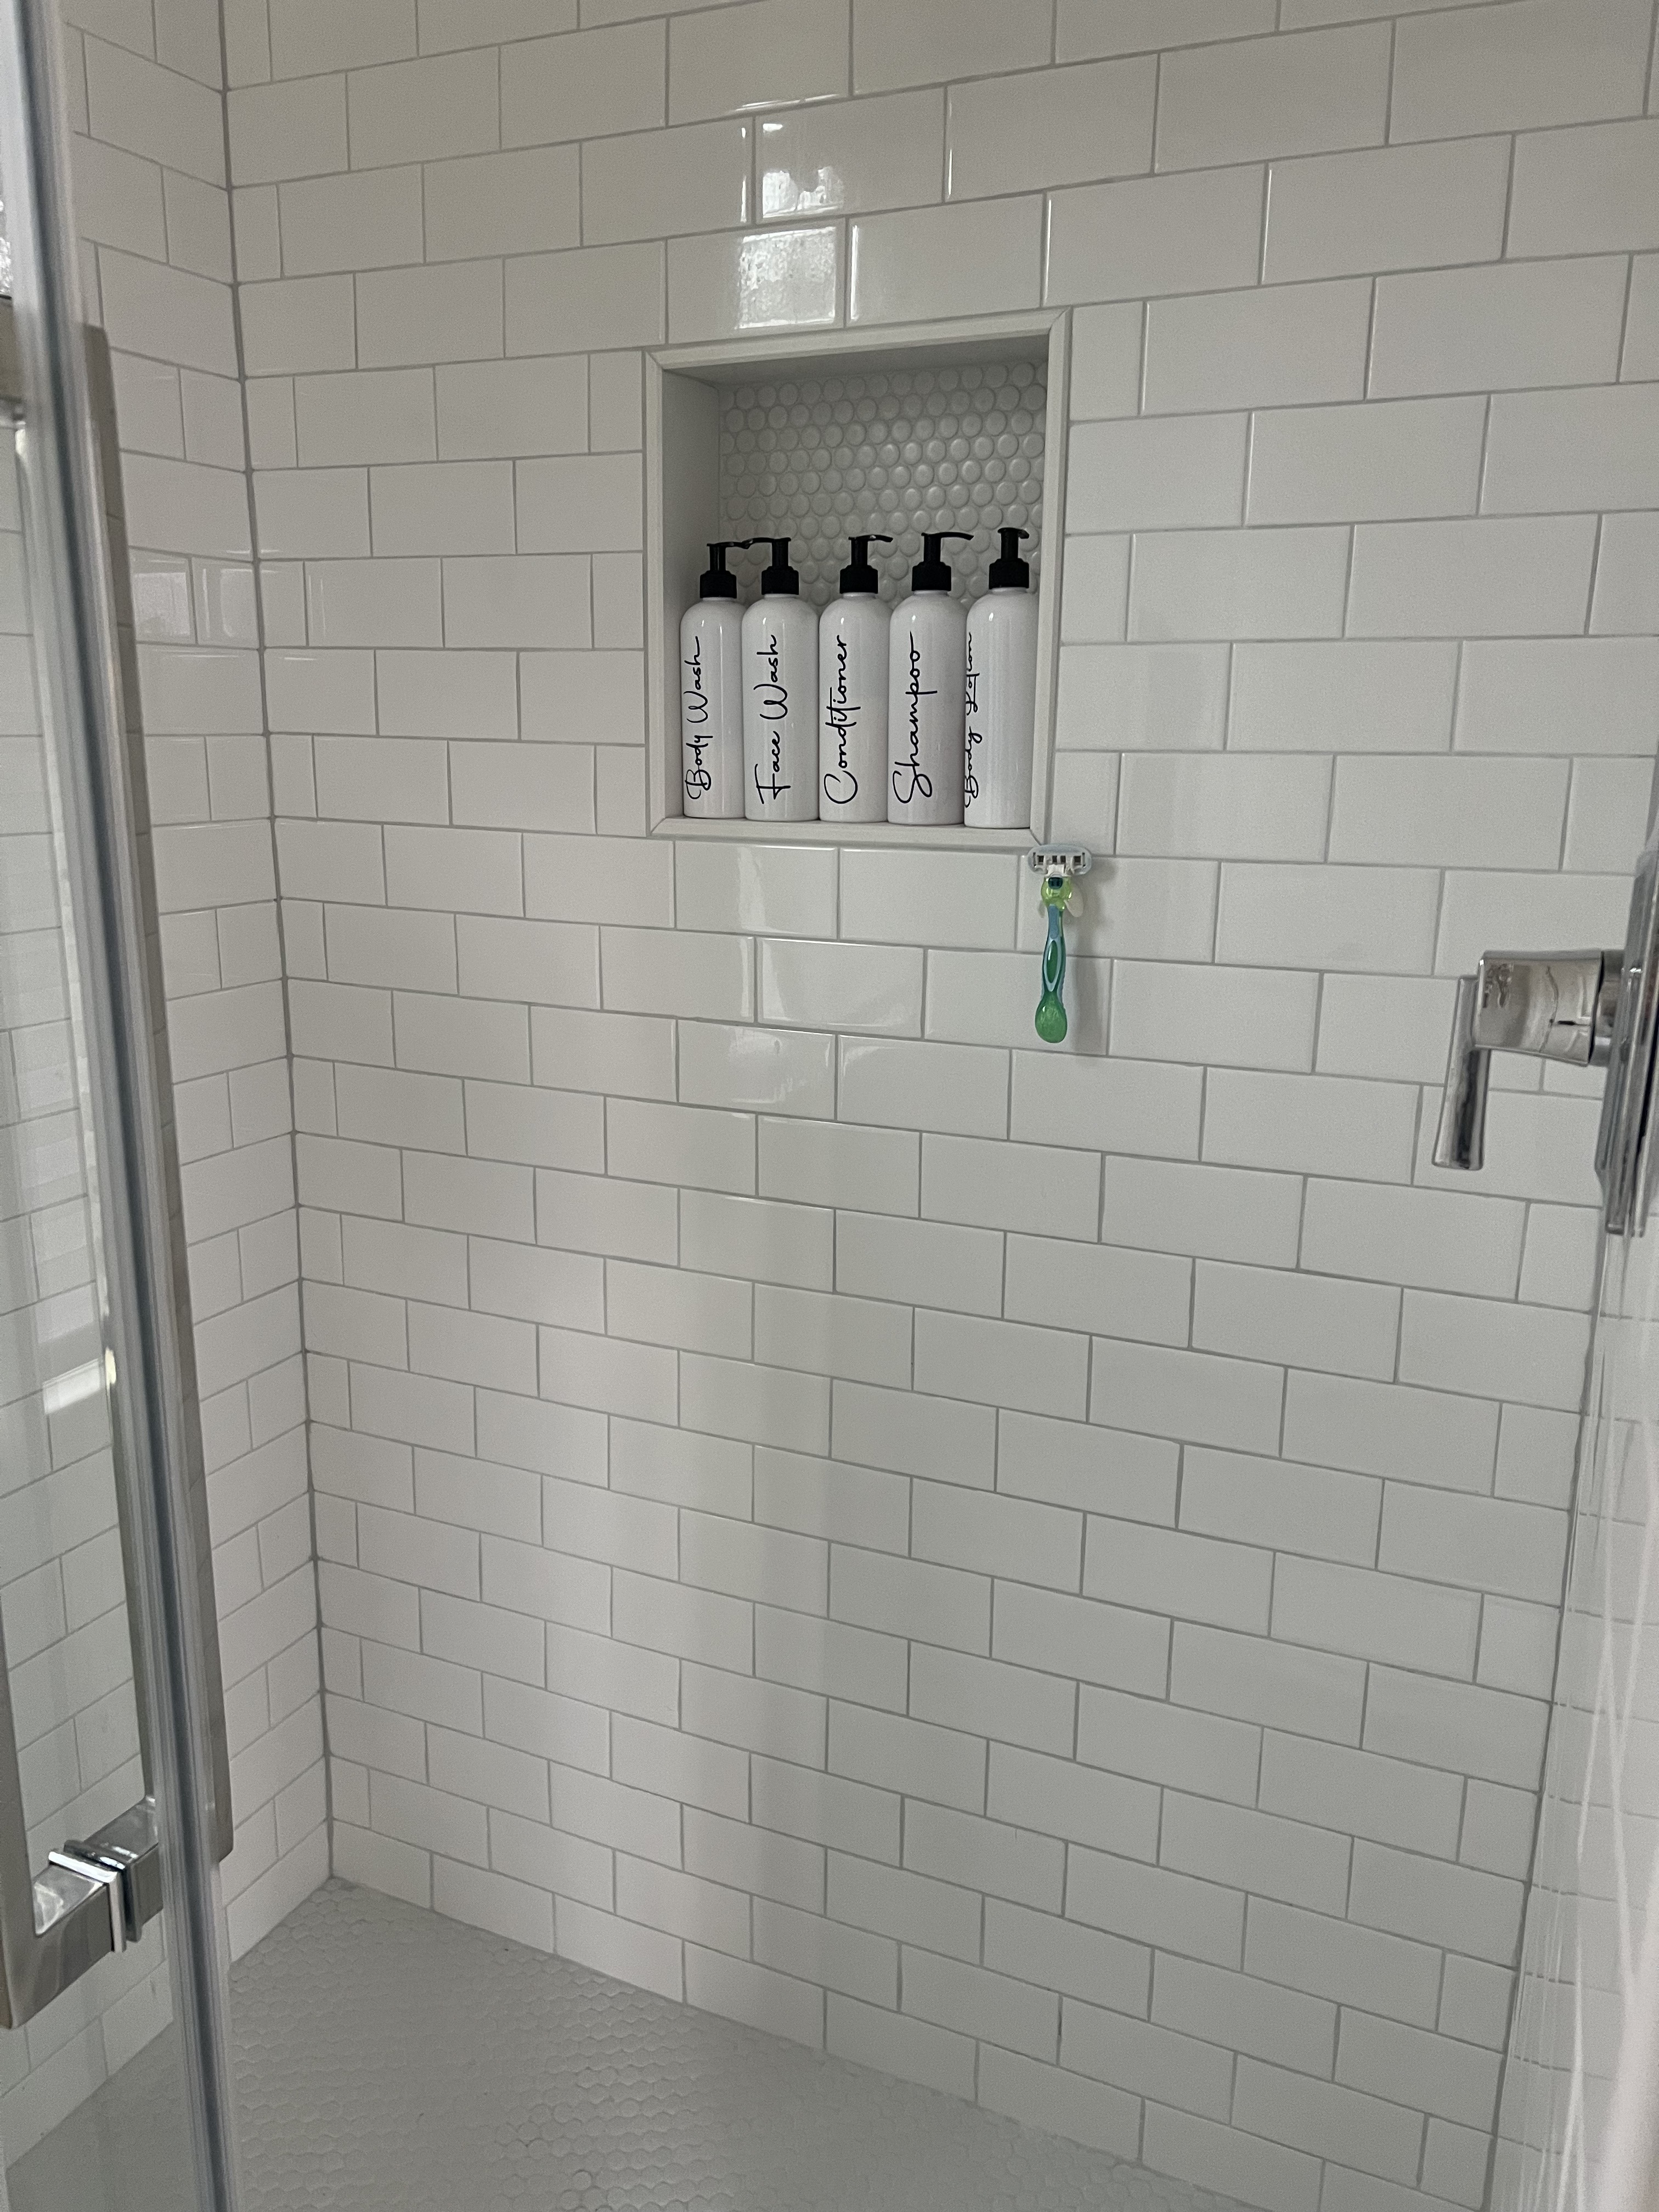
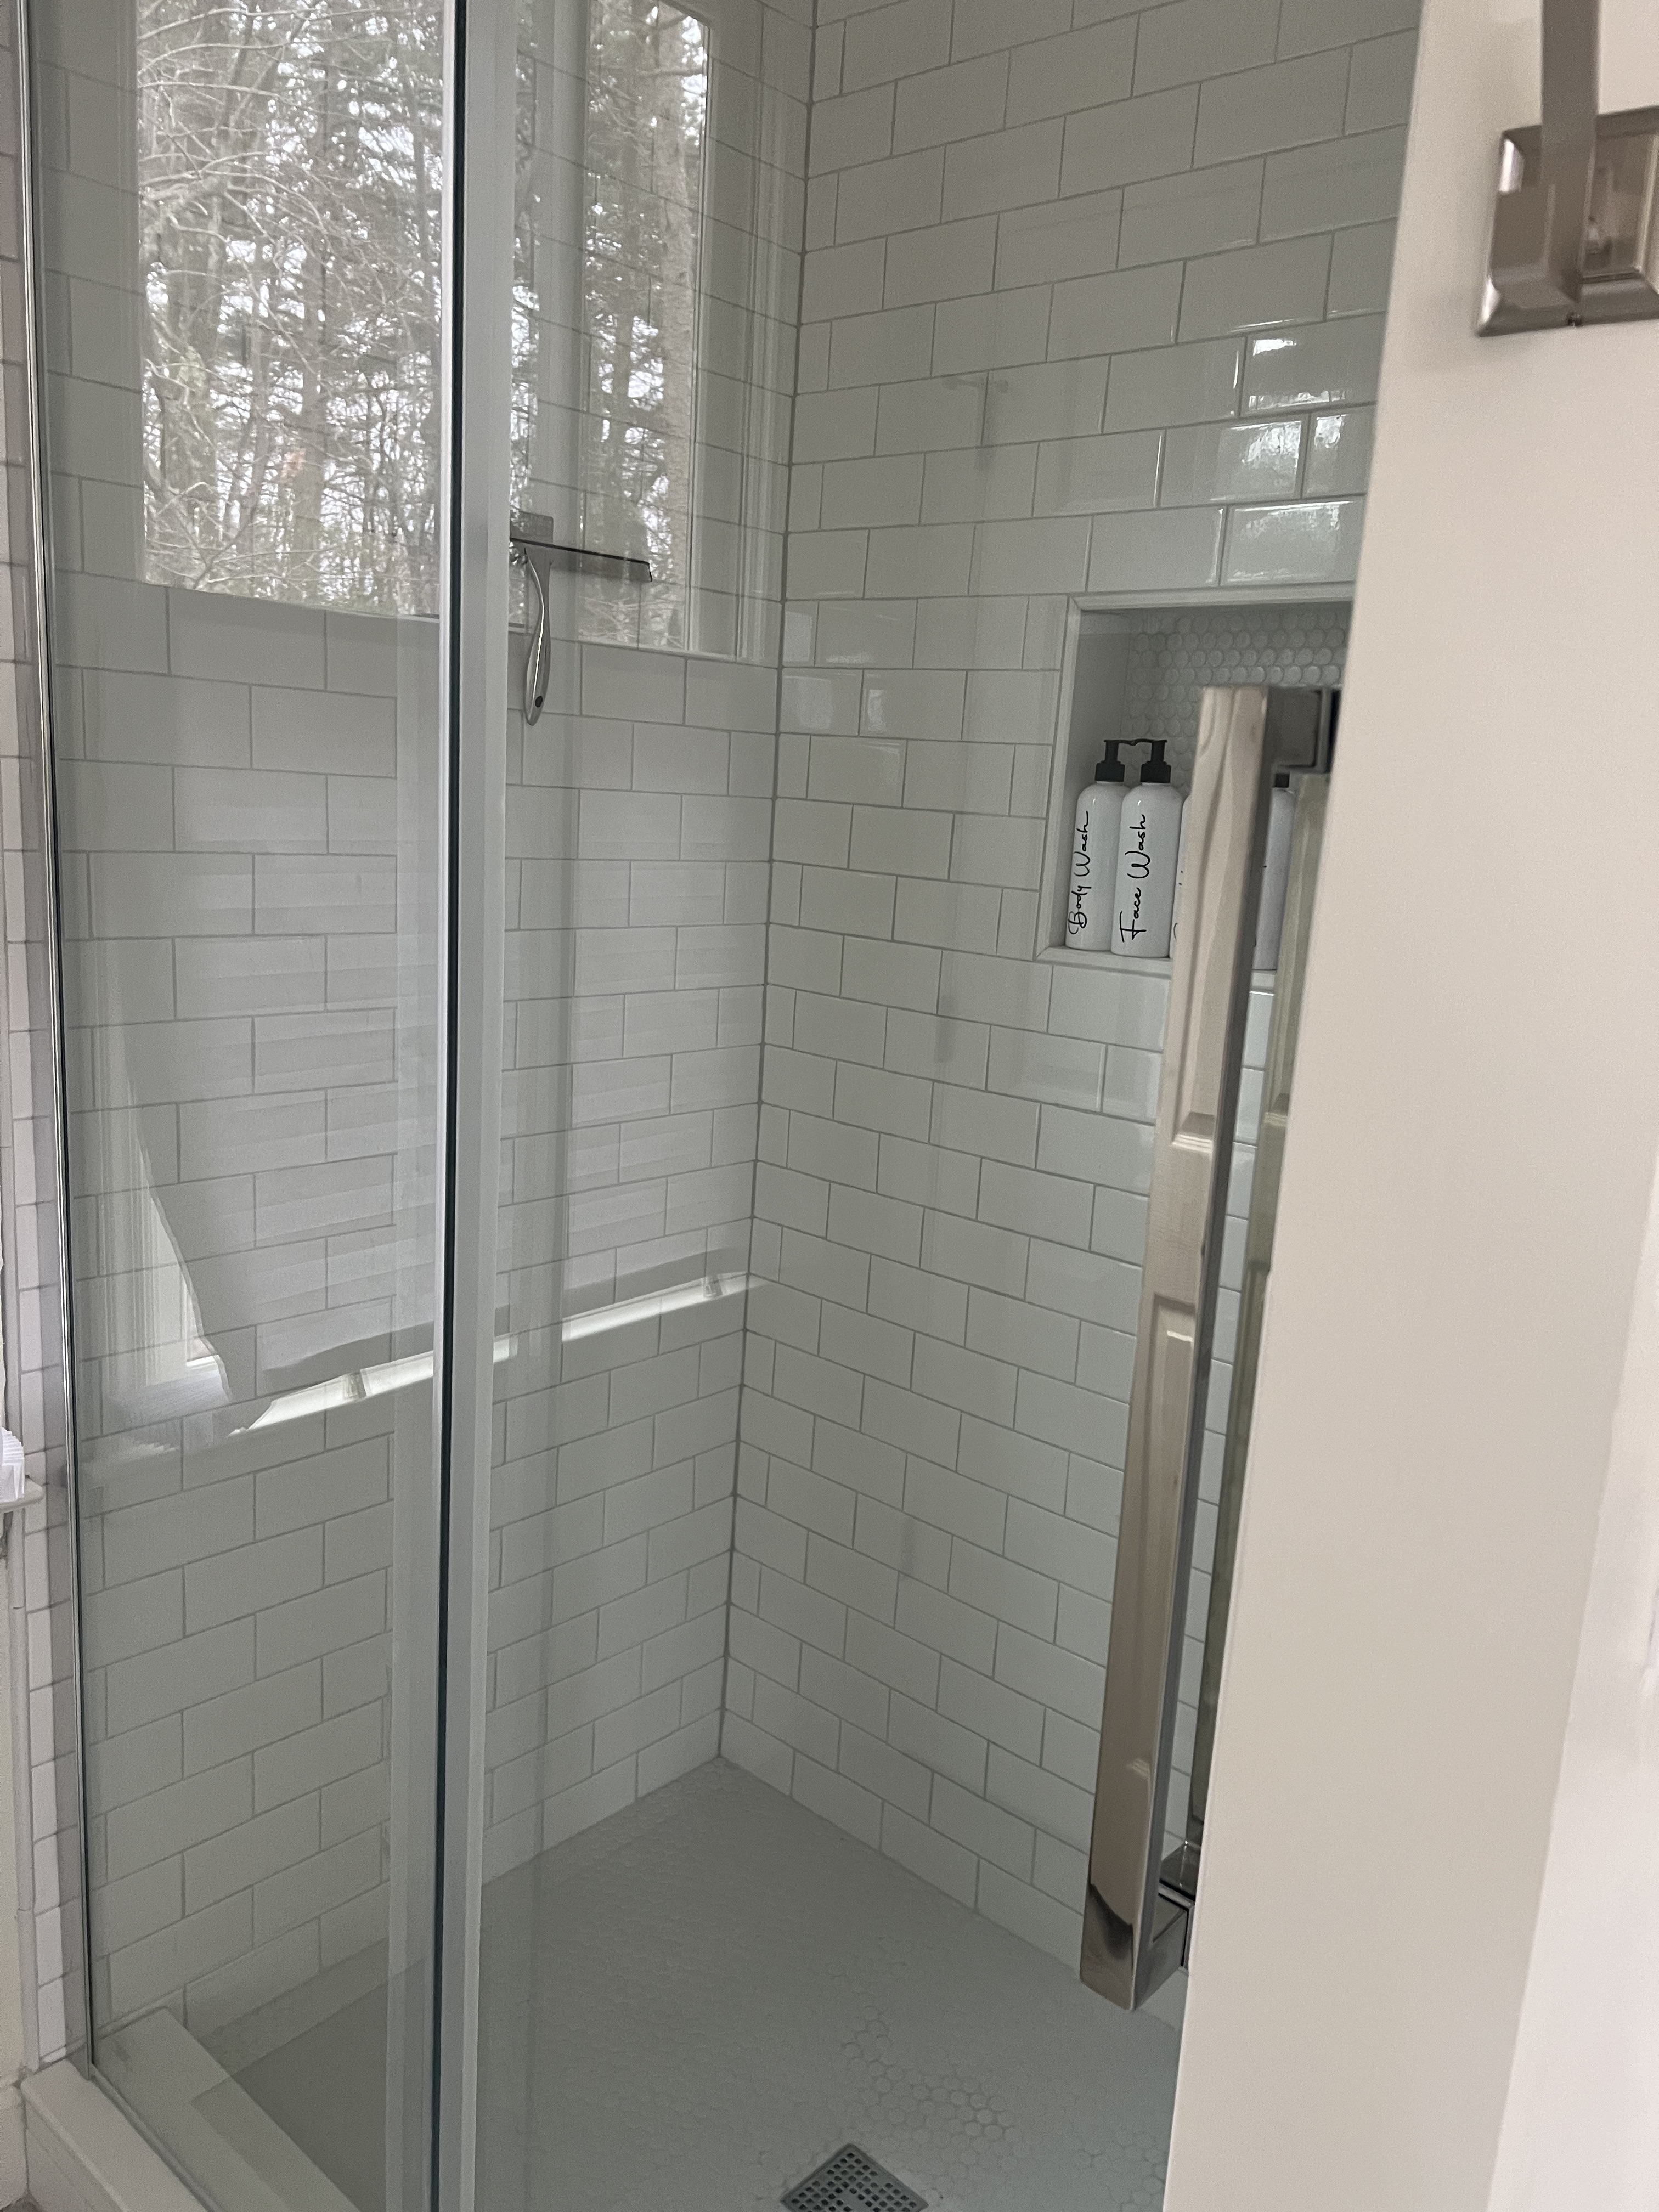
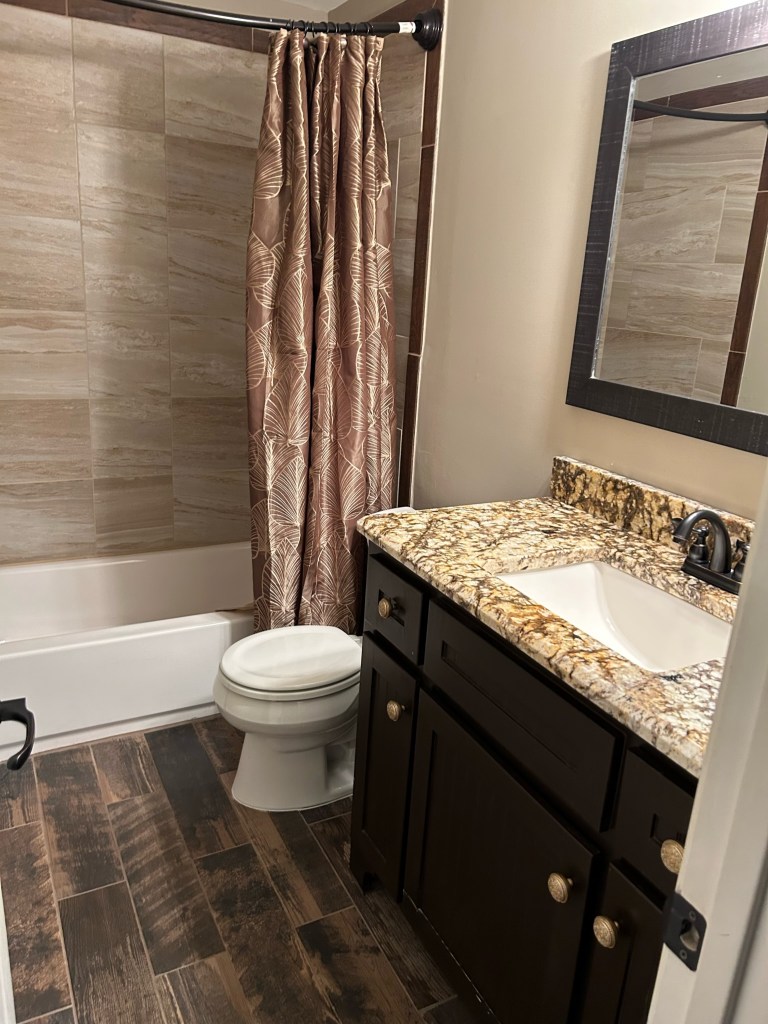
I’ll share more on the kitchen in a future post, but for the time being we took a short break to work on another project for our Atlanta house. More on that in a minute, as I realized I forgot to share with you a much needed transformation that took place right before Christmas. You may or may not remember that I described how GROSS our master shower was. I thought I could live with it until I took my first shower in it and I was so grossed out we decided it was more urgent to get it taken care of. Thankfully our awesome contractor had a little extra time before Christmas to gut the old shower and put in a new shower. We didn’t want to spend a lot of money on the shower, but we wanted something clean and bright. I was able to find an amazing Black Friday deal on a tall shower door (so Keith didn’t have to duck to get in the shower), and we went with inexpensive white subway tile and white penny tile for the floor.
Here is what the shower looked like before.
And here is the after.
It’s a thousand times better!
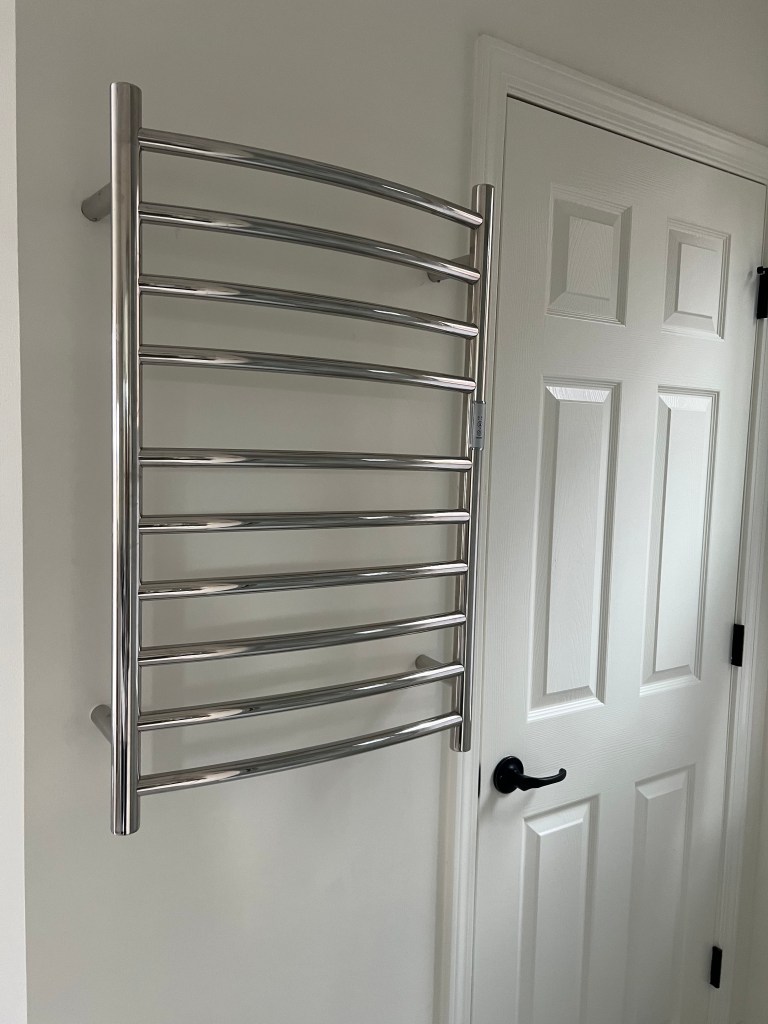
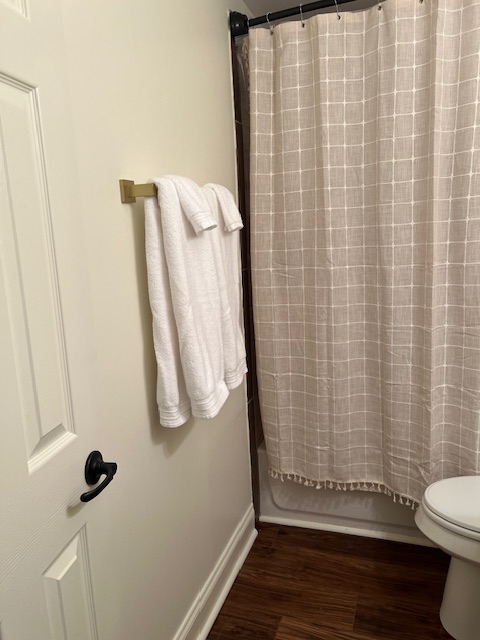
Now on to one of my favorite new things we also added. Prior to us painting, the only towel rod in the bathroom was over the bathtub which isn’t that close to the shower. There’s a little bit of wall space across from the shower, between the water closet and the linen closet. It was just wide enough to add the towel rods there. Then I had a brilliant idea….because it was a narrow space and we’d have to hang two towel rods – one high for Keith and one lower for me – why not put in a heated towel rod instead! So we did and I LOVE IT! All future houses for me will need a heated towel rod!
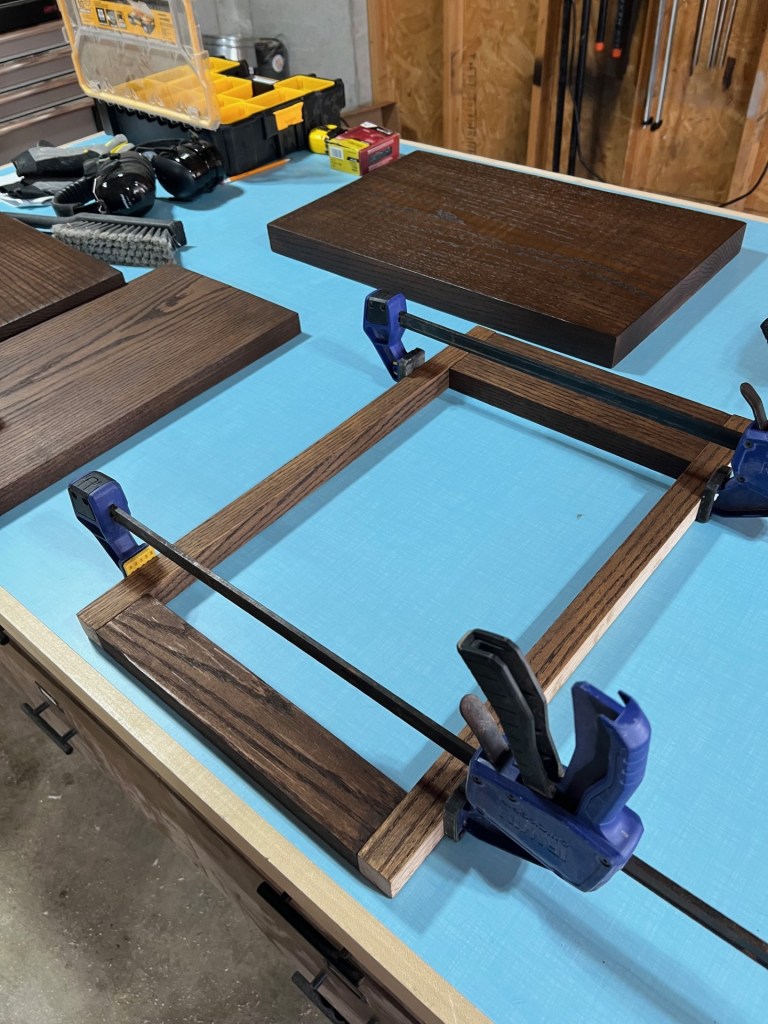
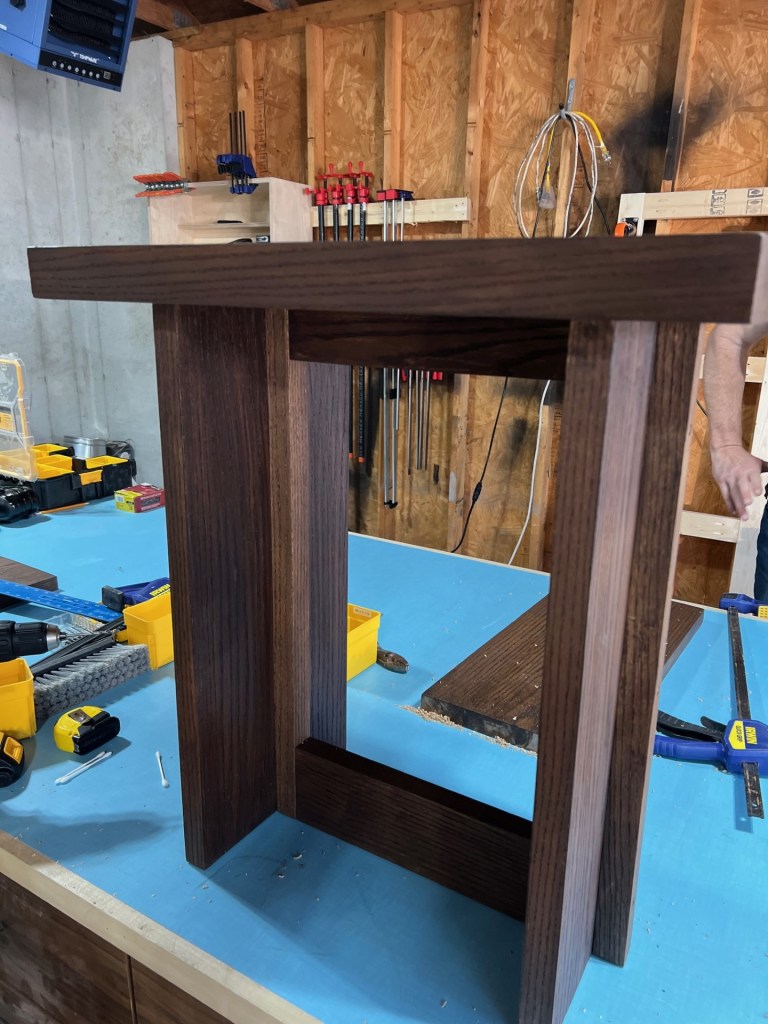
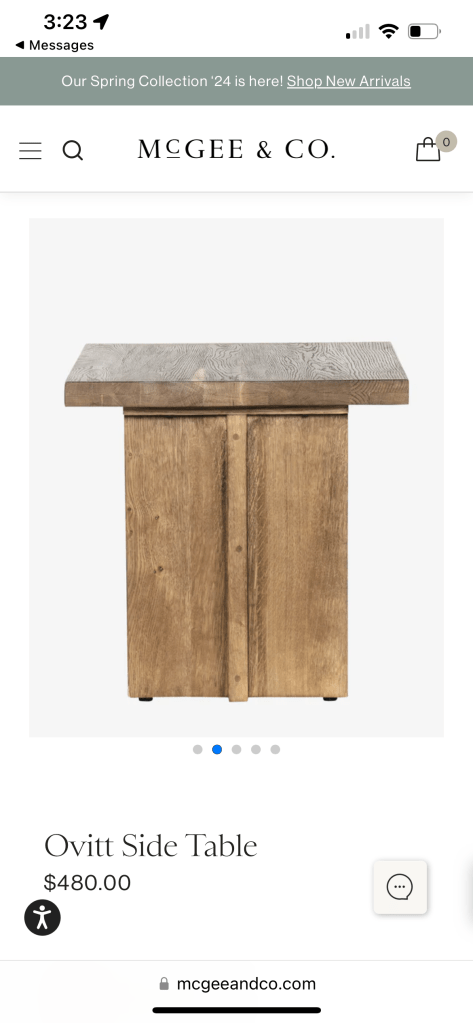
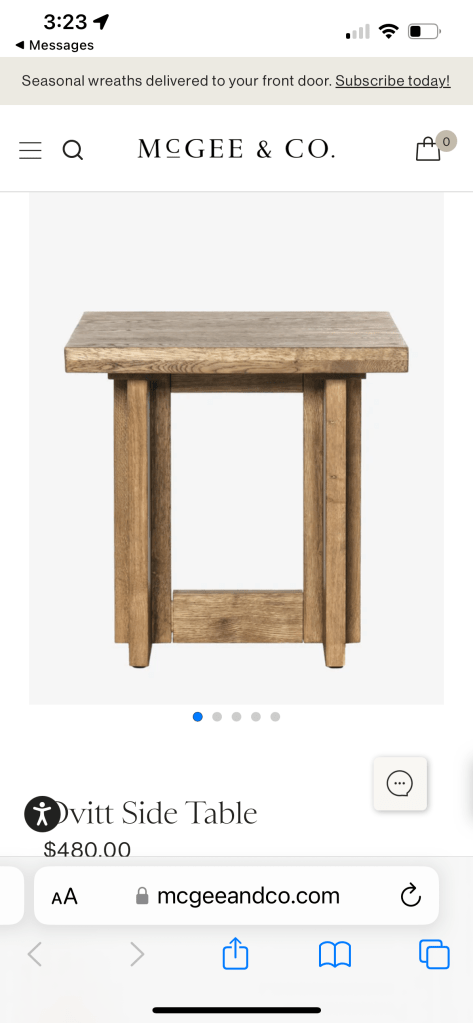
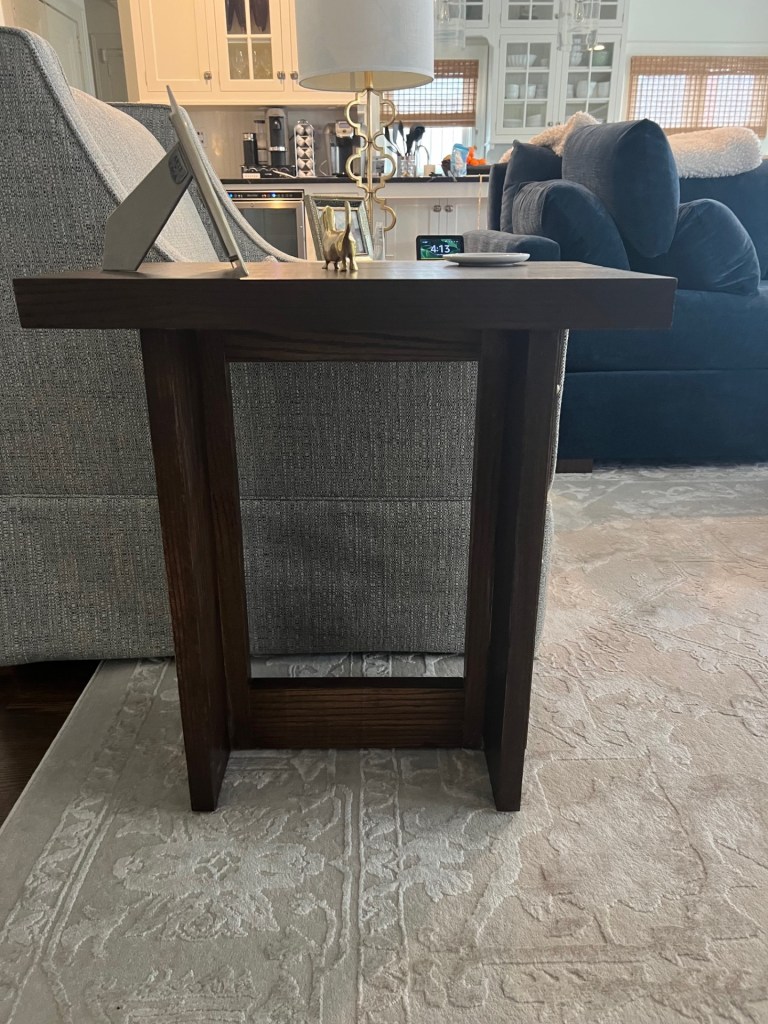
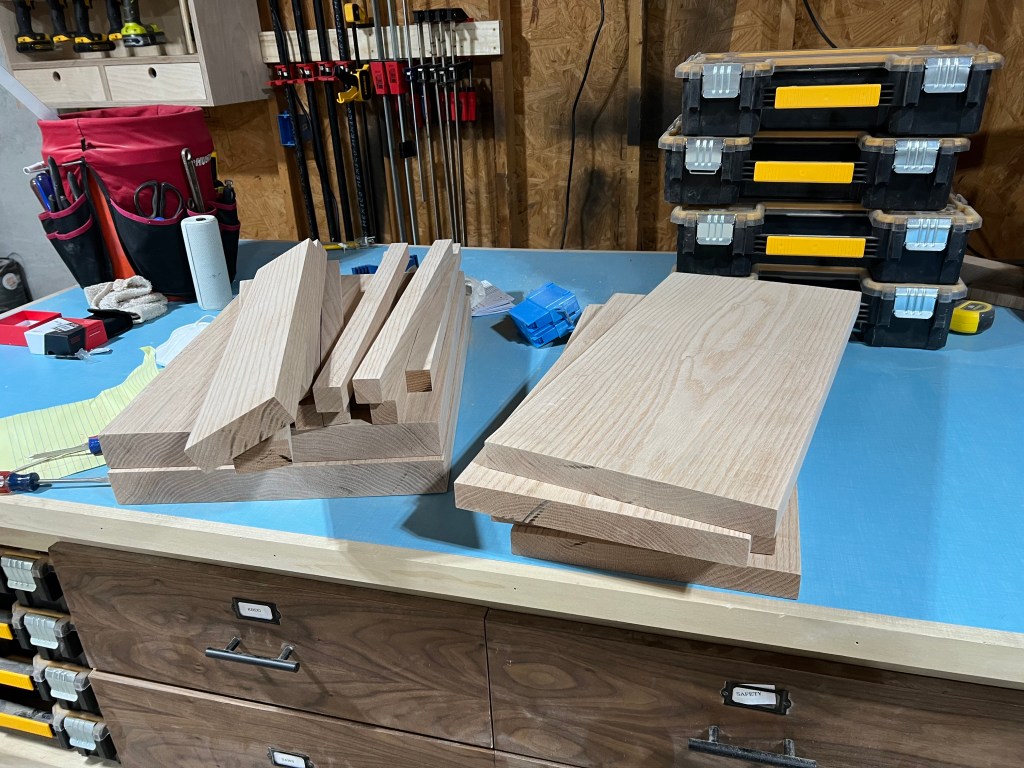
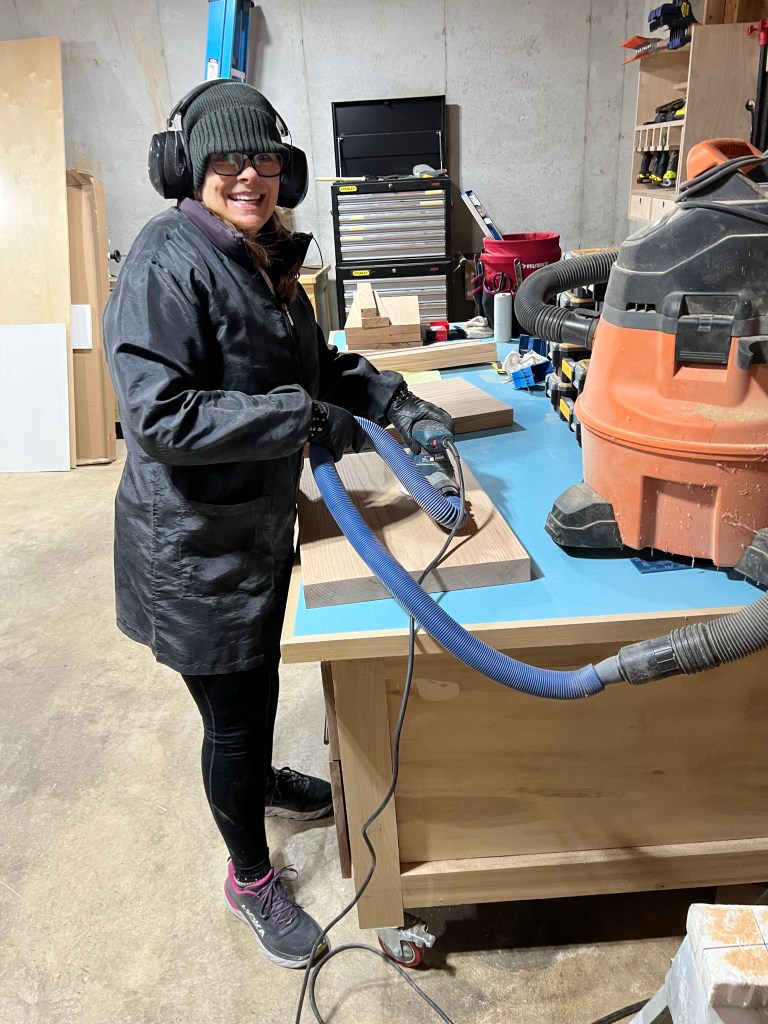
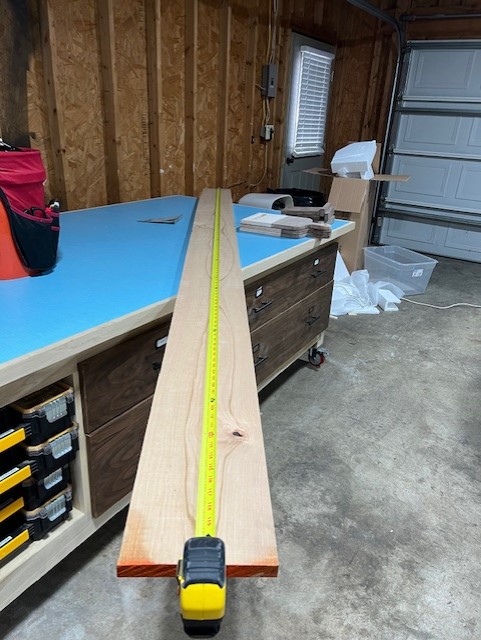
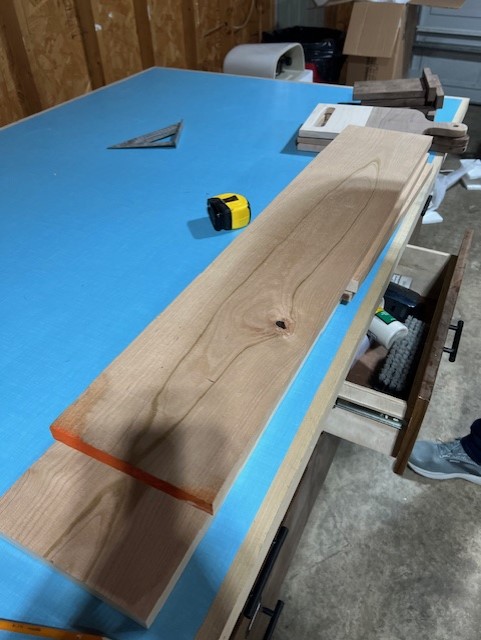
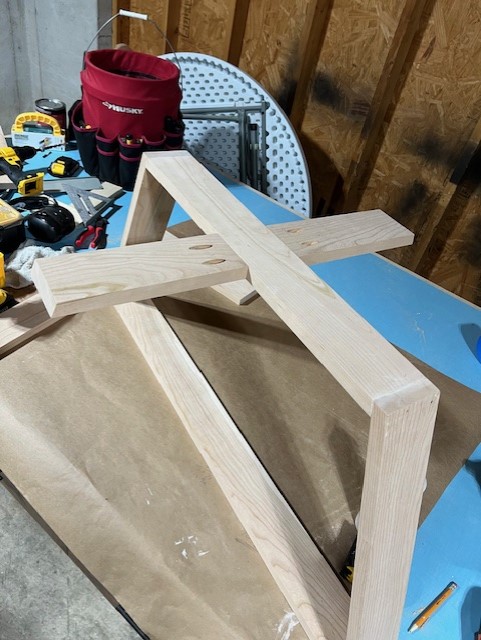
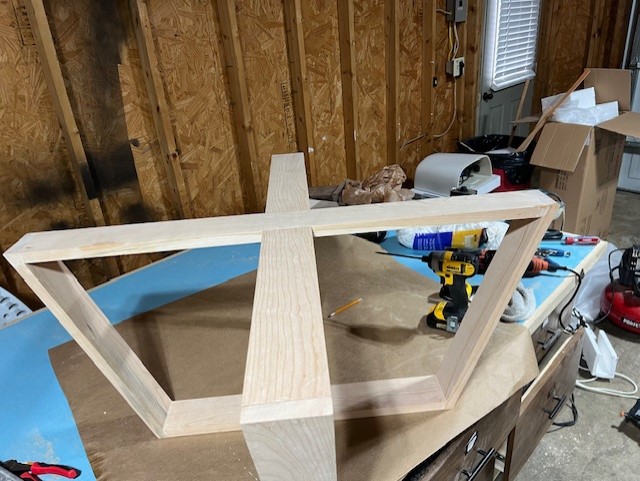
Now, back to our other project. In our Atlanta house, we recently got a new sofa and brought our old sofa up to Big Canoe. Our new sofa is wider than our old sectional, so we need some fairly narrow end tables for it. I’ve been looking high and low and just didn’t find anything I liked. So we’ve decided to build them! We bought some gorgeous 2″ thick, 10′ long, red oak boards for the end tables. They weigh a ton! Initially I wanted to do some nesting tables, but the depth of the boards and the challenge of doing a miter cut on such thick material gave us pause. So back to the drawing board! After getting some inspiration from the folks at McGee&Co, we’ve come up with the design for the end tables. And I’m in love!
After we finalized our design and figured out all the cuts we needed to make, we braved the frigid 18 degree weather and got busy. We made all of the cuts, then while Keith was planing down some of the pieces from 2″ to 1 1/4″, I started sanding. We’ve both managed to avoid frostbite and here’s where we are. I’m a vision, aren’t I?
We still have to assemble, stain and poly, but we’ve made a lot of progress.
I hope you all had a great Christmas and are starting the new year off happy and healthy! Keith and I took a break from projects for the holidays and went to Louisiana to see my family. We came back up here when we got back to Georgia and have been busy ever since! I thought I’d update you on all of our projects. This weekend in particular has already been quite busy, so buckle up for a LOT of pictures of what we’ve been up to.
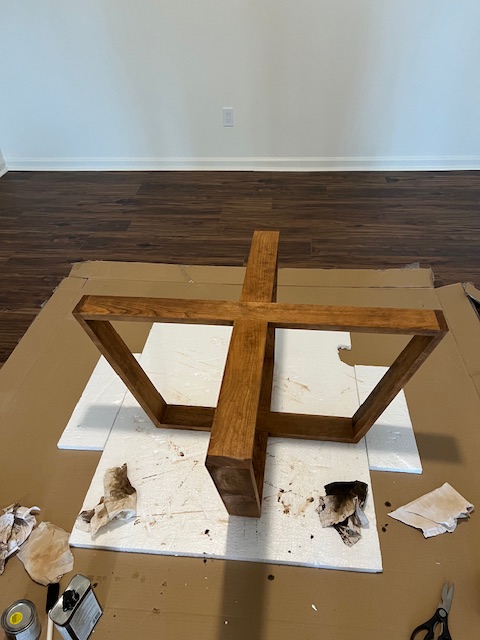
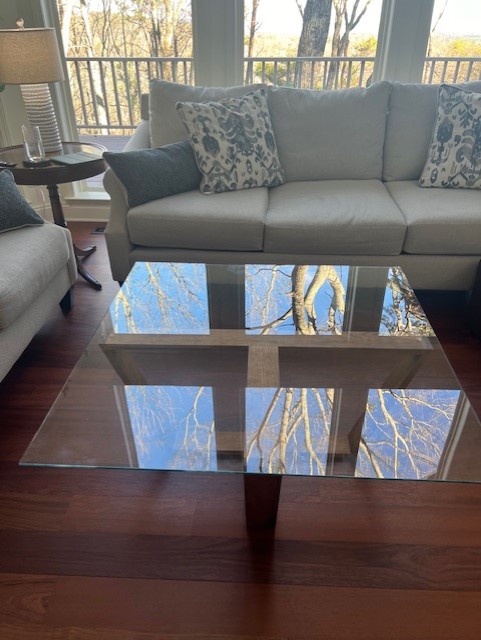
You may have noticed from my last post that we are a little short on furniture in this house! I’m trying to be thoughtful about what I buy, but last week we actually made a piece of furniture! Our good friend and realtor, Sheila, had a 40″ piece of tempered glass she didn’t need, so we built a frame for it and made it into a coffee table! For about $25 of solid cherry, we cut a few boards with some 20 degree angles, had an interesting time putting said angles together to make a box, and put two of those boxes together. Then it was time for sanding, staining and finishing! Here it is in progression.
Here is the finished product! We reoriented our sofas and I like the layout a lot better. The coffee table looks great! Sorry for the glare on one of the pictures – I am clearly not a professional photographer nor a professional blogger!
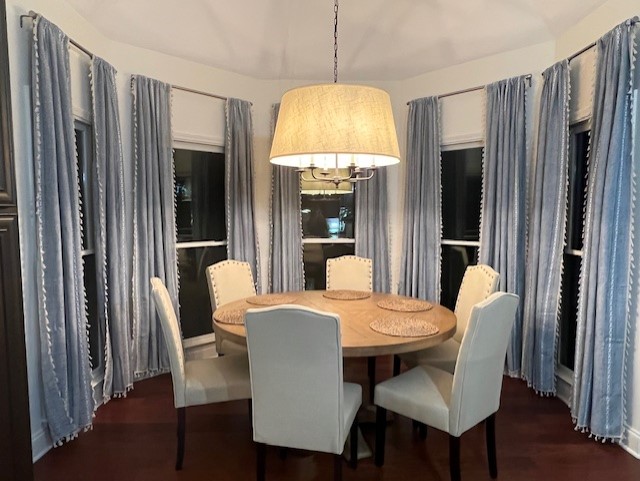
Next up was the kitchen. I had to go back to Atlanta for a couple of days. While I was in Atlanta, I had lunch with our good friend Anna who is the reason I started volunteering at Shepherd Center where I now work. You won’t remember this, but Anna gave us a light fixture for our Scaly Mountain house that she didn’t need. It worked great there. Well, Anna had another light fixture she had bought for their new house and didn’t need. And she generously gave it to me for here. When I walked in with it, Keith was a little taken aback thinking it was huge. But it looks amazing in here! So before we got working on the kitchen today, we hung the new light fixture and hung curtains in our dining area. I LOVE the new light fixture and the curtains! It really warms the room up and I couldn’t be more thrilled! Thank you again, Anna!
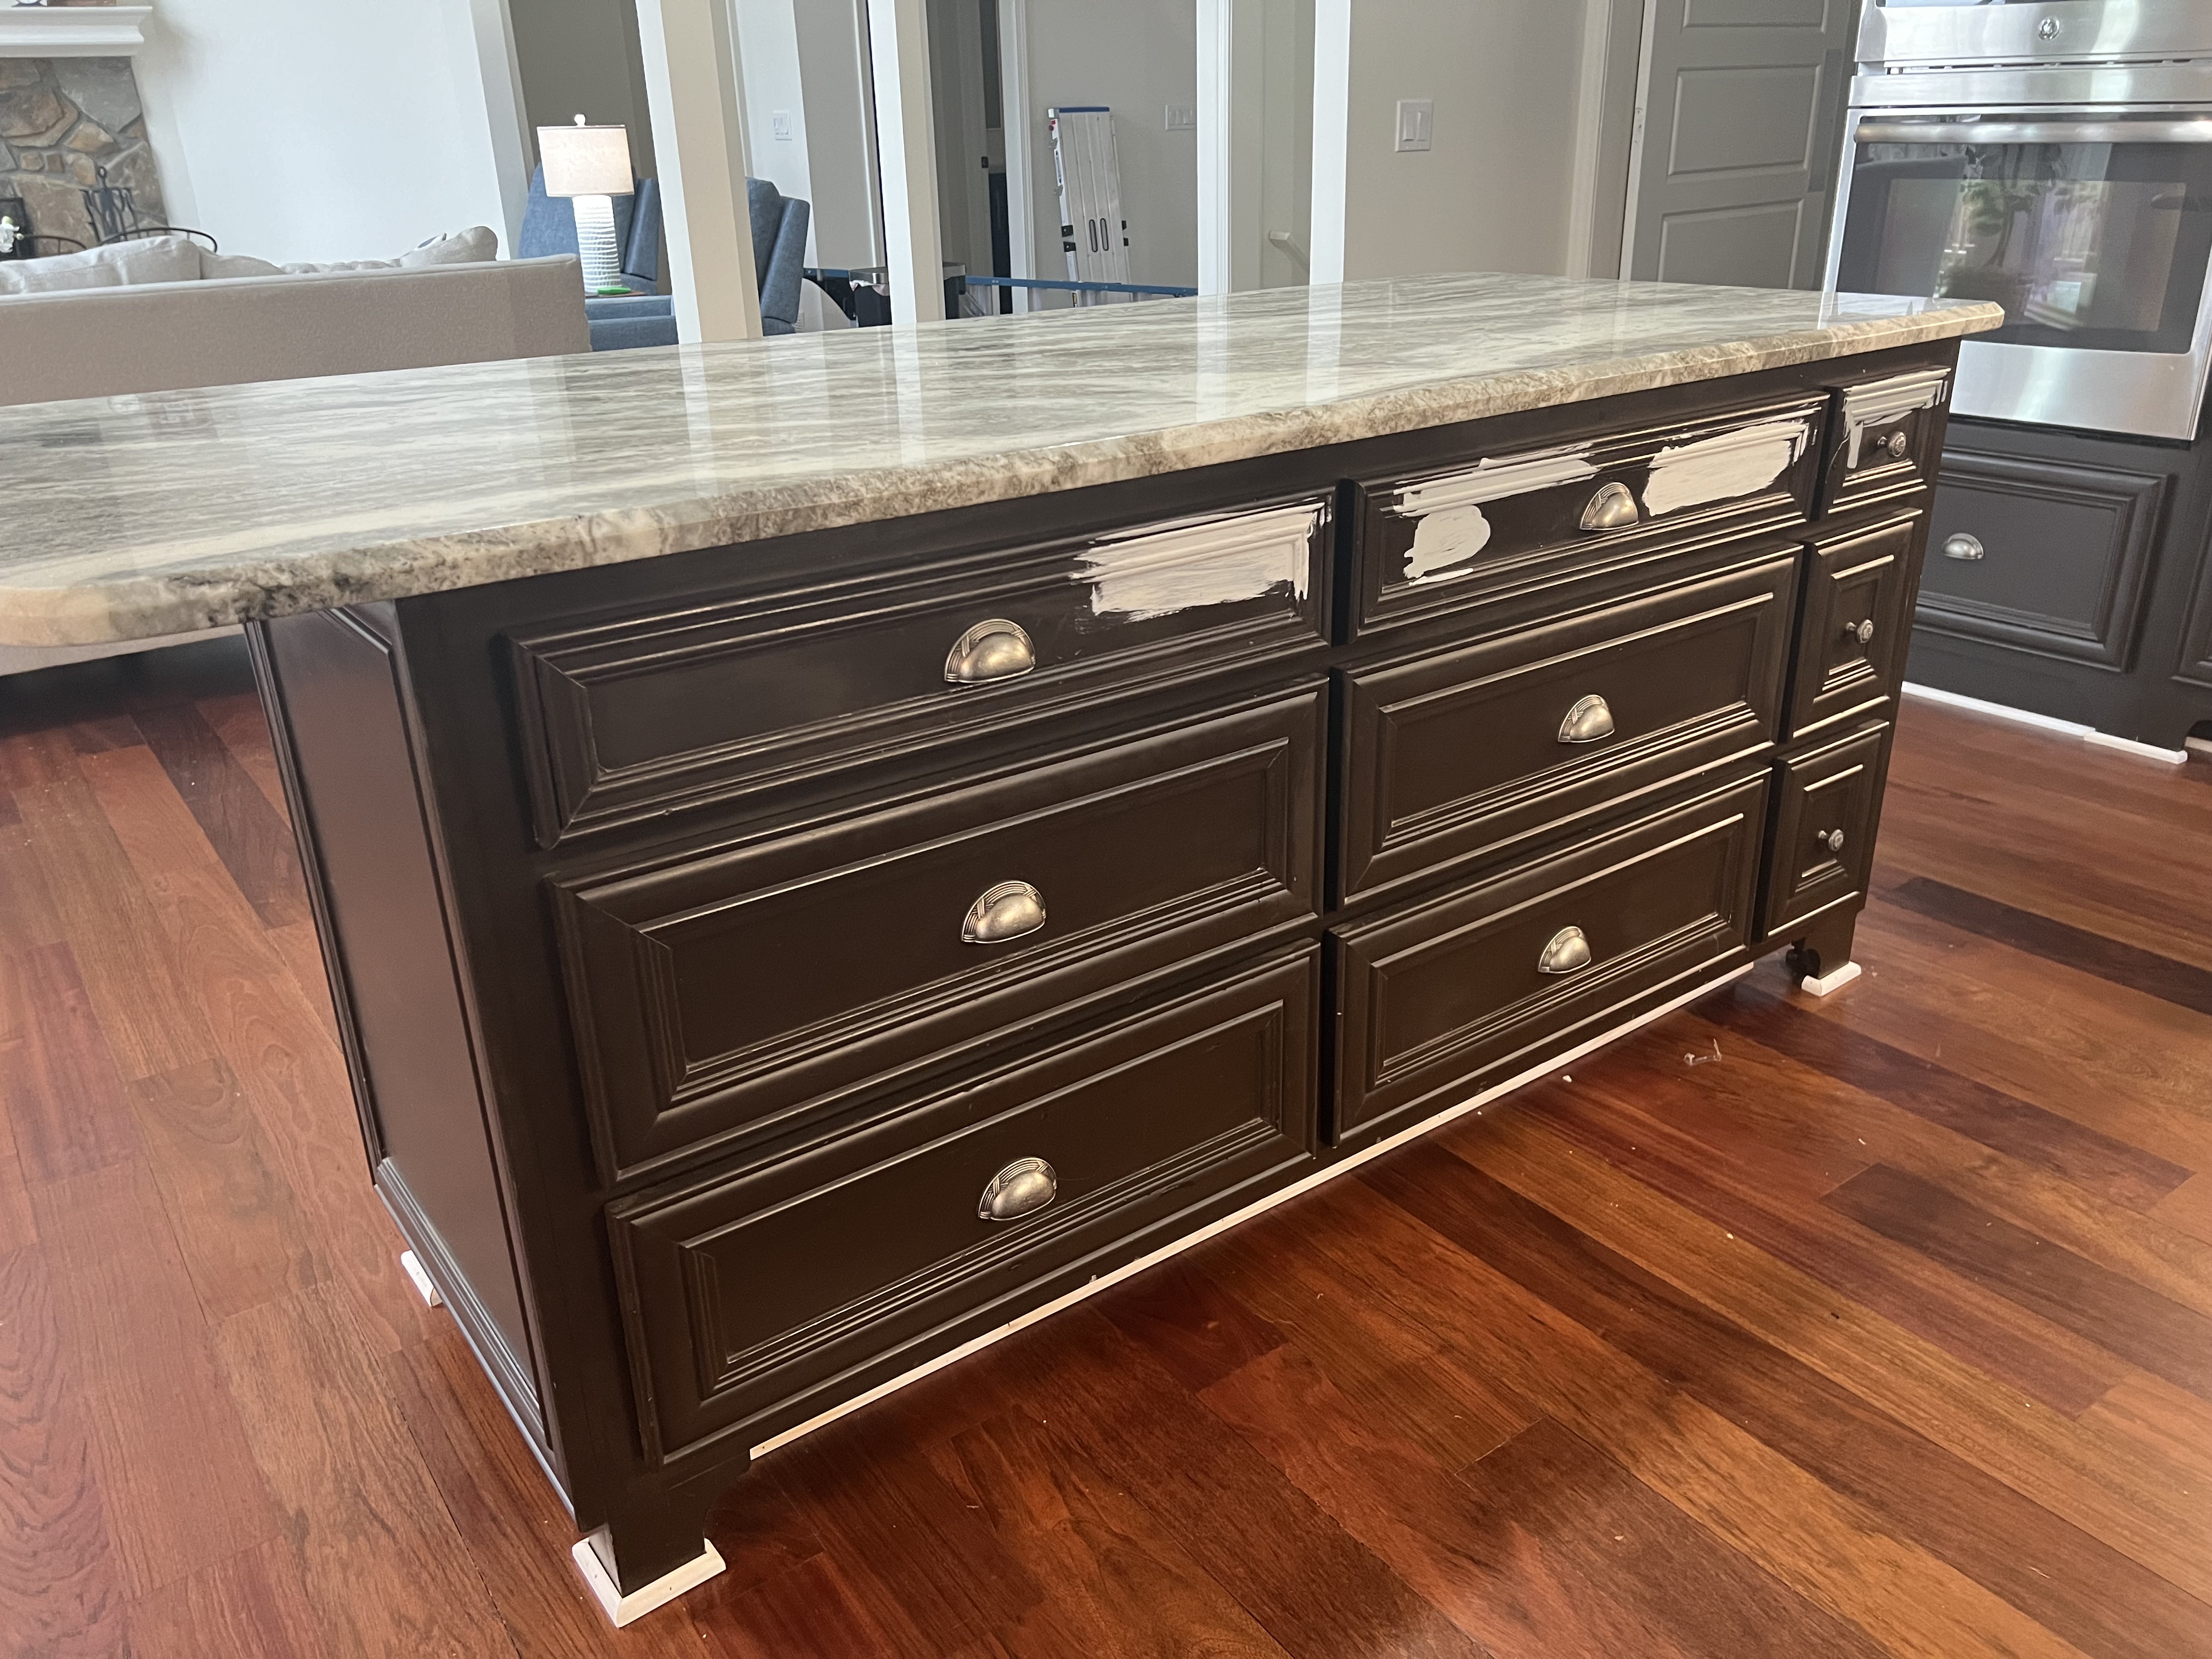
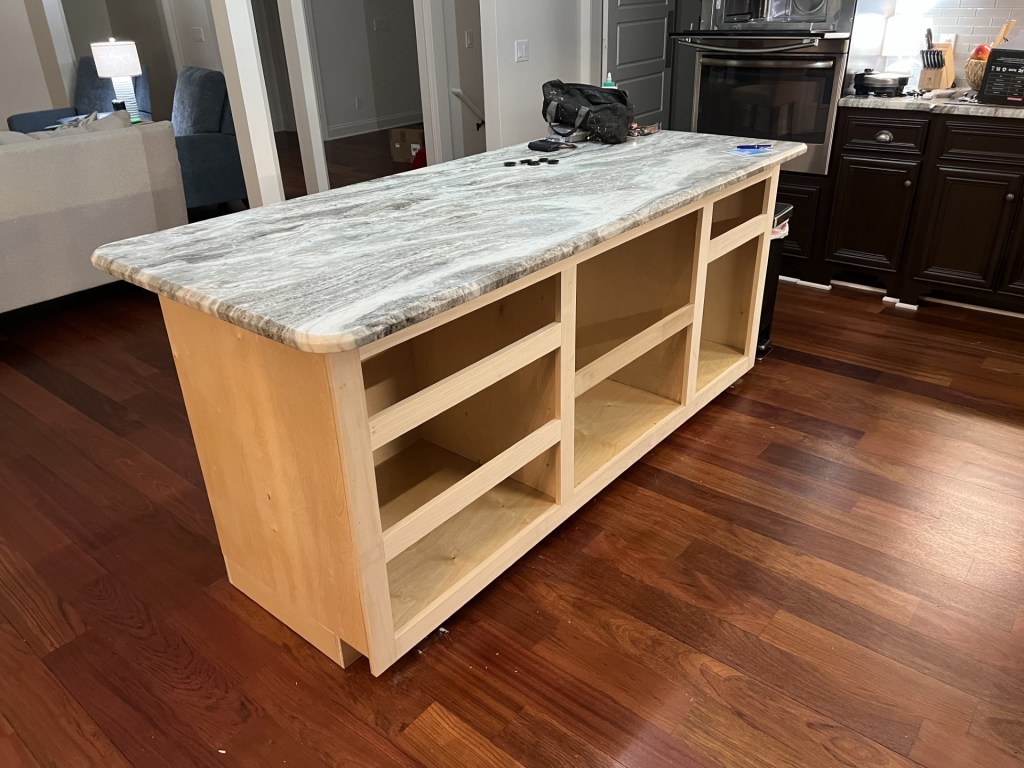
Back to the kitchen. The existing island sucked. There’s just no other word to convey how crappy it was. It was a stupid layout, had a weird overhang on one side, drawers that were flimsy and stuck and made horrible noises when you pulled them out, etc. So we spent a lot of time designing what all purposes we wanted the island to have and Keith started building it. We’ve also got plans for the rest of the kitchen but we wanted to get the island done first.
Our goals for the new island: 1) pull out trash can, 2) a deep drawer with dowel dividers where I can store my dishes, 3) lots of drawers for storing cooking utensils, tupperware, etc.
Because we are building this custom, we were able to really make it be whatever we wanted to be. As I mentioned above, there was a weird overhang on one side of the island – not really big enough for a counter stool. So we decided to use that extra overhang to make our island bigger. Because bigger really is better! While I was in Atlanta, Keith built the boxes and bases for the island.
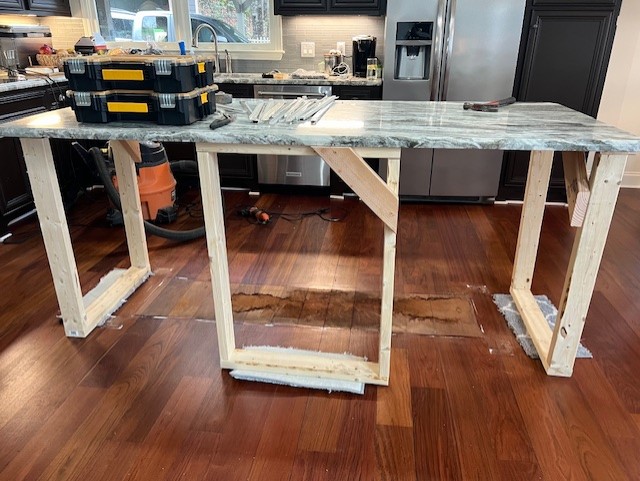
One thing we were stewing over was how to get the granite off of the existing island and be able to reuse it for the new island. It was a conundrum! After discussing it with some friends who came up on NYE, we came up with the idea of jacking it up somehow. We ultimately decided to build some frames out of 2×4’s to support the granite while we demoed what was below it. I’m not going to lie – it was a little scary as we were doing it, but…spoiler alert…it worked!
Here are a few pictures of the “before” of the island. I even took a pic inside one of the drawers so you can see how awful it was.
So let’s start with how we prepped to get the granite off. First, we took out all of the drawers and drawer slides . Then we used Keith’s oscillating saw (which we fondly refer to as the badass saw) and we cut through the silicone that was holding the granite in place. Once we got through most of that we were able to pull the outside panels off the old island.
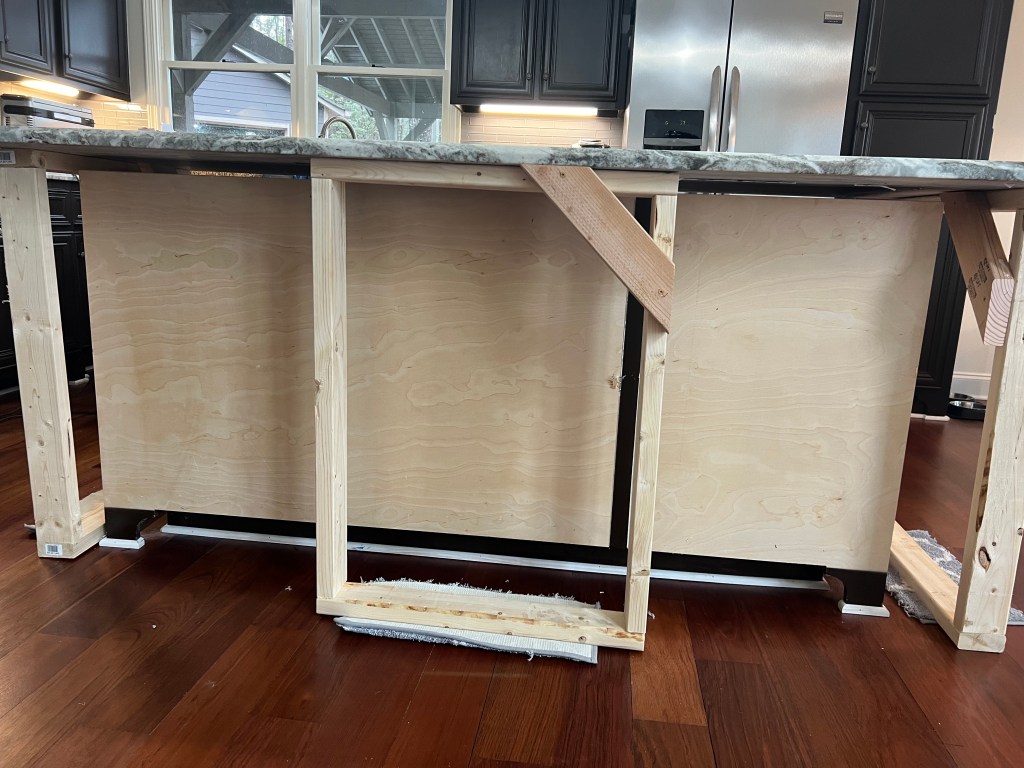
Once we had the granite separated from the cabinet, it was time to put in some 2×4 frames that Keith built to hold the granite. This is where it got a little nerve wracking. Keith lifted the granite (and thankfully didn’t give himself a hernia) while I slid the 2×4 supports underneath 3 of the 4 sides of the island. Once it was stable, we literally demoed the boxes underneath. Scary stuff here, folks!
And here is the scariest picture of them all. The granite being held up with nothing underneath it!
While I steadied the granite, Keith slid the bases in, leveled them and secured the to the floor. Then he slide the boxes on top of the bases and secured them to the bases, while I stood holding the granite in place! Good times… Because I was holding the granite in place, I didn’t get pictures of the “during”. But here it is with the boxes in place!
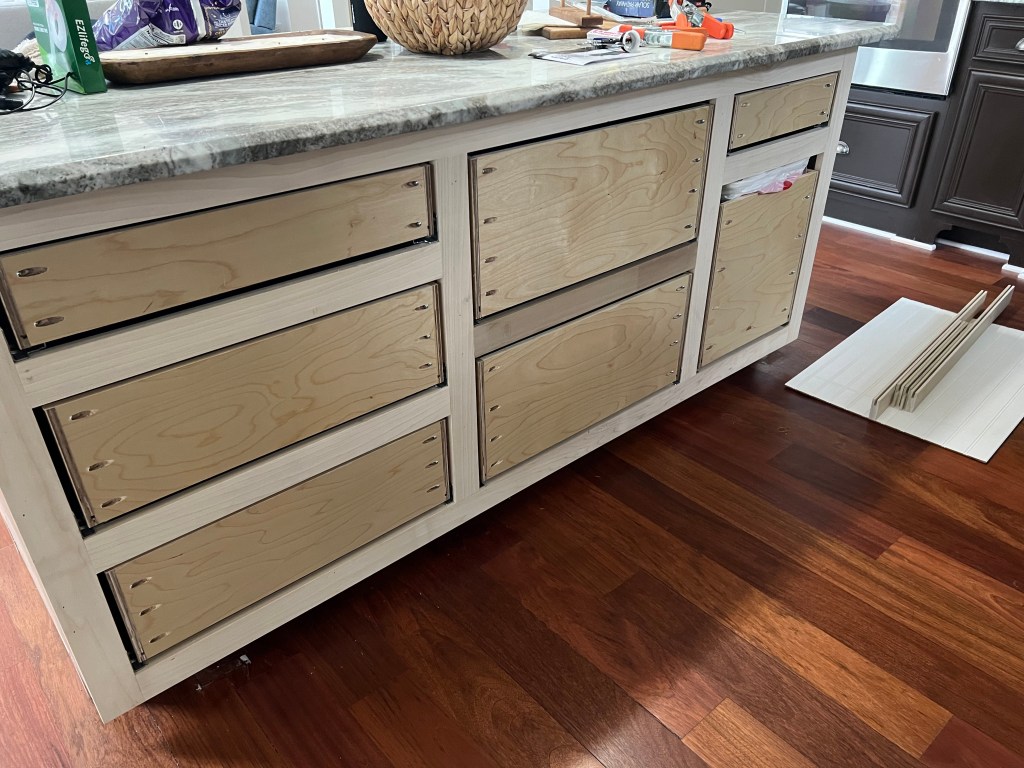
Next up was the face frame for the front of the cabinet. We built that this afternoon and set it in place.
Voila! We have an island. We set the granite where it needed to be and used silicone caulk to hold it in place. Tomorrow we will work on the drawer slides and drawers and it should be functional again either tomorrow or later next week when we come back up! I’ll show more on the inspiration for the kitchen drawers and the rest of the kitchen changes later. But already we are both so thrilled with how it’s looking!
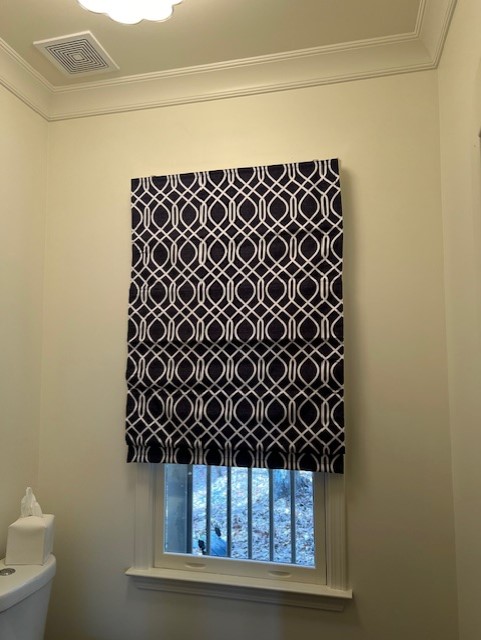
One little project I did yesterday while Keith was working was to put up a new blind in the powder room. Realistically a Roman Shade is probably not the most practical for a powder room, but our house is so low down the hill and private that I didn’t really worry about practicality as much as I did the aesthetic of it! Plus it’s super easy to pull down and raise back up.
Before, I go, I wanted to share a picture of the morning sunrise view we get most mornings. It really is beautiful! Enjoy!
Hi everyone! Sorry I’ve been MIA but we’ve been busy! Since I last posted, all of the interior painting has been finished, the floors are finished, a lot of repairs outside have been made, and we’ve been trying to get the place put together!
We have made a lot of progress on the interior, and I’ll try to write a post later this week with some more pictures.
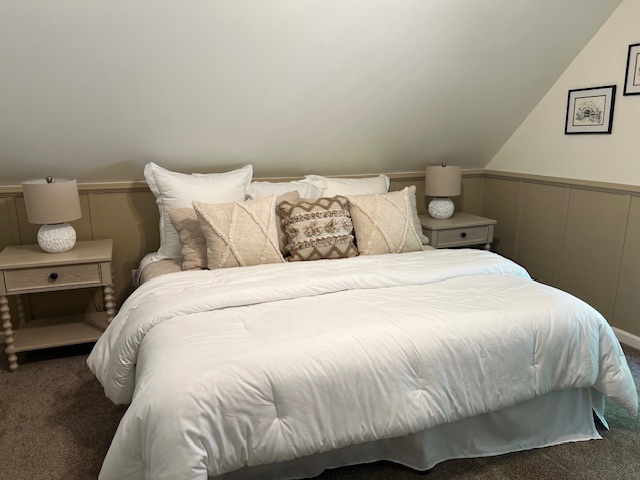
Let’s start upstairs. As I mentioned in a previous post, I don’t love the carpet up there but it’s almost brand new and in good shape so we will leave it for now. In the upstairs bedroom, we’ve put a king bed. It has a slanted wall so we don’t currently have a headboard. At some point we will build one that fits the space, but in the meantime we’ll just leave it as is. I’ll share pictures of the space later this week once I get the bedding on the bed. The bathroom was painted, a new mirror was installed and a new shower curtain. The vanity was fine as is so we just updated the towel bars in there. There is an ugly overhead light that I need to swap out but that will happen in due time. Here is the before and then the after.
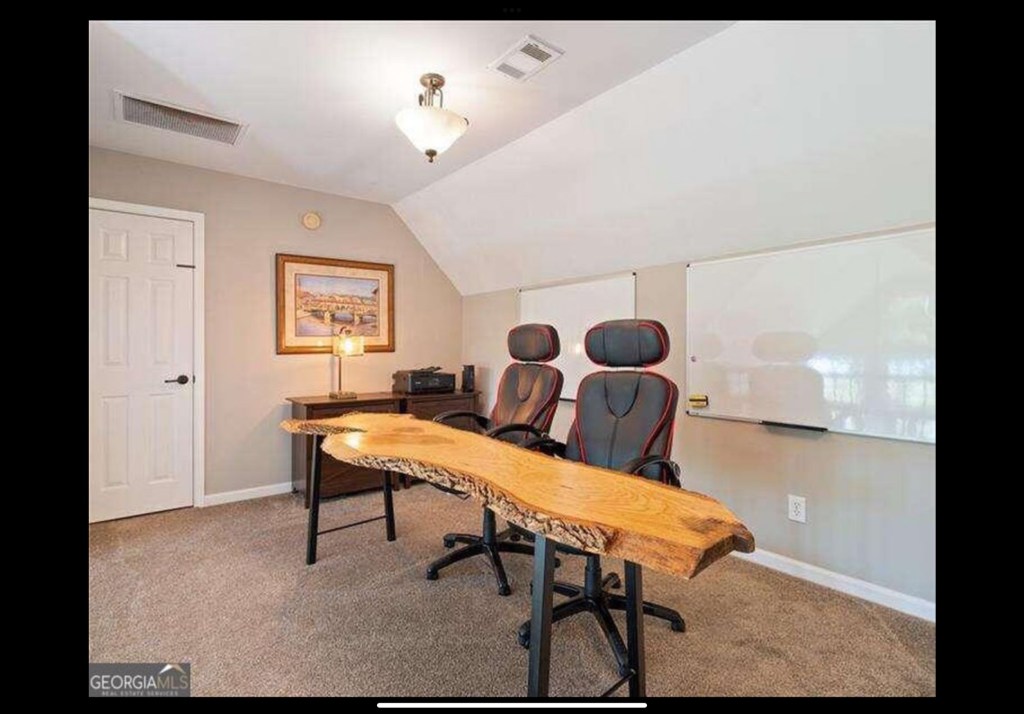
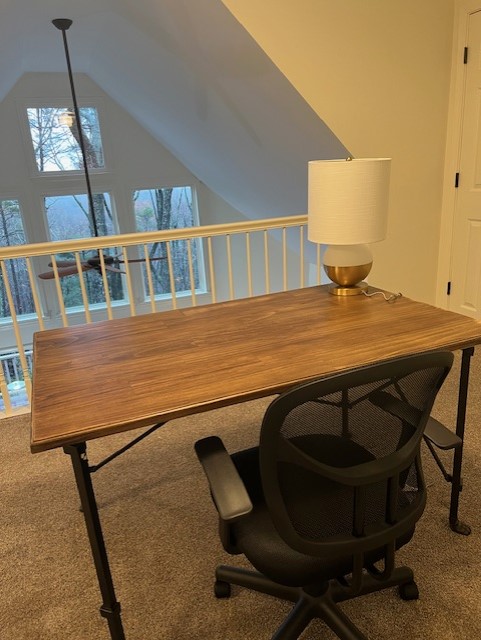
Outside of the upstairs bedroom is a large alcove which will serve as Keith’s office. We’ve replaced the lighting up there and painted the railings. Keith’s office has a beautiful view out the windows in the den. I found his desk on Facebook Marketplace. The top of it had to be refinished, so I did that over the past comple of weeks. I am still looking for some sort of credenza and we need LOTS of art for the house, but that will happen in due time.
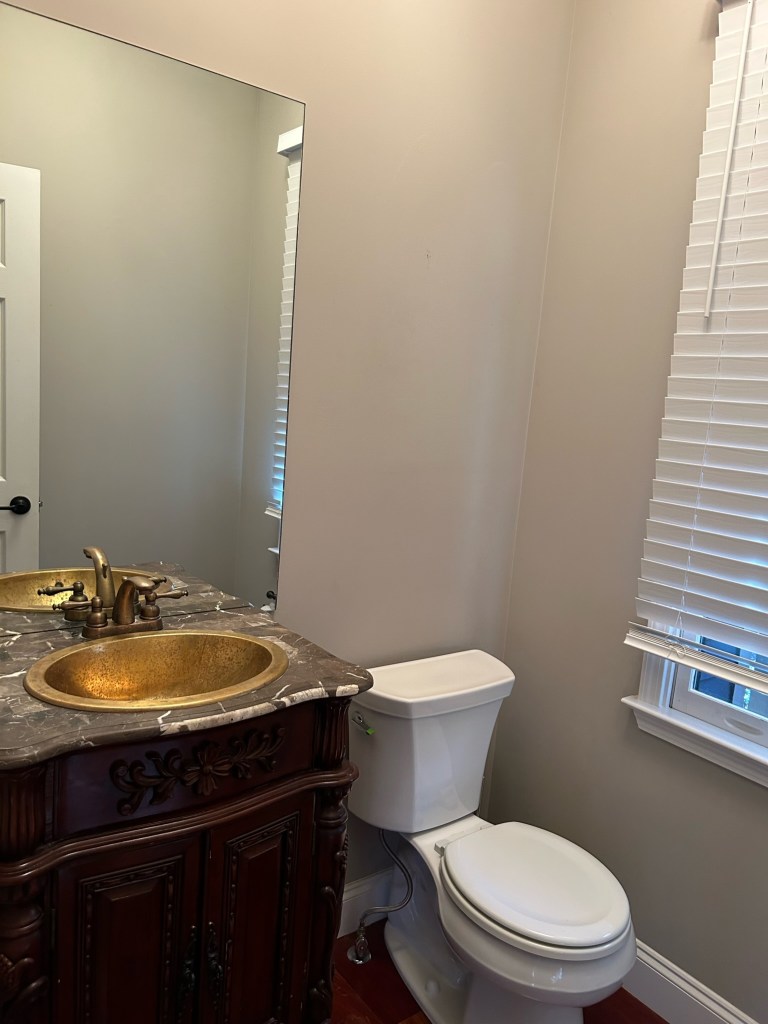
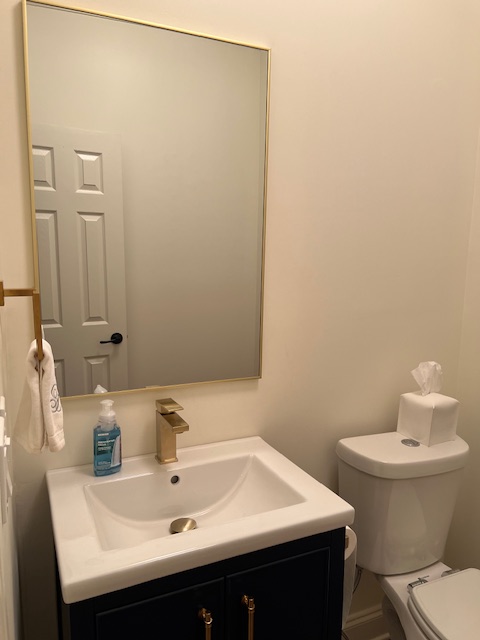
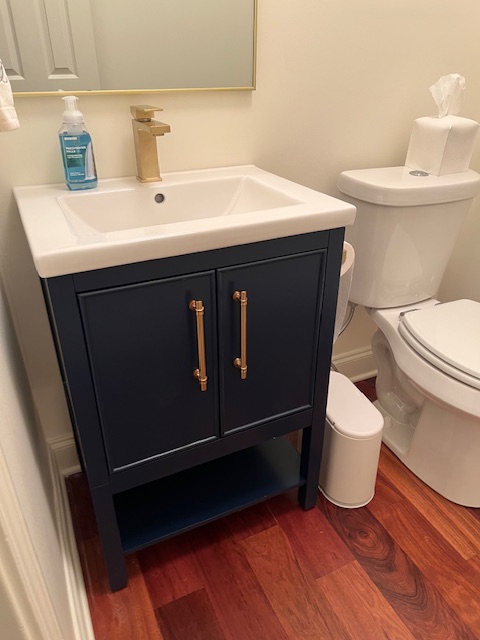
Moving down to the main level, one of our first projects to be completed was the powder room. It had very outdated lighting, similar to what was in the upstairs office before. It also had a very ornate vanity which was very much not our style. We’ve replaced the vanity, mirror, toilet and lighting. And it looks terrific! Again, it needs some art on the walls, but in the meantime, here’s the before and after.
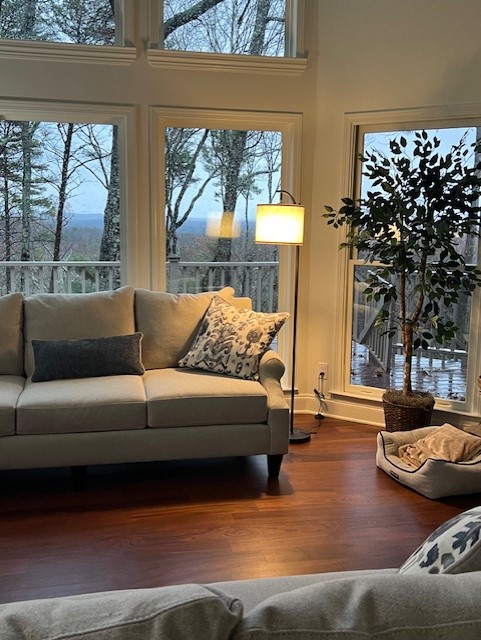
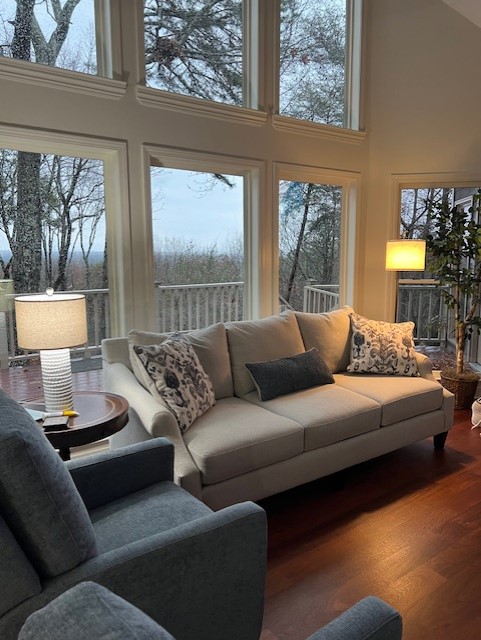
Here are a few pictures of the den. You may notice we’re lacking a coffee table and end tables. We plan to build our coffee table in the new year, and we haven’t yet decided if we will build or buy end tables. Please note Keith enjoying a beverage, using our cooler as his end table! ;) Also, if you remember how ugly the front door was before, the last picture shows how it looks better (still not beautiful but better) painted white without the weird little medallions around the windows!
The kitchen deserves a whole blog post on its own. But in the meantime, you can see we did update the lighting and have it as functional as we can for the time being. We’ll be doing a lot of work in the kitchen in the new year. I promise you, the photos of the kitchen don’t do justice to how bad it is. It’s not very functional and the cabinets look terrible up close.
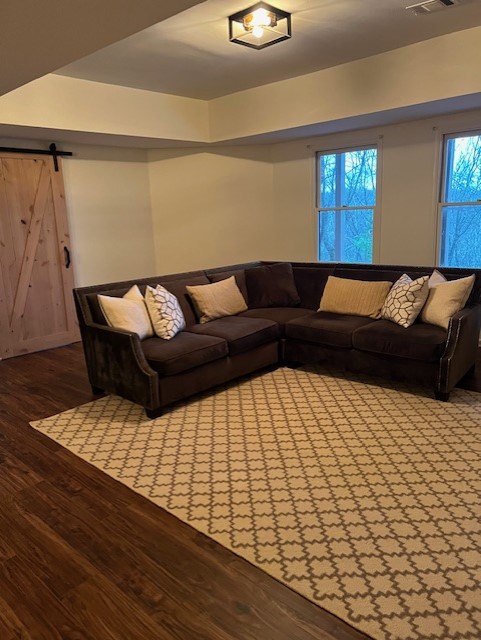
Moving downstairs, the paint job made a big difference in the lower level. We need lots of furniture and some new lighting down there, but it’s not our focus for now. As a reminder, here are the befores of the den downstairs.
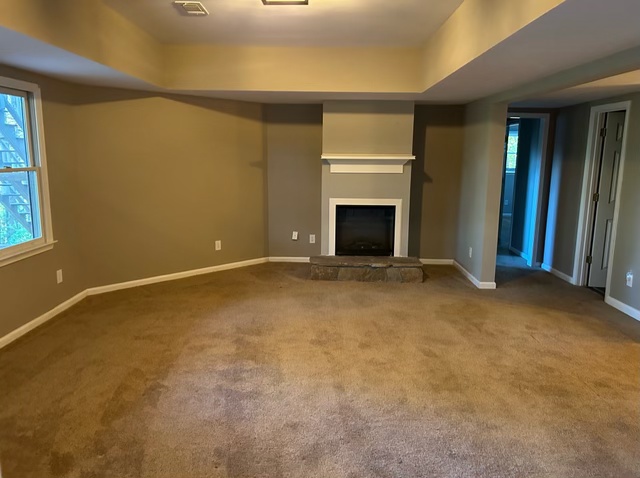
And here are some afters. We have some plans for the fireplace, but just removing the mantle helped aesthetically.
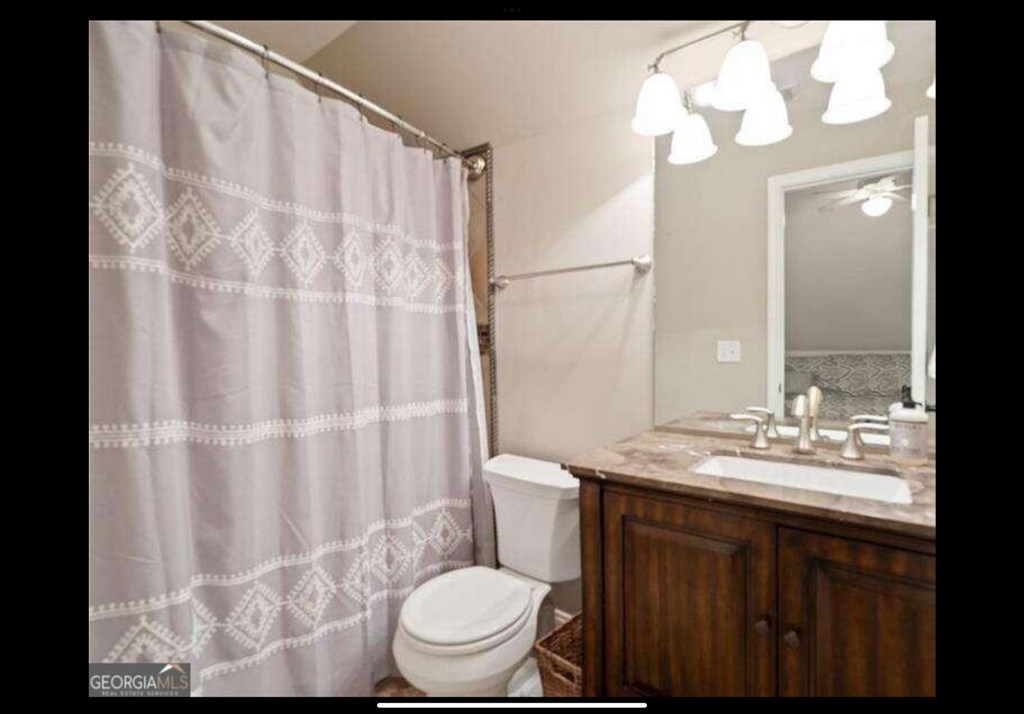
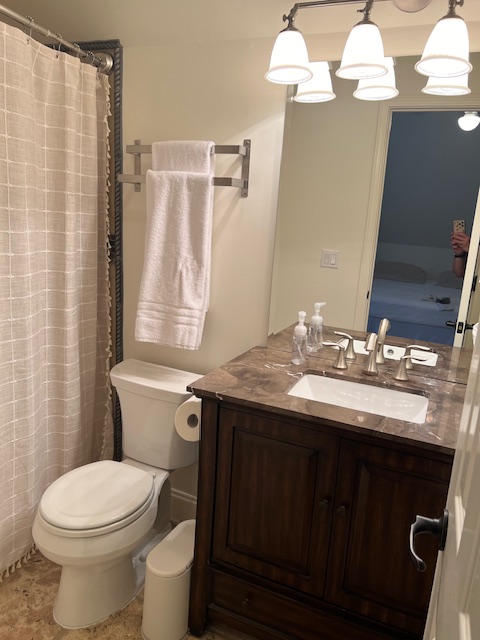
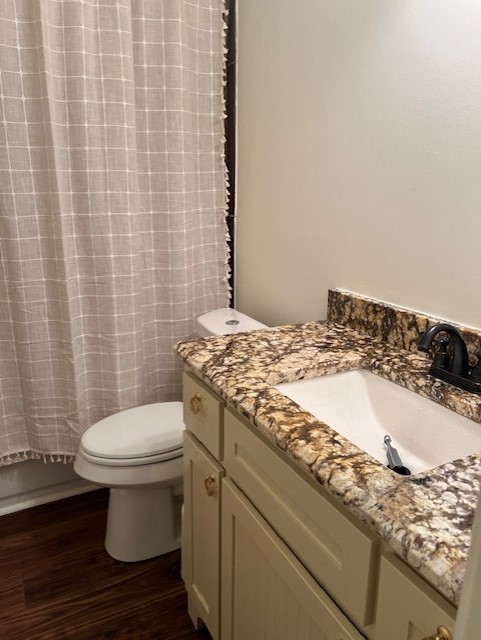
One thing Keith really detested was the vanity countertop in the downstairs bath. Let’s be honest. I’m not a huge fan, but I didn’t really want to pay to replace the vanity as it’s a fairly specialized size. So I had our painters paint the vanity and it looks a thousand times better. We’re still missing a mirror in there thanks to our new one arriving broken, but it still looks so much nicer. Enjoy the before and after.
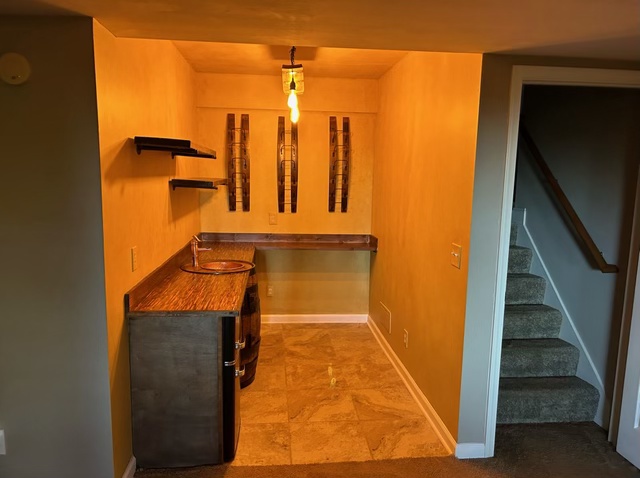
Lest I forget the bar area downstars, we’re not 100% sure what we’re doing in there yet but here’s a quick before/after.
You may notice I’ve not really showed any of the bedrooms. I’ll do that in another post once I get all of the beds with beddings. We still have no nightstands other than the master bedroom, so all of the lamps are on the floor! Haha! I’m on a lookout for those now, so if you’re local to Atlanta and you have any nice looking nightstands you’re looking to get rid of, give me a shout! ;)
If I don’t post anything else before Christmas, I wish you all a very Merry Christmas. We didn’t send out cards this year because we’ve just been too busy. But I promise you’ll get one next year!
Last time I shared pictures of just the main level, so I thought I’d show you some of the upstairs as well as the basement. As I write this, changes are already taking place. I mentioned that we had the floors on the main level refinished, and they look fantastic! If you’re in the Atlanta area and you want a great flooring guy, let me know and I’ll introduce you to Craig O’Riordan at BEC flooring. They truly did a fantastic job! But their work wasn’t just on the main level. They also refinished the hardwood steps going upstairs, and they removed all of the carpet and flooring on the lower level and replaced it with LVP (Luxury Vinyl Planks). It looks soooo much better! I’ll show you in a minute. One interesting find they had when pulling up the old carpet is that they found SCORPIONS. Seriously? I had no idea they were a thing in Georgia and it totally creeps me out! Thankfully without the carpet there they shouldn’t have anywhere to hide.
We are also having the entire house painted, which is already making a huge difference. I’ll take some pics as I can this week and update you soon.
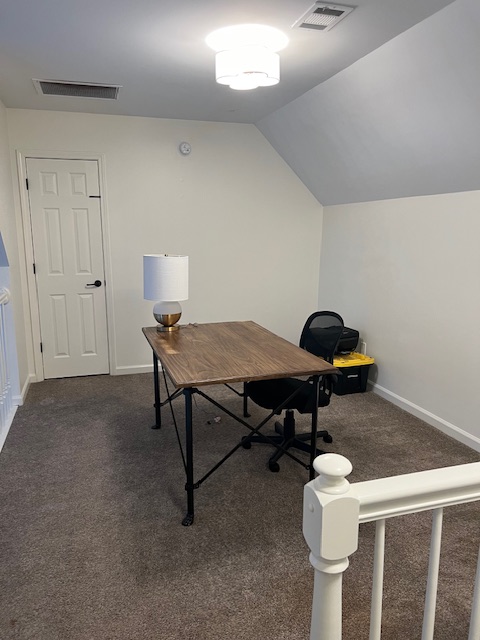
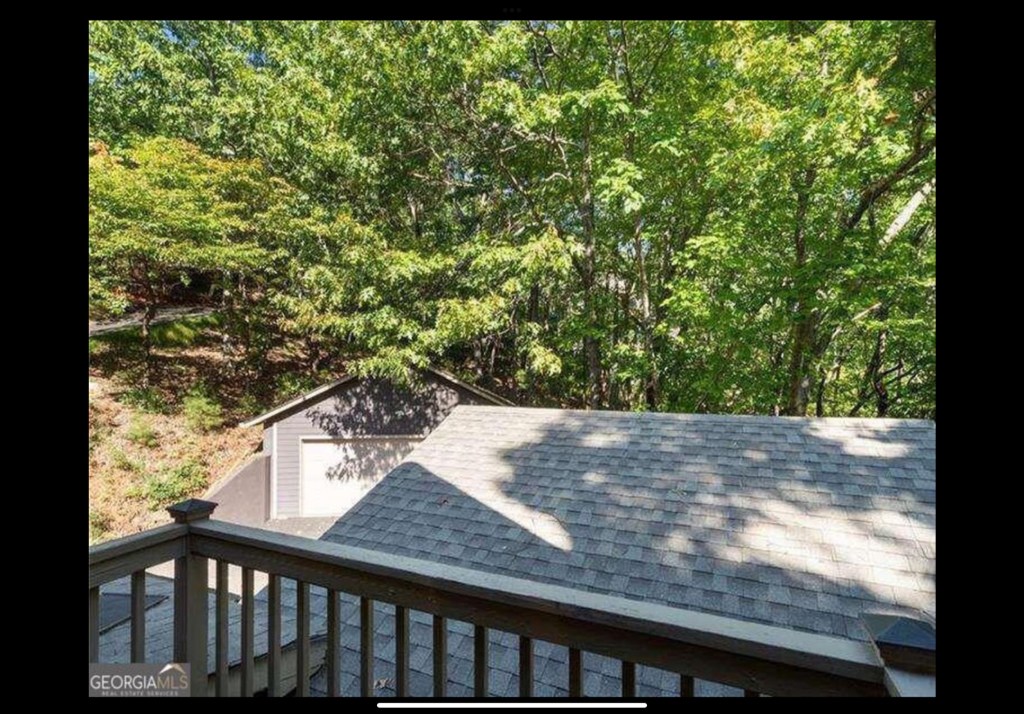
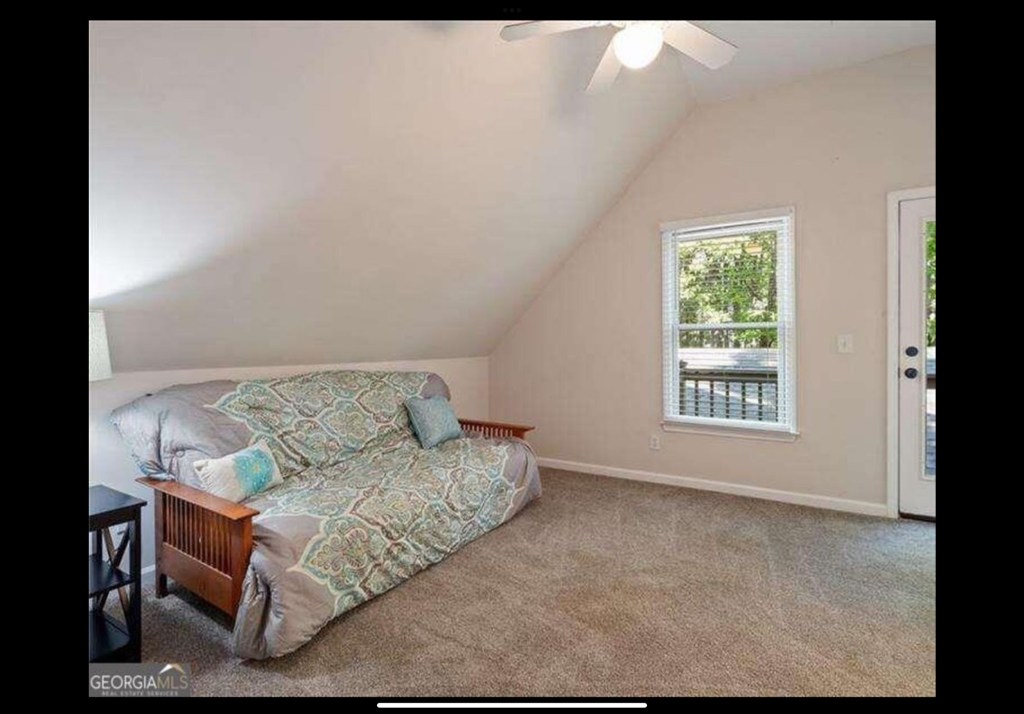
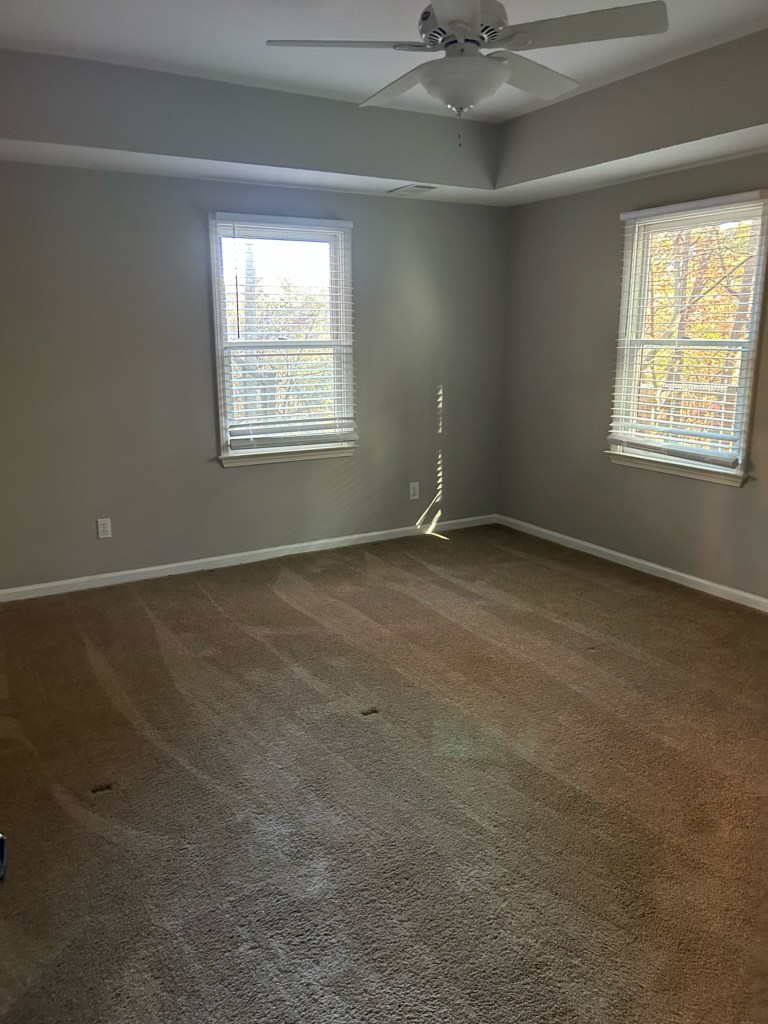
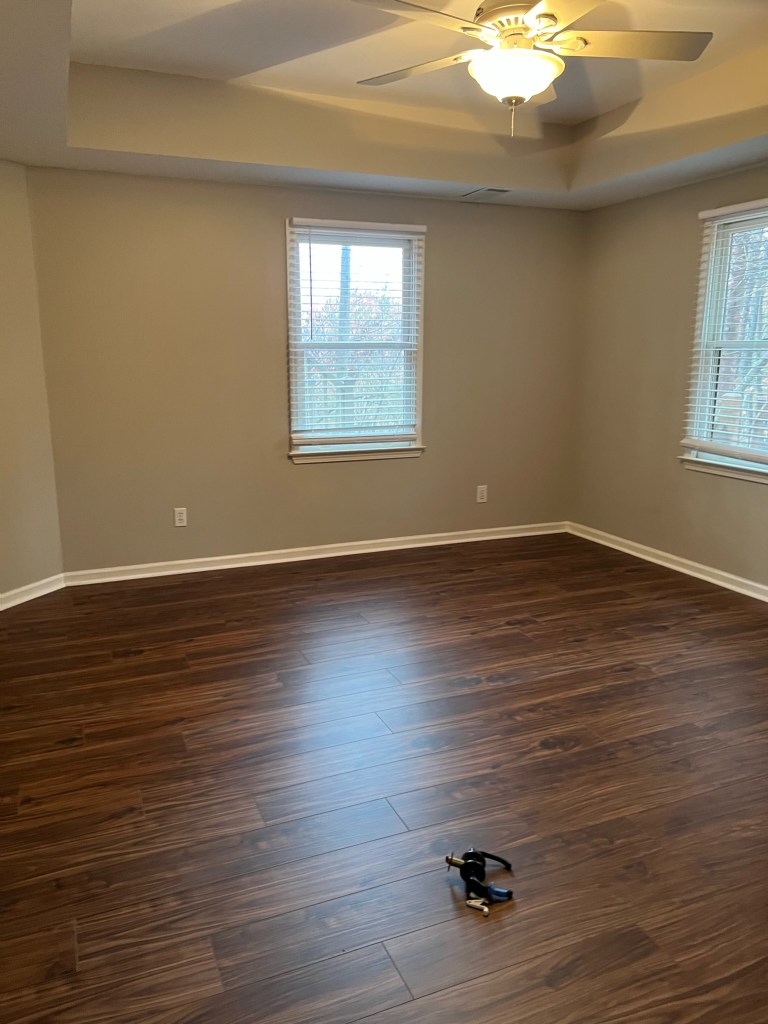
Let’s start with upstairs. When you go upstairs, there’s a lofted area that you can see was used as an office before. That’s our intention as well. I found a desk on Facebook Marketplace for Keith and will refinish the top of it when I get time. So you’ll see more about that in a future post. The lofted area will be getting new lighting soon, like much of the rest of the house! Next to the lofted area is a bedroom with an ensuite bathroom. We’ll be putting a king bed in there and use this as our primary guest suite. It also has a weird little balcony (picture below) off of the room. Not sure why, but we’ll leave it as is for now. I don’t love the carpet upstairs but it’s new and we decided to not spend the money to replace it. Note that all of these pictures were taken from the Zillow listing. This isn’t my furniture.
Moving downstairs, you’ll see that there’s a lot of space! Starting in the room that the previous owners used as a workout room. Our plan for this space is to make it a game room – think ping pong, darts, foosball, etc. It’s a low priority room so as I see things for a good price I’ll get them for that room. These pictures are from before and after the new flooring went in. Unfortunately we did have to remove the flooring in there and put in new LVP to make it all match.
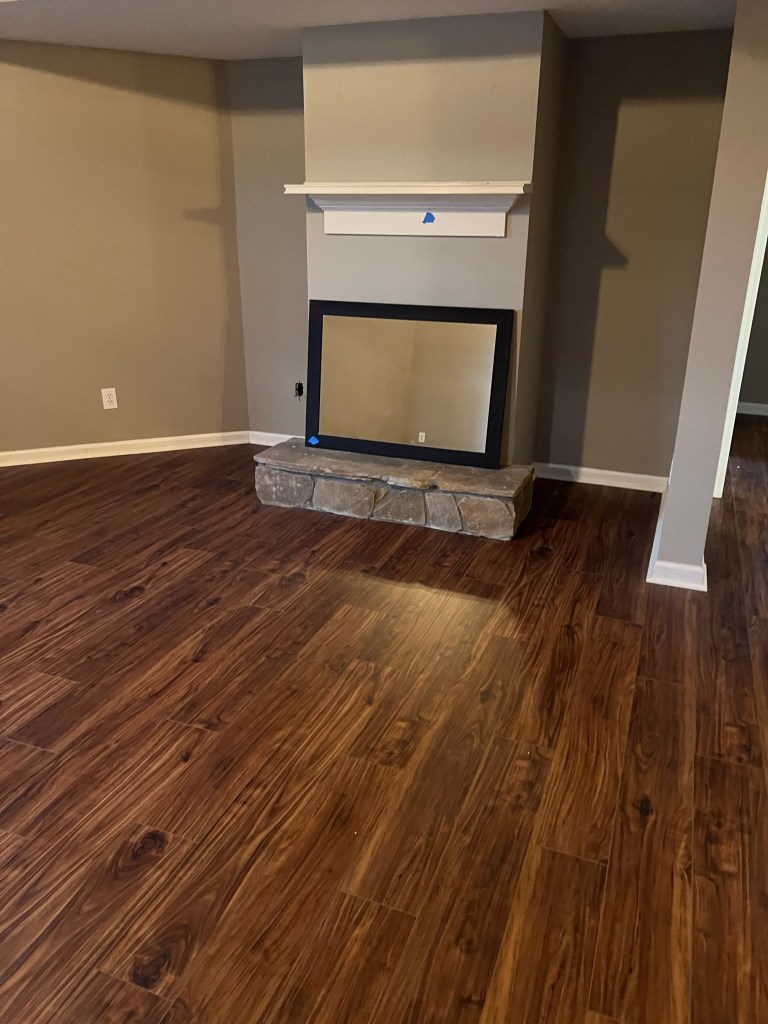
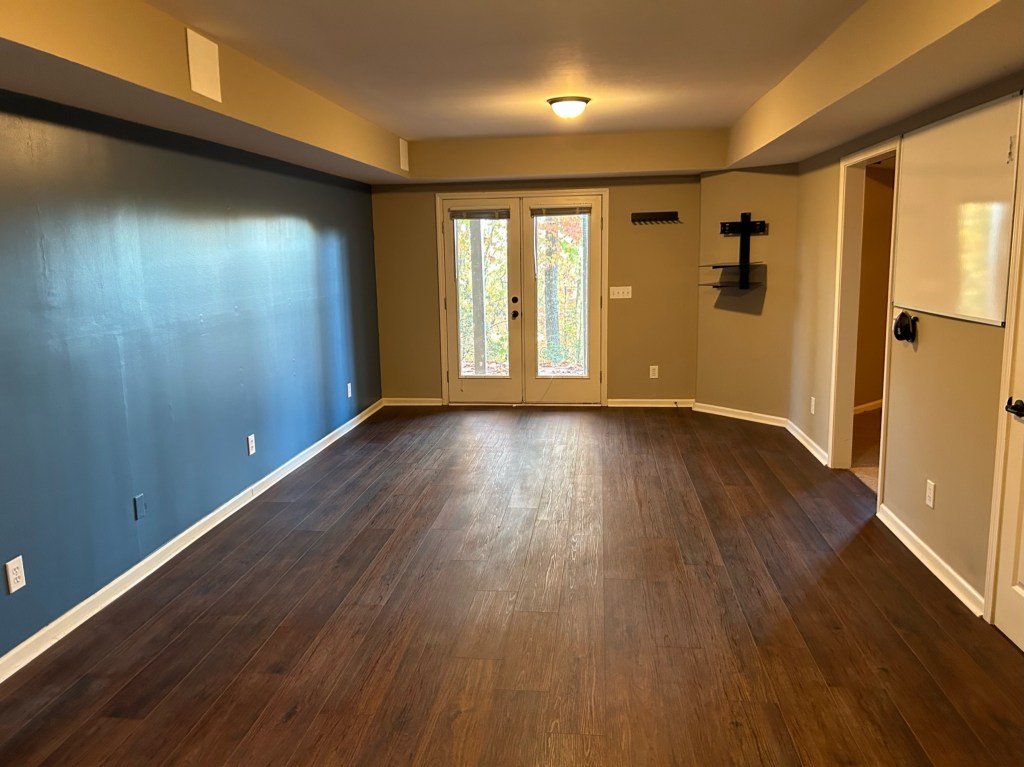
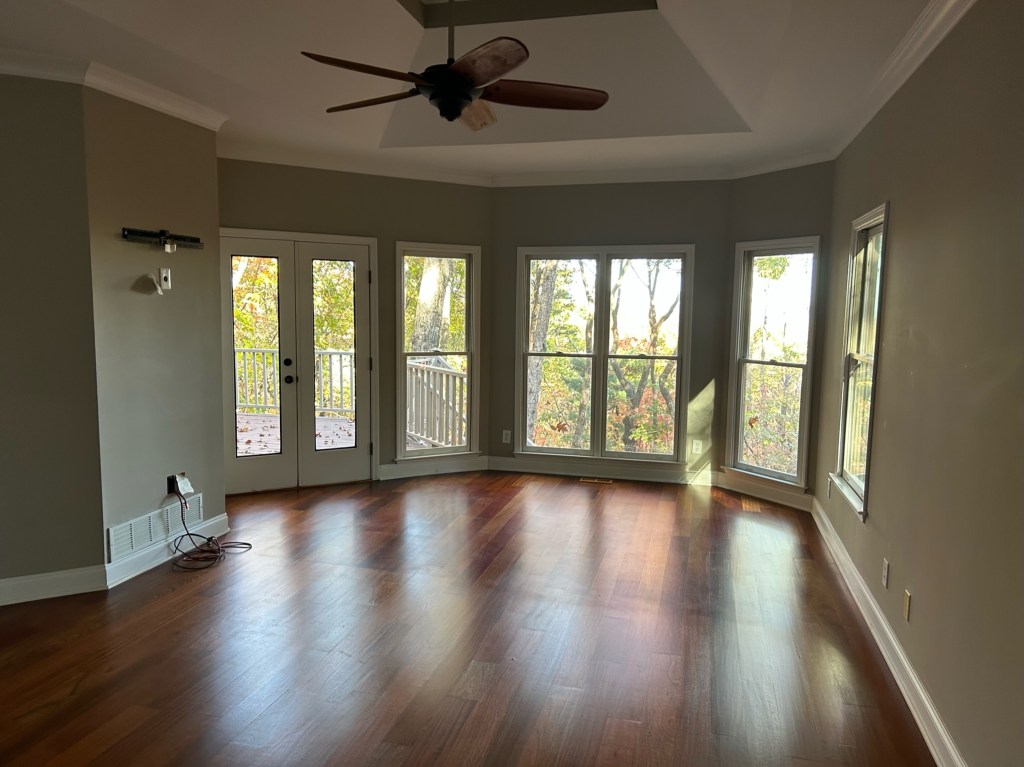
Next door to that is our downstairs den. Like the rest of the basement, the nasty carpet was ripped up and we put in the LVP. It already looks so much better, but let’s address the elephant in the room. The weird fireplace. It’s electric. The mantle looks stupidly too high, and the weird stone hearth doesn’t go with anything else. Short-term, we are removing the mantle, which will make it look so much better almost immediately. Long-term, since the fireplace is electric, we can encase the stone with something to hide it (still TBD) and we’re thinking we’ll build some shelves on the sides of the fireplace. Again, all still TBD and a low priority for now. Pictures below are from before and after!
Off of the downstairs den is a kind of cute little bar area. We’re not 100% sure what we’re going to do with this space long-term. Short-term, we’re painting it along with everything else, so it will no longer be the strange faux-painted walls. I think that will immediately make it look better!
Down the hall is a bathroom. We don’t love the counters in there but they’re thick granite so we’re painting the cabinet a neutral lighter color to hopefully neutralize them somewhat. Expect pictures of that soon.
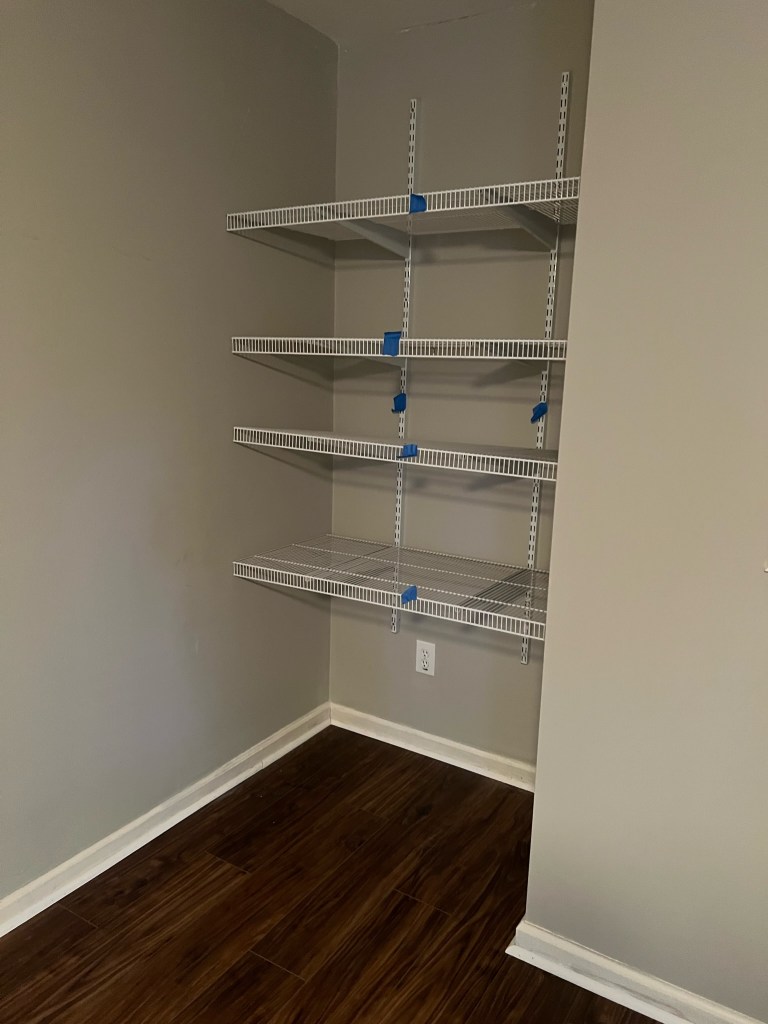
There are also two bedrooms downstairs. We’ll put two twins in one of the rooms and a king in the other. One of the rooms has a little alcove area that they put closet shelving in!?!?! Shaking my head at that design choice. They’ll go away now and we may put some nice shelves there or put a dresser in there. Who knows. We’ll also be changing out the ceiling fans in the rooms. I’m not sure what else will happen with these rooms so it will be a surprise for all of us!
We are officially moving furniture in this week and Keith’s garage stuff next week. It’s all a work in progress and it will be a while before it’s fully furnished, but we’ll have some fun along the way. Since we’re paying people to do the really hard stuff, we will enjoy more of the process this time! More pics and details to come soon!
Hi everyone! It’s been a minute so I thought I’d catch you up on what’s happening with the Heffrons! As we get closer to full-time retirement (still 3-5 years out), we have been thinking a lot about where we’d like to live. Keith and I both love the mountains. And as much as we LOVED our little house in Scaly Mountain, we knew that long-term that wasn’t where we wanted to live full-time. We’ve talked a lot about the Asheville area, and that may still be on the table. But another area we’ve been talking about is closer to Atlanta (1:15 minutes away door-to-door) and it’s in the foothills of the North Georgia mountains. It’s called Big Canoe, and it’s a gated development with a lot of amenities (a beautiful clubhouse with indoor and outdoor dining, 3 9-hole golf courses, two swimming pools, a few small lakes, tennis, pickle ball, bocce ball, lots of hiking trails, etc.). As we started talking about it being a contender for retirement, I came up with the idea that we should sell our Scaly house and buy something there to really dip our toes in the water. We met with a realtor in Scaly and mid-September put that house on the market. Lo and behold if we didn’t have our first offer less than 24 hours after we listed it! We ended up with 11 showings in 100 hours, 7 offers at or above list and we finally accepted one well above our listing price. Needless to say we were thrilled! A big thanks to Rachel Wavra for being our terrific realtor in Scaly. If you are ever interested in buying a place in the Highlands area, please use her!
We didn’t have a place to buy yet but had been looking for several weeks with my long-time friend Sheila Lantier, who is an awesome realtor in the Atlanta area! After looking at several places that just didn’t fit us or were WAY more of a project then we wanted, we finally found one. After quite a bit of back and forth with the sellers, we finally came to an agreement and we closed this week on Monday.
We are really excited about the new house so I thought I’d take y’all along on the ride as we put the Heffron touch on the house! I mentioned that we closed on Monday at lunchtime. Well, at 1 p.m. we had our flooring guys starting with refinishing the hardwood floors on the main level and ripping up the carpet in the lower level so that we could put down LVP (luxury vinyl planks which look like hardwood). Carpet is a bad idea in a basement and the LVP will really update the house and the breeding ground for mildew and mold that carpet can have. Plus, the carpet down there was older and kind of a baby poop color! For flooring, we are using BEC Flooring which is owned by Keith’s old business partner, Craig. They do a great job if you ever need flooring work done!
On Saturday our painters will start and will be repainting the entire interior of the house Dover White. Right now it’s a bit of a greige color and it’s just kind of blah. We want a fresh clean slate. If we want to paint some color, we can do that later ourselves.
You may notice a theme that’s a little different from om our Scaly house. We are paying people to do some of the hard stuff and/or stuff we just don’t want to do ourselves. Especially with the painting, there will be some need for scaffolding, etc. and that’s just more than we have the resources or energy to do.
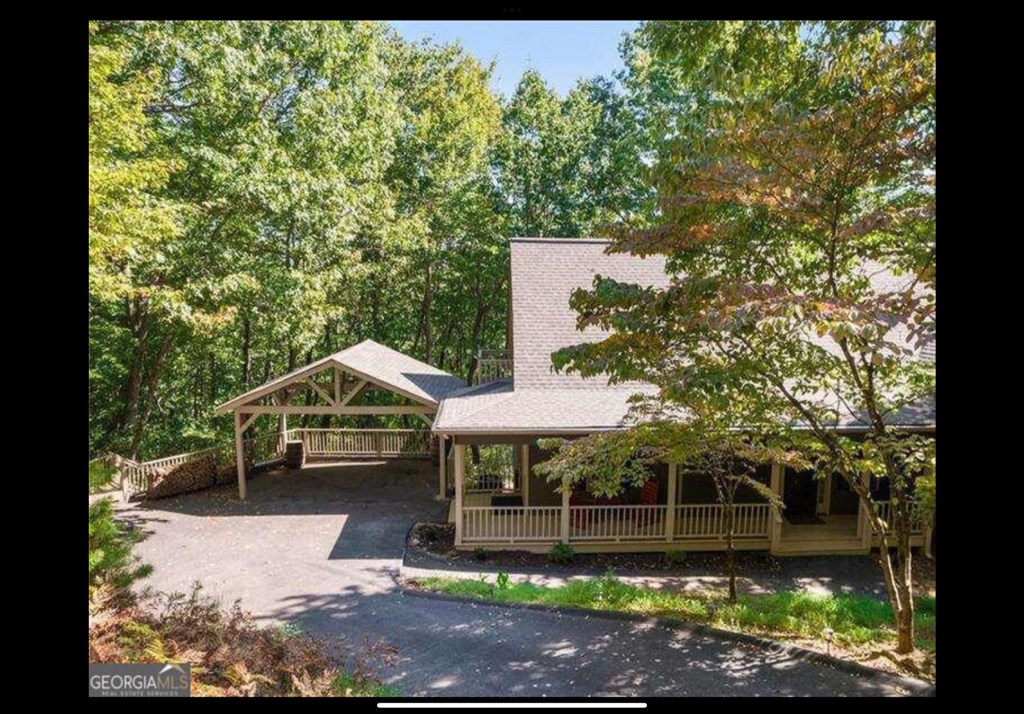
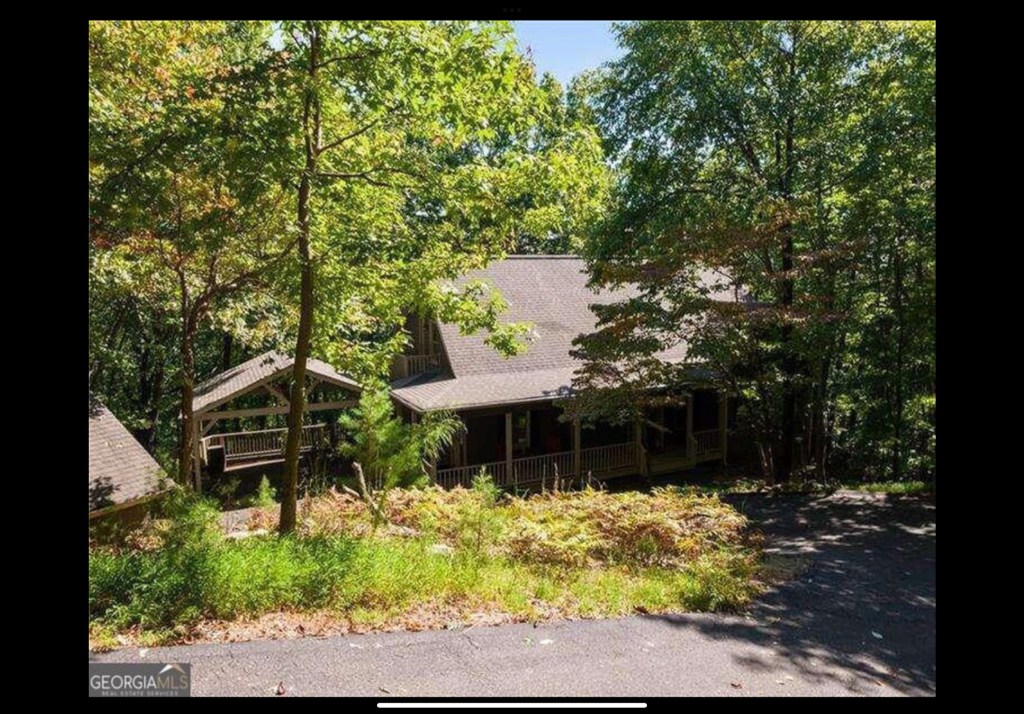
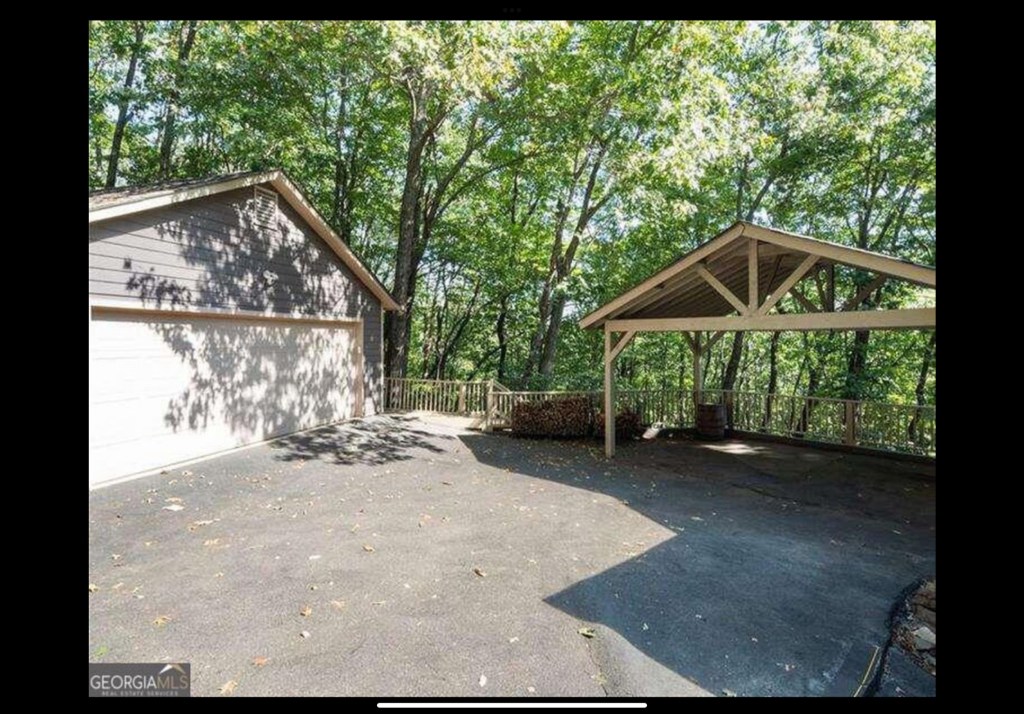
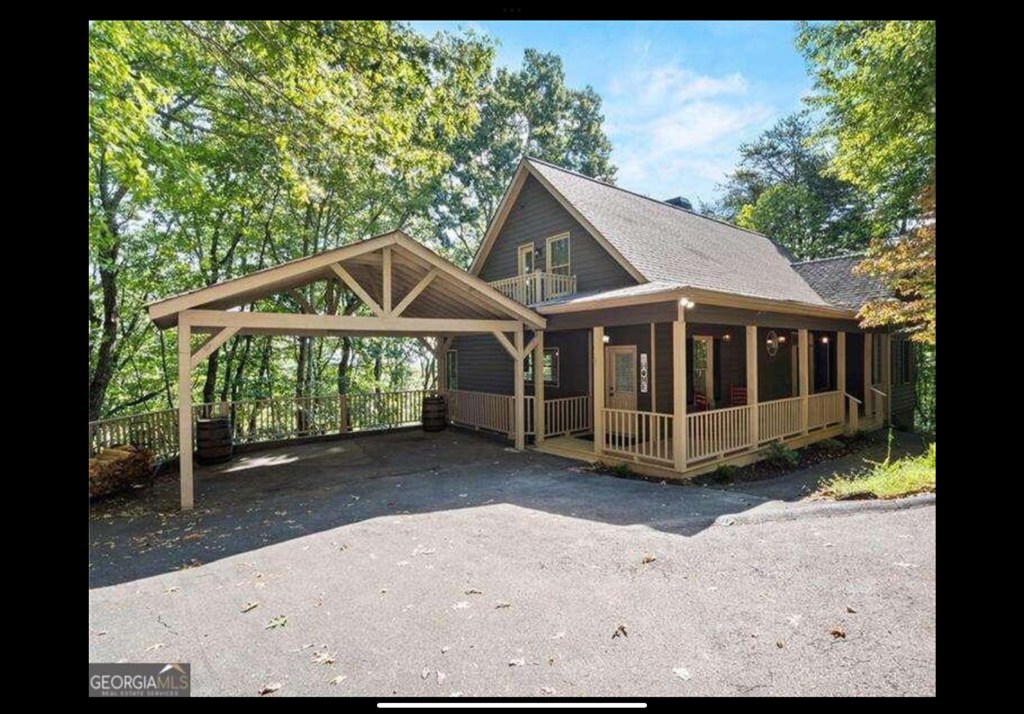
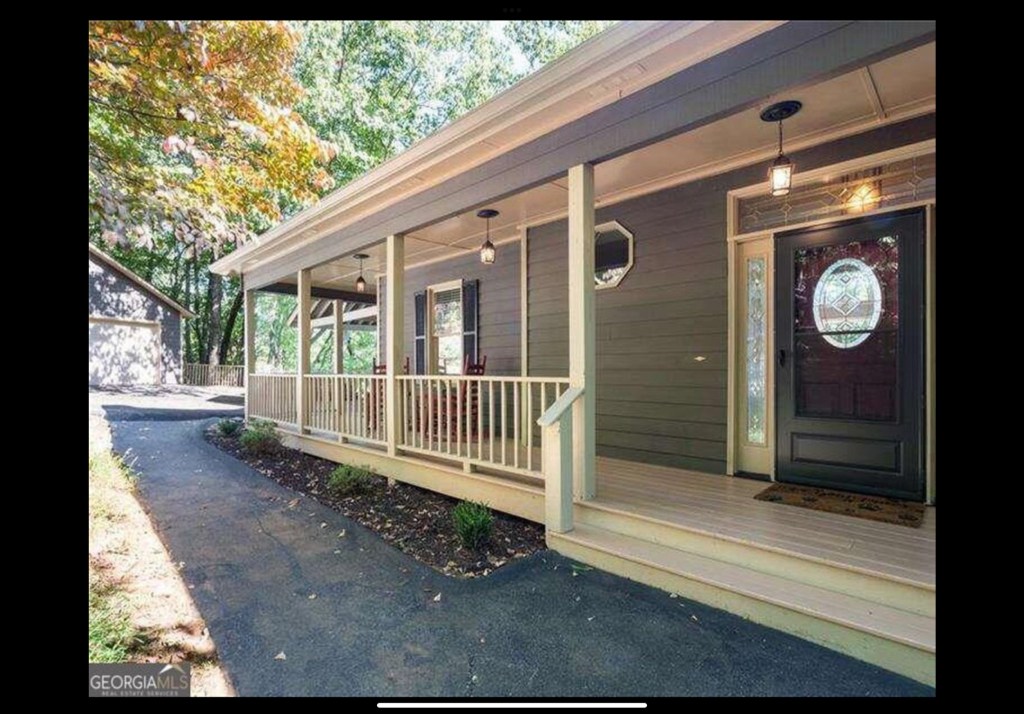
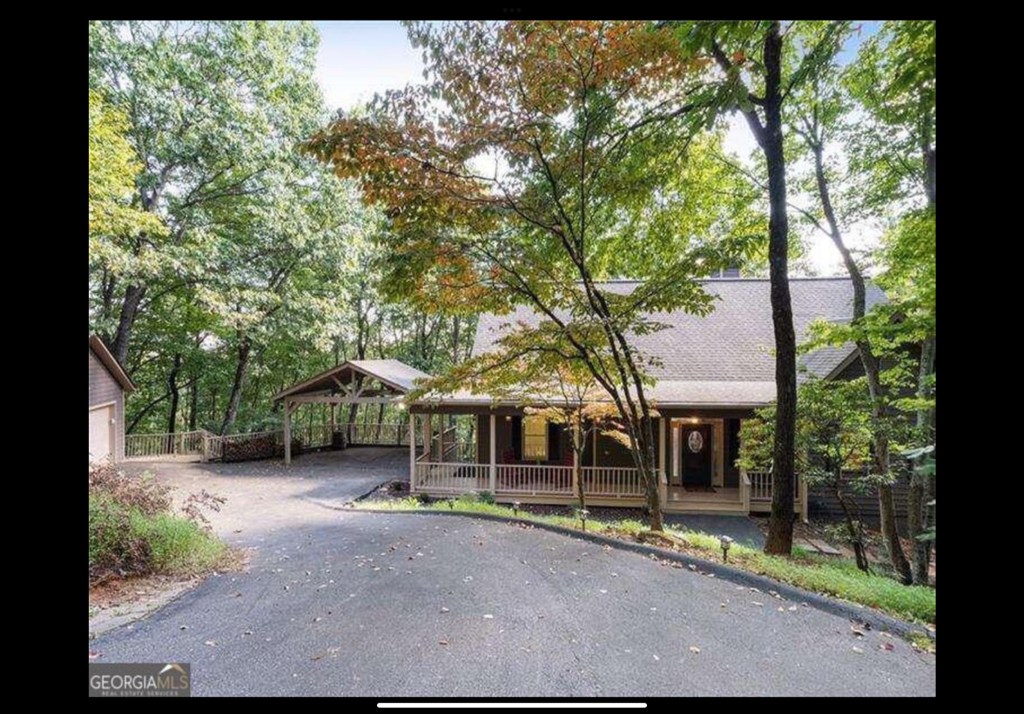
Now, let’s take a little tour of the main level of our new house and I’ll share what our initial thoughts are of what we will be tackling. The exterior is fine – nothing particularly gorgeous but not offensive either. One selling factor was the house had a two car garage that will be Keith’s (and my) workshop. He kind of took over our Scaly garage and we have enough stuff that it really does almost need a two car garage for. The house also has a carport, so at least my car will be (mostly) covered from the elements. It’s a little bit of a short carport so my car sticks out a little bit in the back but it’s better than nothing! What we don’t like about the front of the house is the little octagon window, but we have no intention of getting rid of it just because it would be too much work. We also don’t love the front door. It’s dated. It has ugly little medallion things all around the oval glass. Our painter is going to pop off all the medallions and then paint it out black on the outside and white on the inside and we’re hoping the glass will just kind of fade away. If it doesn’t then one day we may invest in a new front door. But that would be not be any time soon. One more note before you look at these pictures. Big Canoe has a LOT of restrictions. I mean a LOT. And one is that you leave your landscaping fairly natural. No grass whatsoever. Our yard is a little too “natural” so we’ll at least trim down the weeds and put down pine straw or something. So don’t judge too much on the overgrown landscape!
Now moving back indoors. As you walk in, there is a coat closet and a powder room to the right of the front door. The powder room has a vanity that I consider to be ugly. You may love it, but we don’t. So one of our first projects will be to replace it with one I bought a few weeks ago and put in a new mirror and lighting and a new comfort-height toilet. More pics of all of that as we do it.
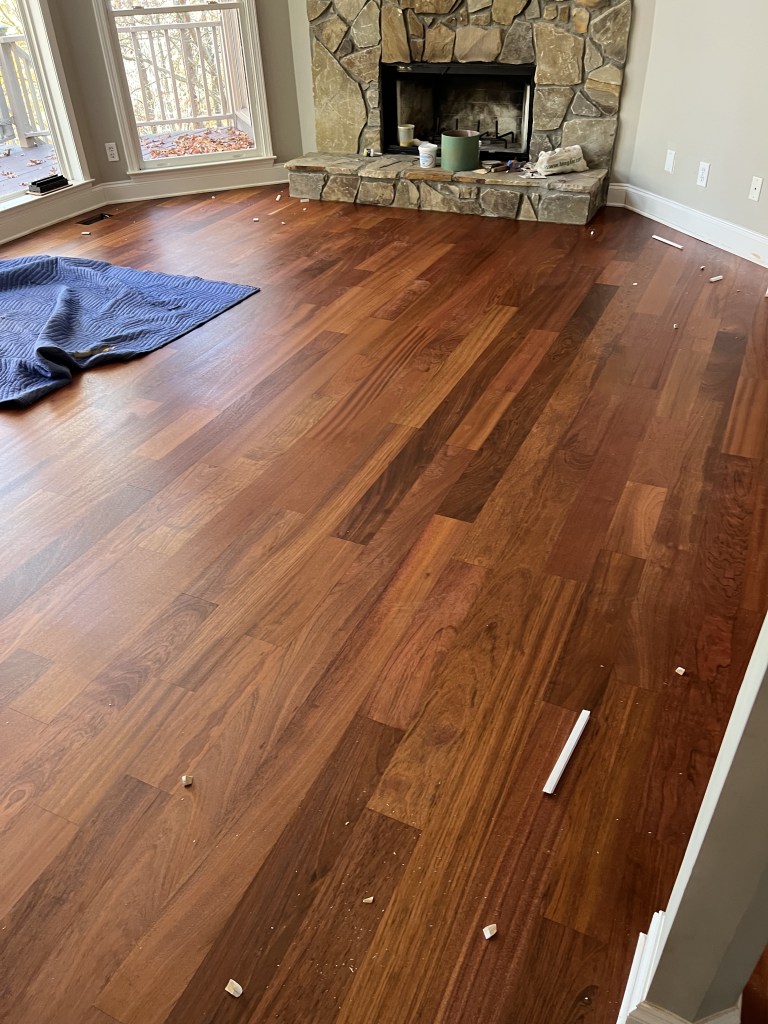
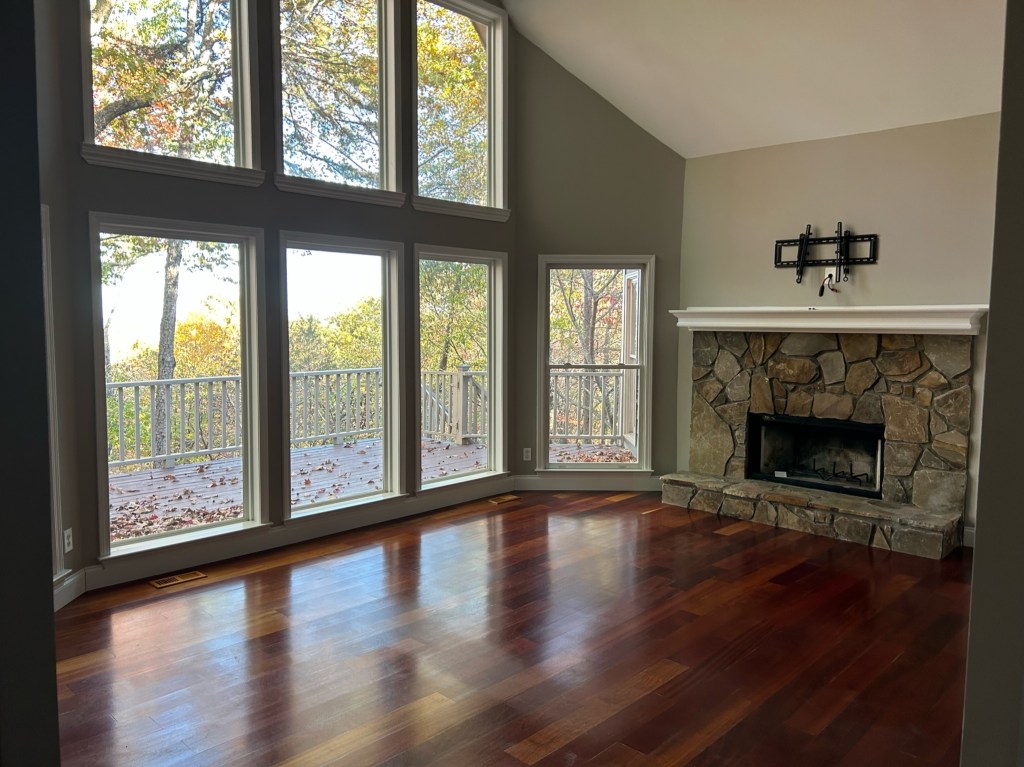
As you continue into the house, you’ll see we do have a really nice view. Not as good as our Scaly home but still quite nice. We’ll get some vista pruning done eventually but even right now we’ve got a lovely view. The main level has Brazilian cherry floors. Not my favorite as they read a really red tone, but they’re expensive and when we refinished them they lightened up. We paid extra to have them finished with a UV light protector so hopefully they won’t darken up to the reddish color any time soon. Here’s the newly refinished floors.
I mentioned the view. Here it is at an angle, prior to the floors being refinished.
Notice that the floors aren’t reading as much red now, thankfully. Now let’s chat about this fireplace. I HATE the stone. I really do. But I think I’ve found a project that we’ll attempt where we will “overgrout” it and possibly lime wash the stone to lighten it up. So expect an upcoming blog post on that!
To the left of the living area is the kitchen/dining area. The kitchen looks okay in these pictures but in real life the cabinets are a little beat-up looking and could use a refresh. Our plan is to build new shaker-style doors and drawer fronts. You may recall that we did that in Scaly in our hall bath. It’s not hard and not expensive and will be a huge improvement! When we do this, we’ll paint out the kitchen to be a much lighter color that will go well with the pretty granite in there.
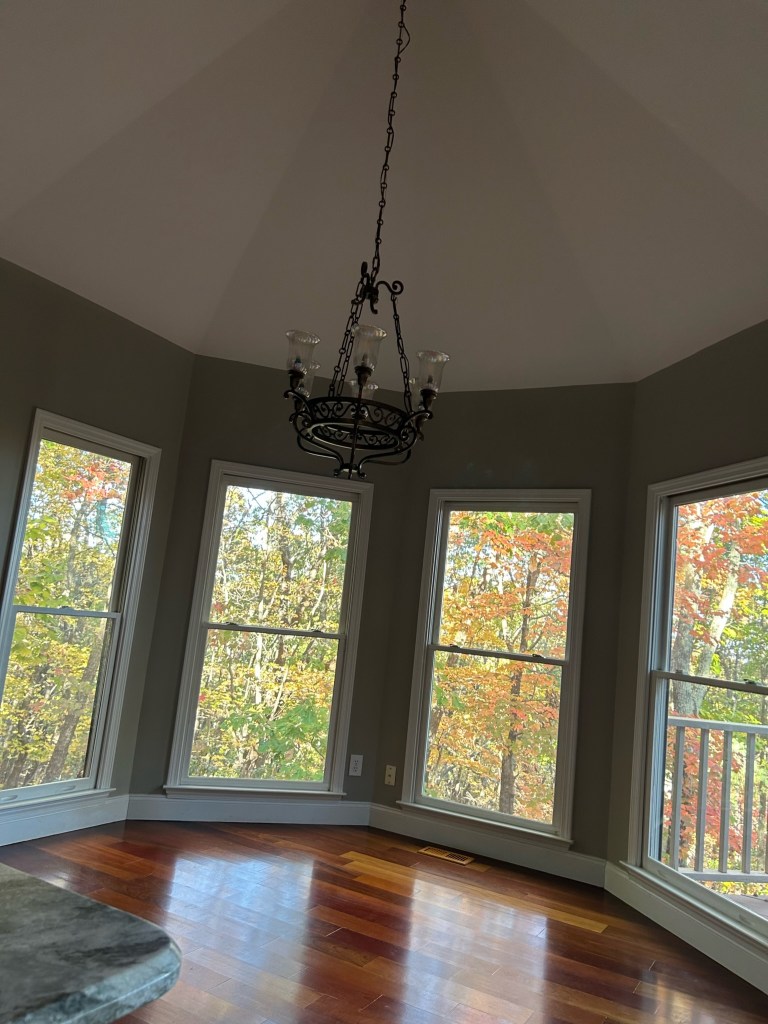
Now let’s chat about the lighting situation. It’s awful. There is a mishmash of lighting throughout the house. There’s boob lights, farmhouse style lights, overdone scrolled heavy lighting, old dated ceiling fans, etc. None of it goes together and most of it just needs to go! So we’ll be addressing that almost immediately! I’ve already bought two new pendant lights for the island, a new light for over the sink, and a new light to go in the dining area. I can’t wait to get rid of the stuff that’s in there now. Not a big fan! So let’s take a look at the breakfast area. It’s kind of a turret. Not a lot to change in here other than the lighting. I may add some curtains. We will see!
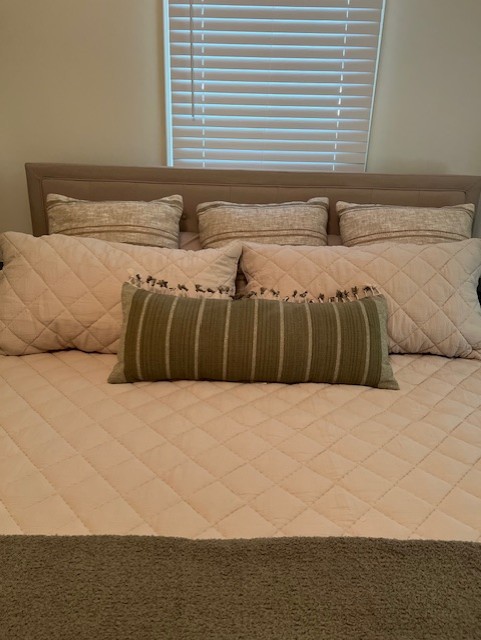
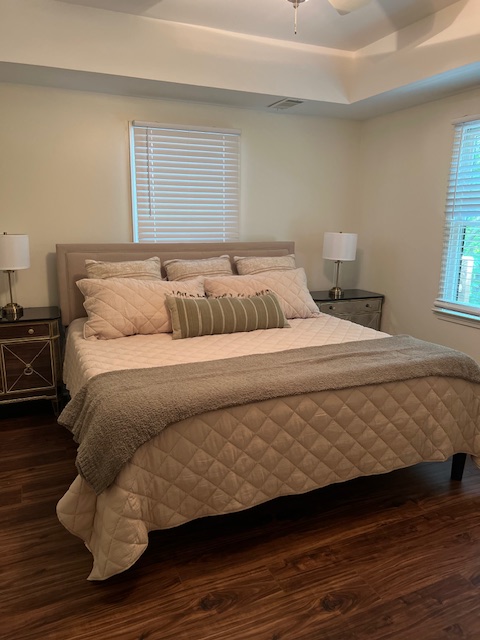
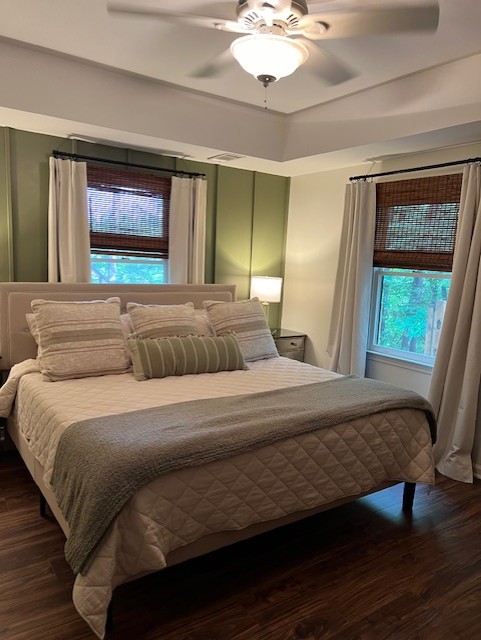
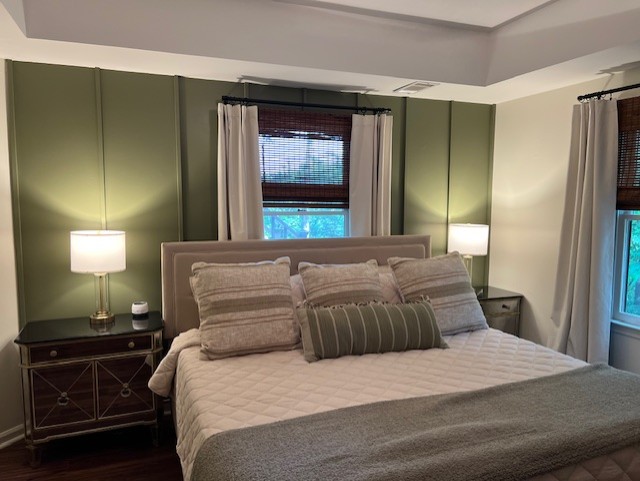
On the other side of the fireplace is the master bedroom. It’s quite large. There are no window treatments at all on the windows. I mean, I know it’s a private space but that is just creepy! Plus who wants to be woken up with sun streaming in at 5:30 in the morning in the summer. So I’ve got light-blocking curtains on order and those will be going up immediately. We’re also having our painters patch up the wall where they had a TV and I’ll put some sort of tall dresser there eventually.
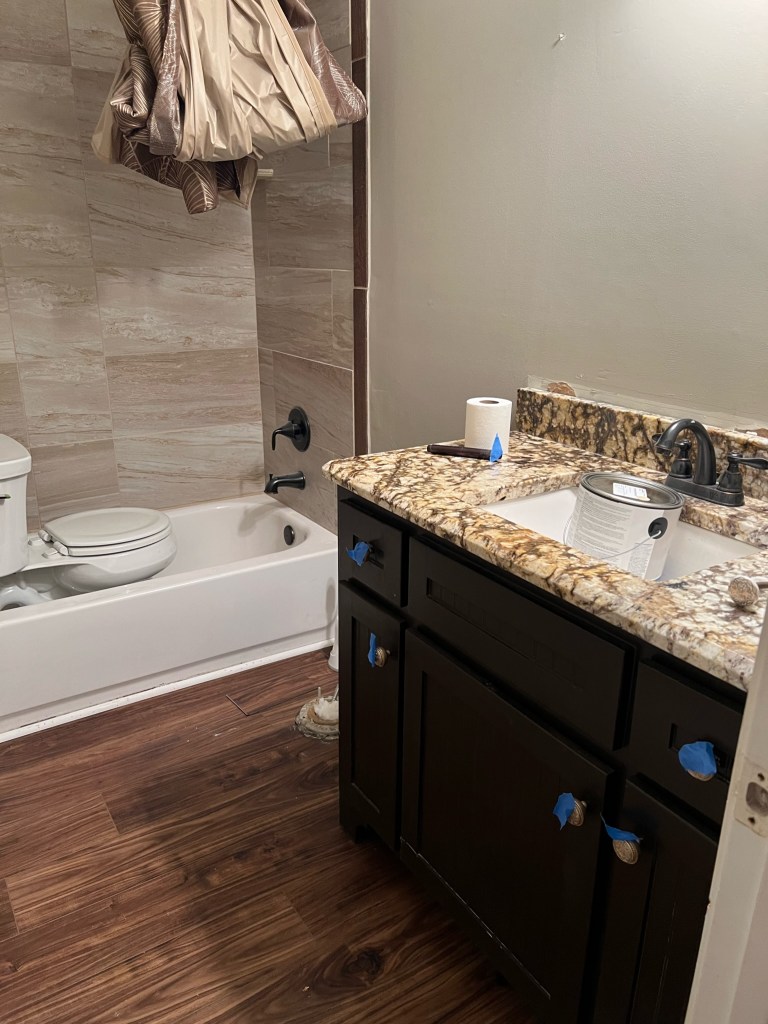
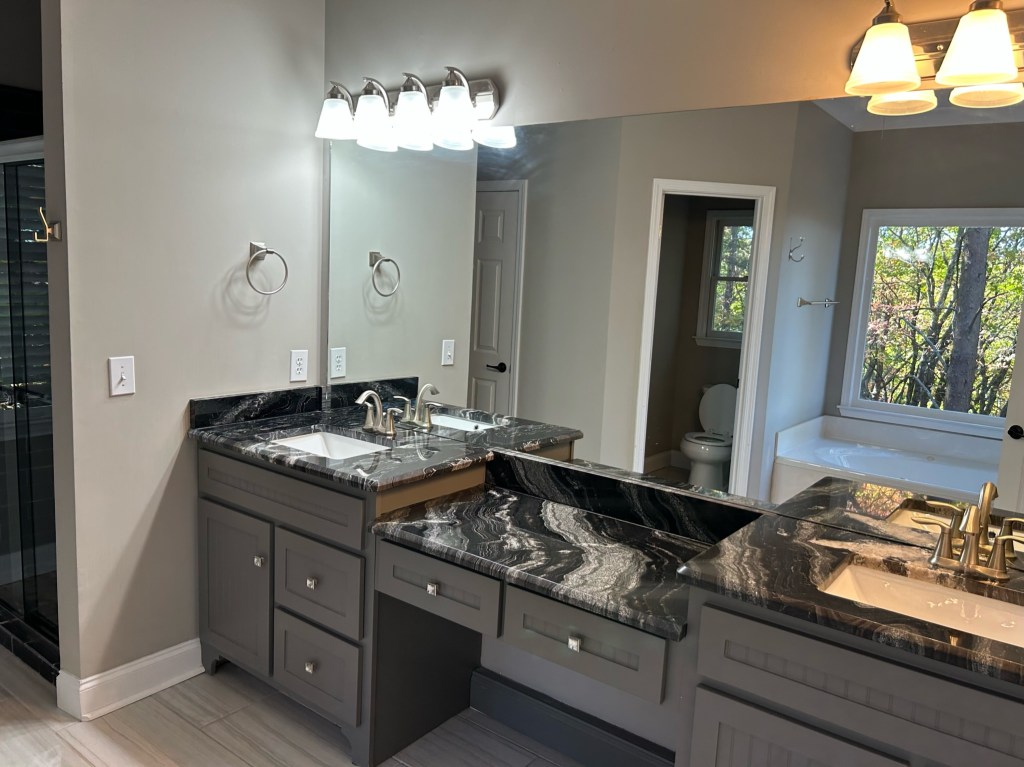
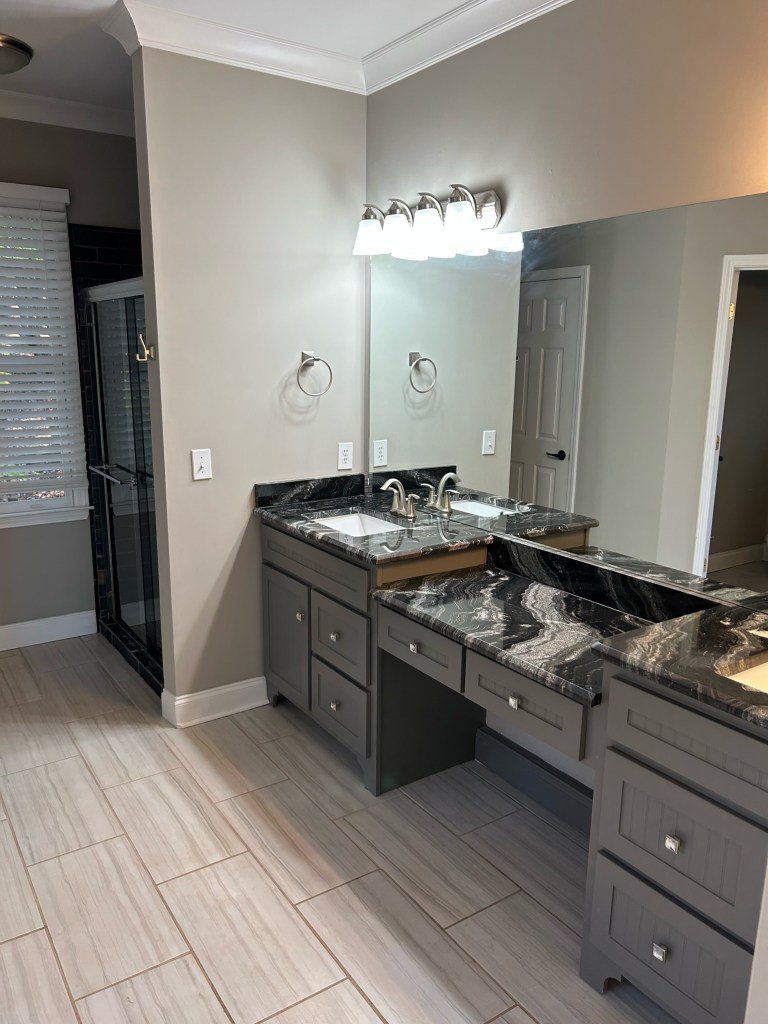
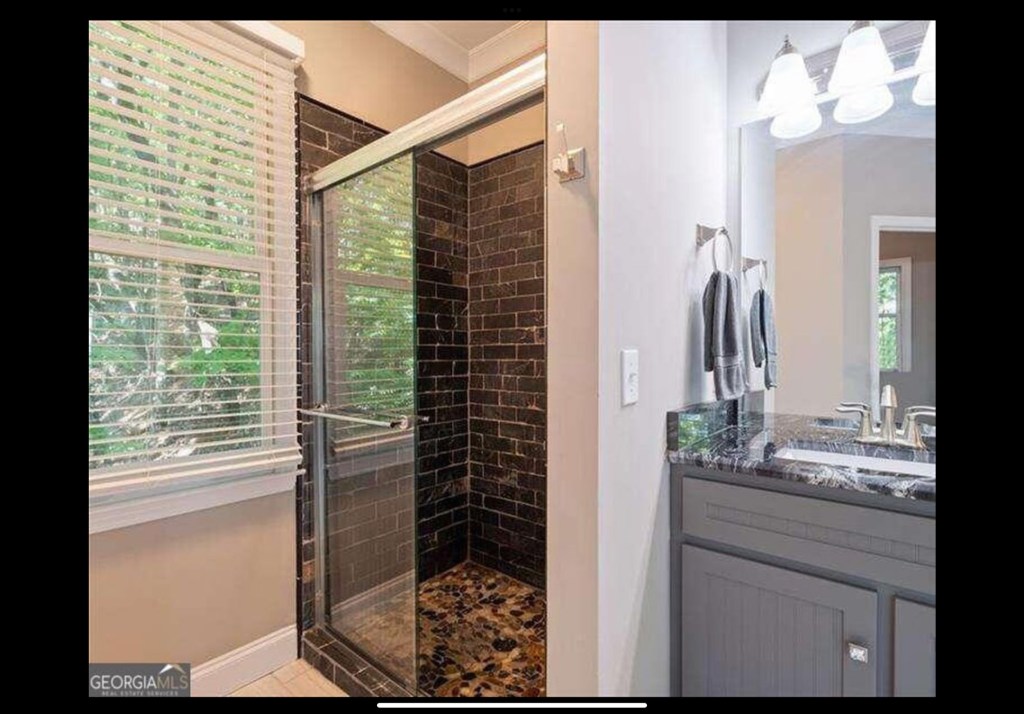
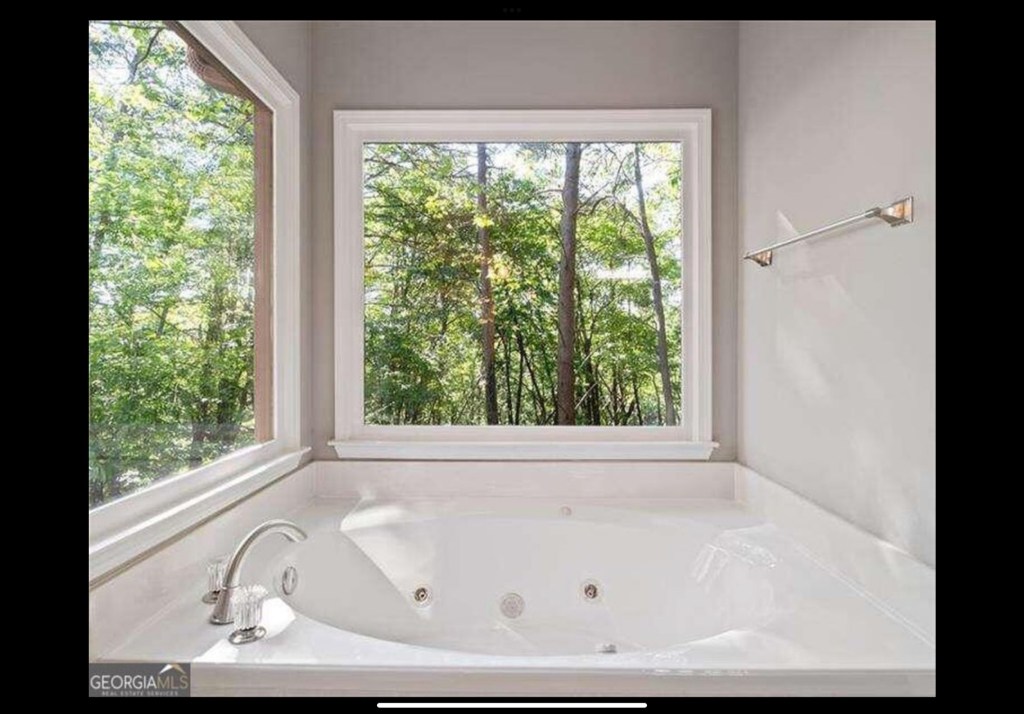
On to the master bath. It’s also quite large and has been mostly renovated. Not entirely to our taste (the master shower has some seriously questionable tile choices). And you may note I said “mostly” renovated. They left the giant jacuzzi tub there. Not a smart choice. That being said, we would prefer to not have to rip it out as that would cascade into having to put in all new flooring. We have a project idea that we’ll try in there and see if we can make the tub look more intentional, so stay tuned for that. While our painters are there this week and next, we are having them paint out the cabinets to a lighter gray color to coordinate with the countertops a little better. I’m also going to likely put a plantation shutter on the window in there.
So that’s it for the main floor. Upstairs there’s a bedroom with an ensuite bathroom and a lofted area that will be Keith’s office. Downstairs there are two more bedrooms, 1 bathroom, a den and what will be a game room. It’s a big house. It’s a lot to furnish! But it will be a lot of fun.
More to come on all of that, but I’m tired and you’re probably tired of reading! So we’ll call it a night. But welcome back to At Home with the Heffrons!